Table of Contents
Advertisement
Advertisement
Table of Contents

Subscribe to Our Youtube Channel
Related Manuals for Ouellet OTP-B09000D


Summary of Contents for Ouellet OTP-B09000D
- Page 1 00685-14/04/2014 © Copyright, OUELLET Canada, 2014...
- Page 2 MODEL : OTP-B09000D OTP-B12000D OTP-B18000D OTP-B24000D...
-
Page 3: Table Of Contents
CONTENTS In accordance with the company’s policy of continual product improvement, this appliance’s aesthetic and dimensional characteristics, technical data and accessories may be changed without notice. GENERAL INFORMATION Notices before use Operation and maintenance Notices for use Parts How to use the wireless remote control 7-8-9-10-11 Emergency operation Care and cleaning... -
Page 4: Notices Before Use
Notices before use Please read the following carefully before operating When the voltage Disconnect the Never splice the is very high, the compo- power supply when power cord or use nents can easily be heat pump an extension cord. will damaged. -
Page 5: Notices For Use
Notices for use Please read the following carefully before operating Do not cut or damage the When the unit is in use, use the remote power cords and control wires. control to adjust the vertical and lateral If they are damaged, have them air direction. - Page 6 Notices for use Operating principle and special functions for cooling Principle: The heat pump absorbs heat in the room and sends it outside, so as the indoor ambient temperature decreases, the cooling capacity will increase or decrease based on the outdoor ambient temperature. Anti-freezing function If the unit is running in COOL mode and on a low temperature, frost will form on the heat exchanger.
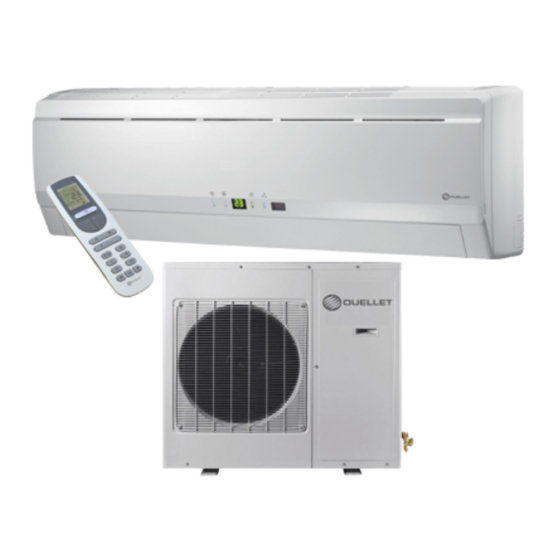
- Page 7 Parts Indoor unit Air in SET TEMP/ AMBIENT TEMP Wireless remote control Cool Power Heat Receive window ON/OFF Outdoor unit Air in (1) Remote control (2)Front panel (3) Filter (4)Guide louver Air out (5) Wall pipe (6) Bind tape (7) Drainage pipe Note:This is just the schematic plan, please refer to the actual product...
-
Page 8: How To Use The Wireless Remote Control
How to use the wireless remote control • Remote control description ON/OFF Press to start or stop the unit. - : Press to decrease the temperature setting. + : Press to increase the temperature setting. MODE Press to select the running mode («... - Page 9 How to use the wireless remote control • Remote control description ON/OFF Press this button to turn the unit on. Press again to turn the unit off. Press this button to decrease the set temperature. Hold it down for longer than two seconds to decrease the set temperature at a faster rate.
- Page 10 How to use the wireless remote control Press this button to select either outside or recycled air. Press once for the recycled air mode, and the LCD screen displays “ ”. Press a second time to use set both the recycled and outside air modes, and the LCD screen displays “...
- Page 11 How to use the wireless remote control COMBINATION OF "+" AND "-" BUTTONS: LOCK Press "+ " and "-" buttons at the same time to lock or unlock the keypad. If the remote control is locked, “ ” is displayed. In this case, when any button is pressed, “ ”...
-
Page 12: Emergency Operation
How to use the wireless remote control Changing Batteries and Other notices 1. Lightly press the and slide in the direction the arrow is pointing to remove the back cover of the wireless remote control. (As show in figure) 2. Take out the old batteries. (As show in figure) 3. -
Page 13: Care And Cleaning
Care and cleaning CAUTION heat pump • Turn the power off and remove the power plug before cleaning the . Failure to do so may cause electric shock. • Never put water directly into the indoor unit to clean it because this way cause an electric shock. heat pump •... - Page 14 Care and cleaning Remove the air filter Open the surface panel at an angle, pull the air filter downward, and remove it. ( a) Clean ( b) To clean the dust on the filters, you can either use a vacuum cleaner, or wash them with warm water and a neutral deter- gent if very dirty (i.e.
-
Page 15: Troubleshooting
Troubleshooting CAUTION Do not repair the heat pump yourself. Incorrect repairs may cause electric shock or fire, so please contact an author- ized service center for professional repair. You can save time and repair fees by going over the troubleshooting tips below. - Page 16 Troubleshooting CAUTION Do not repair the heat pump yourself. Incorrect repairs may cause electric shock or fire, so please contact an author- ized service center for professional repair. You can save time and repair fees by going over the troubleshooting tips below.
- Page 17 Troubleshooting CAUTION Do not repair the heat pump yourself. Incorrect repairs may cause electric shock or fire, so please contact an author- ized service center for professional repair. You can save time and repair fees by going over the troubleshooting tips below.
- Page 18 Installation service - Notices for installation Important Notices 1. The unit must be installed by a qualified technician according to local regulations and the instructions in this manual. 2. If the heat pump the instructions in plug, connect it directly to a fixed circuit, A breaker should be installed in the fixed circuit.
-
Page 19: Notices For Installation
5. Children should be supervised to ensure that they do not play with the appliance. 6. Installation by anyone but a certified OUELLET technician will void warranty. -
Page 20: Installation Dimension Diagram
Installation dimension diagram Installation dimension diagram Space to the ceiling above Space to the wall 15cm away 15cm away Space to the wall above Space to the floor The dimensions of the space necessary for correct installation of the appliance including the minimum permissible distances to adjacent structures Air inlet side 30cm above... -
Page 21: Installing The Indoor Unit
Installing the indoor unit Install the Rear Panel 1. Always mount the rear panel horizontally. As the water drainage pipe is on the left, when adjusting the rear panel, this side should not be too high; the right side should be slightly higher. Wall Wall 2. - Page 22 Installing the indoor unit NOTE: If the electrical wire is not long enough, please contact the authorized service centre to buy an exclusive electric wire of the correct length. The wire are not allowed • The electric wiring must be correctly connected. Incorrect connection may cause a malfunction.
- Page 23 Install outdoor unit Electric wiring Handle 1. Disassemble the handle on the outdoor unit right side plate. N(1) blue brown yellow- black 2.Take off cord anchorage. Connect and fix power connect blue green yellow- brown cord (for cooling and heating unit,connect and fix power green connect cord and signal control wire)to terminal block.
-
Page 24: Testing And Post-Installation Verification
Testing and post-installation verification Check After Installing Items to be checked Possible malfunction Is the unit firmly attached The unit may fall, shake or make noise. Has the refrigerant been tested for leakage It may cause insufficient cooling(heating). Is the heat insulation sufficient? It may cause condensation and dripping. -
Page 25: Installing And Maintaining A Healthy Filter
Installing and maintaining a healthy filter Installation Instructions 1. Pull the front panel from the two ends in the direction indicated by the arrows. Then pull the air filter downwards to remove it. (See Fig.a) 2. Mount the healthy filter onto the air filter,(as shown in Fig.b). If the air filter cannot be in- stalled, please mount the healthy filter on the front case.
Need help?
Do you have a question about the OTP-B09000D and is the answer not in the manual?
Questions and answers