Advertisement
PRE-ASSEMBLY:
Remove all parts and hardware from carton box along with any plastic protective packaging.
Do not discard any contents until after assembly / installation is completed to avoid accidentally discarding small
parts or hardware.
For safety and ease of mounting, two-people working together is recommended.
Please read all instructions before beginning assembly and save these instructions for future use.
NOTE: The mounting hardware provided is meant for drywall / stud mounting only. Try to mount to wood studs
whenever possible. For safe mounting, it is essential to use the proper hardware for your wall type.
local hardware store for assistance for any other wall type if necessary.
TOOLS NEEDED
(not included)
-
Philips Screwdriver
-
Pencil
-
Tape Measure
Parts Included:
(D) Finials (2)
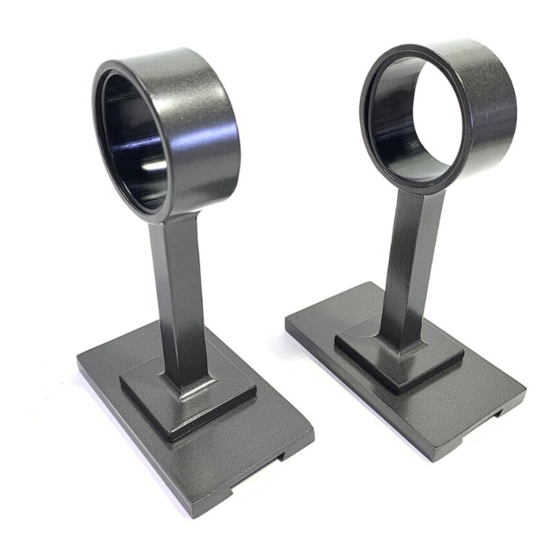
(E) Bracket* (2)
(F) Bracket* (1)
(G) Mounting Plates (3)
(H) Large End Rod (1)
(I) Large Central Rod (1)
(J) Small Rod (1)
* The Bracket (E) includes a large ring for holding the Large Rod (H / I).
* The Bracket (F) includes a small ring for holding the Small Rod (J).
ROD ASSEMBLY INSTRUCTIONS:
There are three rod sections - TWO larges & ONE small. All these rod sections are shipped separately and
-
must be assembled before mounting to form a long single telescoping rod assembly.
First, insert the Large Central Rod (I) into the Large End Rod (H), then insert the Small Rod (J) into the Large
-
Central Rod (I).
-
Please note that the small rod includes an insertion end that has a plastic bushing and an opposing finial end
that includes a threaded hole. To assembly, with one hand holding the Larger Central Rod (I), use another
hand to hold the Small Rod (J) together with the plastic bushing and then carefully insert into the Larger Central
Rod (I), see illustration shown below. The plastic bushing will keep the two rods from scratching.
I
H
Oversized Adjustable Metal Rod 44" -108"
:
- Stud-Finder
- Carpenter's Level
J
I
Assembly & Installation Instructions
Hardware Enclosed:
(A) Drywall Anchors (6)
(B) Metal Screws (6)
(C) Allen Key (1)
I
H
Contact your
J
I
P: 1 / 3
Advertisement
Table of Contents

Subscribe to Our Youtube Channel
Related Manuals for West Elm Oversized Adjustable Metal Rod 44" -108"


Summary of Contents for West Elm Oversized Adjustable Metal Rod 44" -108"
- Page 1 Oversized Adjustable Metal Rod 44" -108" Assembly & Installation Instructions PRE-ASSEMBLY: Remove all parts and hardware from carton box along with any plastic protective packaging. Do not discard any contents until after assembly / installation is completed to avoid accidentally discarding small parts or hardware.
- Page 2 INSTALLATION INSTRUCTIONS: Determine a desired mounting location over a window frame and then use a tape measure, a level or a laser line level and a pencil to make a level line that extends along the entire width of the window or door frame and a predetermined distance above it, as shown by arrow “A”...
- Page 3 HANGING THE CURTAINS (Curtain is not included with this item) Pole Pocket/Grommet Top Curtains – Remove Finial (D) from either end of rod to slide curtains onto the assembled rods. Drapery Hooks/Tie Top Curtains – For drapes with drapery hooks or tie tops, hang each hook or tie each tie directly onto the rods.
Need help?
Do you have a question about the Oversized Adjustable Metal Rod 44" -108" and is the answer not in the manual?
Questions and answers