Table of Contents
Advertisement
Advertisement
Table of Contents

Summary of Contents for COBHAM SAILOR 6004
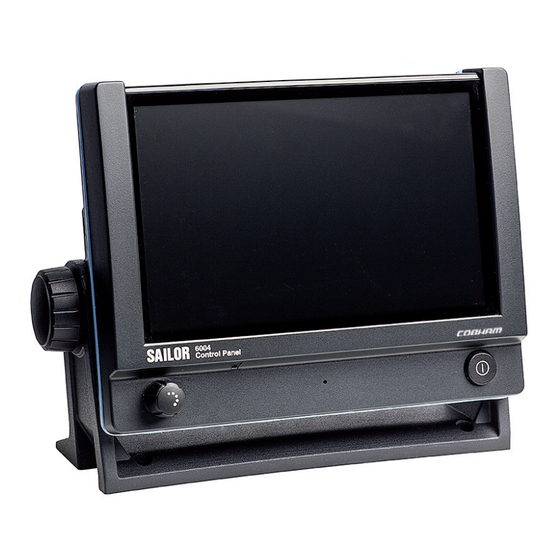
- Page 1 SAILOR 6004 Control Panel Installation manual...
- Page 3 SAILOR 6004 Control Panel Installation manual Document number: 98-136644-D Release date: September 3, 2015...
- Page 4 In the event of any discrepancies, the English version shall be the governing text. Thrane & Thrane A/S is trading as Cobham SATCOM. Copyright © 2015 Thrane & Thrane A/S. All rights reserved.
- Page 5 Cobham SATCOM assumes no liability for the customer's failure to comply with these requirements. DO NOT OPERATE IN AN EXPLOSIVE ATMOSPHERE Do not operate the equipment in the presence of flammable gases or fumes.
- Page 6 About the manual Intended readers This manual is an installation manual for the SAILOR 6004 Control Panel. The manual is intended primarily for installers of the system and service personnel. Personnel installing or servicing the system must be properly trained and authorized by Cobham SATCOM.
-
Page 7: Table Of Contents
Table of Contents Chapter 1 Introduction The SAILOR 6004 Control Panel ...........1 .................1 General description ..............2 Key features and functions ............2 System configuration example Chapter 2 Installation Unpacking ....................3 ..................3 Initial inspection ......................3 Storage Installing the Control Panel .............4 ...................4 Desktop mounting ....................6... - Page 8 Table of Contents Chapter 4 Setup and verification System app ................... 19 ....................19 Overview ....................20 Settings ......................30 About Chapter 5 Service & repair General service information ............33 Maintenance & troubleshooting ..........34 Repacking for shipment ..............34 App.
-
Page 9: The Sailor 6004 Control Panel
Chapter 1 Introduction The SAILOR 6004 Control Panel General description You can use the SAILOR 6004 Control Panel as a generic control panel for a number of ThraneLINK applications. The individual applications are managed in separate windows. Notifications from the... -
Page 10: Key Features And Functions
• Rear mounted USB (x2, e.g. for external keyboard) • Connector for SAILOR 6201 Handset or similar System configuration example The following drawing shows an example of how to connect other systems to a SAILOR 6004 Control Panel. The SAILOR 6004 Control Panel... -
Page 11: Installation
Chapter 2 Installation This chapter provides a description of how to unpack, store and install the Control Panel. It contains the following sections: • Unpacking • Installing the Control Panel For information on cable connections see chapter 3 Connectors & controls on page 9. -
Page 12: Installing The Control Panel
Chapter 2: Installation Installing the Control Panel When installing, make sure the Compass Safe Distance of 0.6 m is maintained. The Control Panel can be mounted in two ways, if needed with the cable relief: • Desktop mounting • Flush mount — typically in a console Desktop mounting You can mount the Control Panel on a desktop using the mounting bracket. - Page 13 Chapter 2: Installation To mount the Control Panel using the mounting bracket, do as follows: 1. Find a suitable location to mount the Control Panel. Make sure there is at least 80 mm of free space for cable access behind the Control Panel. 80 mm 60.5 mm Space for...
-
Page 14: Flush Mount
Chapter 2: Installation 4. Mount the two knobs on the sides of the bracket, but do not tighten them yet. 5. Connect the cables as described in chapter 3. 6. Adjust the angle of the Control Panel to the wanted position. The bracket can be adjusted ±... - Page 15 Chapter 2: Installation 3. Ensure that the flush mount gasket is placed correctly on the Control Panel. 4. Fit the Control Panel into the cut-out in the console. Flush Mount Gasket Flush Mount Bracket (2 pcs.) Screw M4x65 Torx 20 (4 pcs.) Max Wall Thickness 5.
-
Page 16: Mounting The Cable Relief Bracket
Chapter 2: Installation Screw M3x8 Countersink (3 pcs.) Cable Relief Plate 6. Fasten the four Torx screws. 7. Connect the cables as described in chapter 3. Mounting the cable relief bracket A cable relief bracket is included in the delivery. You can fasten it to the rear panel. -
Page 17: Connectors & Controls
Chapter 3 Connectors & controls This chapter provides a description of all connectors on the Control Panel and guidelines to cabling. It has the following sections: • Connectors • Cabling • Controls Connectors The figure below shows the connectors and the ground stud on the rear panel of the Control Panel. -
Page 18: Auxiliary Connector (Aux)
Chapter 3: Connectors & controls Auxiliary connector (AUX) Pin 1 & 2 are for output to an external 8 Ohm loudspeaker, e.g. a SAILOR 6270 Loudspeaker. The internal audio amplifier can deliver up to 6 W. Pin 4 & 5 are for alarm output. Both outputs are open collector (OC) and can sink up to 100 mA. -
Page 19: Usb Connector
Chapter 3: Connectors & controls Pin assignment: Connector front view on the rear panel of the Control Panel. Pin Description Wire color NMEA in+ Brown NMEA in- Blue NMEA out+ White NMEA out- Green Yellow Grey Hook_PTT Pink 12 V Black Orange USB connector... -
Page 20: Dc Power Input 12-24 V Dc (Pwr)
Chapter 3: Connectors & controls DC Power input 12–24 V DC (PWR) The DC Power input connects to a DC supply with 12—24 V DC nominal (10.8 to 31.2 V DC). The Power connector is a custom connector; a matching cable with connector is included in the box. The figure and table below show the connector outline on the Control Panel, pin assignments and wire color in the power cable. - Page 21 Chapter 3: Connectors & controls Connecting Remote on (ON_IN) With the Remote on function you can switch the Control Panel on from a remote location, without using the on/off button on the terminal. To connect the Remote on function in the Control Panel, do as follows: 1.
-
Page 22: Lan Connector
Chapter 3: Connectors & controls LAN connector There are two LAN (10/100 Mbit/s Ethernet) connectors on the rear panel of the Control Panel, used for communication with connected equipment that is designed to be operated by the Control Panel. For GMDSS installations: Only connect units that are part Important of the system. -
Page 23: Cabling
Chapter 3: Connectors & controls Cabling Before using the Control Panel for the first time, check that all cables are correctly wired and fastened. All cables attached to the Control Panel must be shielded. • The shield of the Ethernet cable must be connected to ship ground directly or via a grounded Ethernet switch. -
Page 24: Connecting Cables
Chapter 3: Connectors & controls Connecting cables To connect the Control Panel, do as follows: 1. Connect an Ethernet cable to the LAN connector on the Control Panel. For one cable, use the lower LAN connector (Primary LAN). Both connectors work in DHCP and zeroconf environments. 2. - Page 25 Chapter 3: Connectors & controls To dim to level zero push the power button once. If an alarm appears while the display is in level zero, the display returns to the latest dim value and the alarm is displayed. At very low dim levels (<1cd/m²), the display may flicker slightlly Note depending on installation and usage.
- Page 26 Chapter 3: Connectors & controls Controls...
-
Page 27: Chapter 4 Setup And Verification
Chapter 4 Setup and verification System app Overview Using the System application – also called app – you can setup the Control Panel and install other apps. Be very careful when changing settings in this app as a wrong setting may impact the functionality of the Control Panel. -
Page 28: Settings
Chapter 4: Setup and verification Settings Tap System and then Settings to enter the section for network configuration, date and time setting and security administration. Tap the section you want to work with and explore the touch screen for each setting. - Page 29 Chapter 4: Setup and verification Network Network Description RSTP Enable Enables RSTP (Rapid Spanning Tree Protocol) used for networks with redundancy - i.e. a ring topology. (Default: enabled) RSTP Priority RSTP priority defines which device on a network that is in charge of the ring.
- Page 30 Chapter 4: Setup and verification Date/Time Date/Time Description Use 24-hour If selected, the time is shown in 24 hour format. If not format selected, the time is shown in 12 hour format with the suffix AM or PM. (Default: 24 hour) LWE: The time is automatically updated by devices on Select time source...
- Page 31 To install an app again see the section below. Applications Tap Applications to install or un-install applications. This section has two tabs: Available, showing the apps that are available to the SAILOR 6004 Control Panel on the current network, and Installed, showing which apps are already installed.
- Page 32 • Update (if available, else grayed out) – tap here to update this app. Enter the password for Admin level and tap OK. Uninstall – tap here to uninstall this app from the SAILOR 6004 Control Panel. Enter the password for Admin level and tap OK.
- Page 33 Chapter 4: Setup and verification System app...
- Page 34 Chapter 4: Setup and verification Display in bottom bar This option can move two apps of admin’s choice into the bottom bar for quick access to the chosen apps. Admin password must be entered to change this option. Device List To enter Device List and choose a device do as follows.
- Page 35 Chapter 4: Setup and verification System app...
- Page 36 Chapter 4: Setup and verification Service Interface Link to the Service Interface, - for further details see the manual for the associated system setup. Self Test To verify the proper functioning of the Control Panel, run a self test. The built-in self test only verifies the function of the Control Panel Note itself, not of any connected equipment nor the total system.
- Page 37 Chapter 4: Setup and verification 2. The self test status page is displayed. Tap an item to start the test. Test result individual Slide the tests list to display further items. Tap to go to the home screen. You can test the following parts and functions: •...
-
Page 38: About
Export test log to Exports and saves the self test results in a file to an inserted USB memory device. About About menu Description Legal Cobham legal information Open-source licences Android version Version Kernel version Platform release Serial number... - Page 39 IP address of the Control Panel (acquired with zeroconf, DHCP protocol or set to static IP) MAC address of the Control Panel When contacting your authorized dealer or Cobham customer service, always have the following present: • Serial number of the Control Panel •...
- Page 40 Chapter 4: Setup and verification System app...
-
Page 41: Chapter 5 Service & Repair
For further information on warranty and service, you may also use the Cobham SATCOM home page at http://www.cobham.com/satcom. When contacting your authorized dealer or Cobham customer service, have the following information present: • Serial number of the Control Panel (label on the rear of the Control Panel) •... -
Page 42: Maintenance & Troubleshooting
Chapter 5: Service & repair Maintenance & troubleshooting No maintenance is required for the Control Panel. Switching off the touch screen temporarily The touch screen can be blanked (dimmed to black) by briefly touching the power button. Touch the power button or touch the screen to return the screen to normal operation. - Page 43 Chapter 5: Service & repair indicating the type of service required, return address, part number and full serial number. Mark the carton FRAGILE to ensure careful handling. Correct shipment is the customer’s own responsibility. Note If the original shipping carton is not available, the following general instructions should be used for repacking with commercially available material.
- Page 44 Chapter 5: Service & repair Repacking for shipment...
-
Page 45: Technical Specifications
Appendix A Technical specifications Item Specifications Mounting method Flush mount or bracket Voltage 10.8 to 31.2 V DC Power consumption Typical: 18 W active Peak: 42 W 3.15 A internal fuse (non-serviceable) Audio output Up to 6 W in 8 Ohm Interfaces 2 x Ethernet (10/100 Mbit/s) Accessories connector... - Page 46 Appendix A: Technical specifications...
-
Page 47: Glossary
Glossary Glossary American Wire Gauge. A means of specifying wire diameters. Direct Current DHCP Dynamic Host Configuration Protocol. A protocol for assigning dynamic IP addresses to devices on a network. With dynamic addressing, a device can have a different IP address every time it connects to the network. - Page 48 Glossary LightWeight Ethernet NMEA National Marine Electronics Association (standard). A combined electrical and data specification for communication between marine electronic devices such as echo sounder, sonars, anemometer (wind speed and direction), gyrocompass, autopilot, GPS receivers and many other types of instruments. It has been defined by, and is controlled by, the U.S.-based National Marine Electronics Association.
-
Page 49: Index
Index Index display brightness, 16 ACC connector, 10 self test, 29 alarm output, 1, 10 drilling plan, 5 application update, 24 applications, 20, 23 Auxiliary connector, 10 Ethernet cable, 15 connector, 14 brightness, 16 factory reset, 23 flush mount, 6 cable attach brackets, 7 Ethernet, 15... - Page 50 Index loudspeaker connect, 10 safety summary, iii self test, 29 self test, 28 LWE time, 22 LAN, 29 start, 28 serial number, 33 service, 33 MAC address, 31 software microphone uninstall, 23, 24 self test, 29 software version, 30, 33 mounting specifications, 37 desktop, 4...
- Page 52 98-136644-D www.cobham.com/satcom...
Need help?
Do you have a question about the SAILOR 6004 and is the answer not in the manual?
Questions and answers
GNSS caution magnetic model expired