
Summary of Contents for International Biomedical AeroNOx 2.0
- Page 1 ™ Portable Nitric Oxide Titration & Monitoring System Operator’s Manual INT-ENG...
- Page 2 ortabl e Nitr ric Oxi Titratio on & M Monito oring S Syste Oper ator’s M Manual hone: (51 12) 873-00 ax: (512) 873-9090 Mail: les@int-b bio.com ebsite: h http://www w.int-bio. .com ailing add dress: ternation al Biome edical...
- Page 3 This page intentionally left blank.
-
Page 4: Table Of Contents
Connection DIAGRAM - Transport Ventilator Circuit ..........45 3.9. Connection Diagram - High Frequency TXP-2D Phasitron ........47 3.10. Connection Diagram - AeroNOx 2.0 Bagger ............48 ALARMS ........................... 49 4.1. General Alarm Information ................... 49 ... -
Page 5: Replacing No, No
, and O Sensors ................75 7.6. Battery Replacement ....................78 7.7. Replacing the Tip on the AeroNOx 2.0 Delivery Regulators ........79 7.8. Parts and Accessories ....................80 7.9. Mounting Options ......................80 ... -
Page 6: General Information
It is also intended to monitor nitric oxide, nitrogen dioxide, and oxygen concentrations in the breathing gas. The AeroNOx 2.0 is intended to be used within a hospital or during air or ground transport outside the hospital. 1.3. -
Page 7: Safety Summary
1.5. Safety Sum mmary The AeroN NOx 2.0 is s intended f for use only y by qualifie ed clinician s, under the e direction a qualified physician. All person nnel operati ing the syst tem should d be thoroug ghly familia with opera ating instruc... - Page 8 Biomedical may result in unacceptable operation of the AeroNOx 2.0 and will void the equipment warranty. The AeroNOx 2.0 samples gas at a rate of 220 mL/min; this can affect the sensitivity of flow triggered synchronized breath of some ventilators. The trigger sensitivity, if equipped, should be checked after connecting AeroNOx 2.0...
- Page 9 Ox 2.0 Bag gger and Ostat Bagg ger are des igned for sh hort term us se only. o not use A AeroNOx 2.0 0 Bagger or INOstat Bagger to deliver con ncentration in excess o of 20 ppm. he generatio...
- Page 10 AeroNOx 2.0 does not scavenge the exhaust gas, and that this gas is vented from the underside of the AeroNOx 2.0, or through the side vent in the event that the bottom port is occluded.
- Page 11 DO NOT exceed 2.00 LPM as displayed on the AeroNOx 2.0 flow display. Displayed values in excess of 2.00 LPM are not accurate. If the flow on the AeroNOx 2.0 flow meter is set at a value greater than 2.00 LPM, the delivered flow will be higher than the displayed flow value.
- Page 12 Follow connection procedure in Section 7. Do not mount or position the AeroNOx 2.0 such that the rear power connection, exhaust ports, or the NO inlet are blocked. The recommended storage temperature limits are within operational temperature limits to preserve sensor life.
-
Page 13: Symbols
1.8. Symbols The follow wing symbol s appear in n the AeroN NOx 2.0 d d ocumentat ion and lab bels. “ON”/ /”OFF” Pow wer (Hold fo or ~3 Soft Key (3) Seco onds to turn off) Silen ce Alarm B Button Date of Man nufacture... - Page 14 Device part numbe Decrea ase Value firmation Set Low A Alarm Limit elect High/ Low Alarm Limits Set High Alarm Limi AC Power P Plugged in a Increa ase Value arging arm Tempo orarily Silen nced for Scree en Lock Approximat tely 60 Sec conds...
-
Page 15: Abbreviations
CISPR International Special Committee on Radio Interference Centimeters Direct Current Electrostatic Discharge Fraction of Inspired Oxygen Full Scale Output Feet HFOV High Frequency Oscillatory Ventilation International Biomedical Inches L/min Liters per Minute Milliamps mbar Millibars mL/min Milliliters per Minute Millimeters... -
Page 16: 1.10. Unpacking
*Calibration requires a calibration regulator. An INOstat Backup Bagger kit is also required in the event of AeroNOx 2.0 failure during use. If your hospital does not have each of these, they must be purchased as separate items shown below. The same regulator may be used... -
Page 17: 1.12. Purge Procedure
Open, then immediately close the cylinder valve pressurizing the hose. Purge (bleed) all of the gas from the regulator and hose with the purge pin on the AeroNOx 2.0. Repeat steps c. and d. four more times for a total of five purge cycles. -
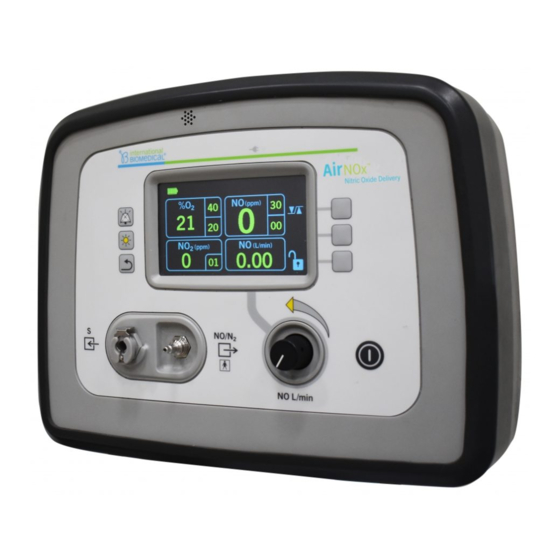
Page 18: Front Panel
1.13. Front Pane Samp ple Line Inle Sample Line e Filter Plug gs Into Quic ck Disconn nect Deliver ry Line Outl Delivery Line Fitting NO F low Contro Sets s NO Flow t to Delivery Outlet Power Turns Po ower On/Off in Screen Displays... -
Page 19: Rear Panel
1.14. Rear Pane NO/N s Inlet Quick Conn nect for NO O Gas Delive Purge P Purge Pin n for NO D elivery Line nsor Housin ng Cover Houses NO O, NO , and Senso Samp ple Gas Exh haust Ports Gas Esc cape for Inte ernal Pump... -
Page 20: Navigating Display Screens
1.15. Navigating g Display Sc creens There are two screen ns that can be displaye ed on the A AeroNOx 2.0 0 NO deli ivery system Main displ ay screen a and Calibra ation screen 1.15.1. M ain Displa y Screen... - Page 21 1.15.2. Ca alibration Mode Disp play Screen uring the fir rst five seco onds of sta rt-up, user has the op tion of ente ering the alibration di splay scree en. The ca alibration sc creen lets th he user sele ect differen t alibration op ptions whic...
-
Page 22: Universal Power Supply
1.16. Universal Power Sup pply Descr ription Illus s tration The un niversal pow wer supply i s both a volta age source for internal chargi ing and an A AC power s upply. The in nternal charg ging circuit w will sense battery con... -
Page 23: Theory Of Operation
OWER STAT Powe ternal Green LED Batte Life Stat DISPL upply ndicator Lights Statu PLUG GGED-IN CHARG GING INDE EFINITE MAINTAI INING UNPL LUGGED SENS WEEK BIAS PLUG GGED-IN CHARG GING INDE EFINITE SYSTE UNPL LUGGED ~5 H HOURS RUNN 1.17. - Page 24 Gas Moni toring displays v The Aer roNOx 2.0 values for N NO and NO in parts p per million (ppm) a and %O A sample lin ne is placed d in the insp piratory lim b of the ventilato or circuit at least 30 cm...
-
Page 25: 1.18. Environmental Effects
10,000 ft. it is recommended that the external supply be unplugged to ensure electrical isolation. The AeroNOx 2.0 will continue to operate on internal battery power for approximately 5 hours until it must be plugged in again to continue and recharge. - Page 26 Rapid changes in temperature, pressure, lighting, vibration, noise, power, and cleanliness must be considered. The AeroNOx 2.0 is designed to withstand these quickly changing conditions. ...
-
Page 27: Pre-Use Checkout/Alarm Verification
PRE-U USE CHEC KOUT/ALA ARM VERIF FICATION Pre-us se procedur res consist of the follo wing tests w which must t be done b before deliv vering NO g to the patient. Th his procedu ure simulate es a ventilat tor circuit w with constan nt flow by u... - Page 28 Description Step Illu u stration Self- -test screen n will appea r. Press an nd hold “BAC CK” button until calibra ation mode screen appears. Press s soft key n next to “ZER RO CAL” to enter zero m mode. Wait for 2-3 minute es until all v...
- Page 29 Description Step Illu u stration Turn th he AeroNO Ox 2.0 Off b by pressing g and holdin ng the “ON/ /OFF” button n for ~3 sec conds. Asse emble Aero oNOx Test Circu 2.0 uit as own using follo owing steps with...
- Page 30 Description Step Illu u stration Close e flow meter r valve and co onnect Test t Circuit to ox xygen flow m meter and 1 100% O ource gas. N No gas sho ould be flowing yet NOTE: : The sour rce may be a bo ottle or wall...
- Page 31 Description Step Illu u stration Conn nect regula tor to cyli nder and h tighten. sert male qu uick conn nect on stai nless steel N NO delivery y tubing into th he correspo onding fema le connecti on on regulator.
- Page 32 Description Step Illu u stration Turn n cylinder o off by rota ating valve f fully clockwise. bserve cylin pressu re for 30 se econds, if pres sure drop i s >100 psi, th here is sign ificant leaka age that mu ust be repa aired.
- Page 33 Description Step Illu u stration Open flow meter r valve and se et O flow th hrough Test C Circuit to 10 L/min. Rotate e NO flow c control fully c clockwise t o Off. Turn th he AeroNO Ox 2.0 on b by pressing g the...
- Page 34 Description Step Illu ustration Rotate e NO flow c control counte er-clockwis se until flow reads 0.25 L/min. Allow v values to st tabilize for at le east 1 minu ute then ACCEPT TABLE RAN NGE: mpare value es to 15-25 ppm ceptable ran nge.
- Page 35 Description Step Illu u stration Set NO O High alar m level 2 ppm m below disp played O value usi “UP/DO OWN” arrow w keys. Alarm m should so ound. Set NO O High alarm m to 40 ppm us sing “UP AR RROW”...
- Page 36 Description Step Illu u stration Set NO O Low alar rm to 5 ppm u using “UP/D DOWN” arro ow keys. A larm should stop ess back bu utton control key Pres ss “O ” soft key. High alarm m limit beco mes highlig ghted.
- Page 37 Description Step Illu u stration Set %O High ala rm limit o 100% usin “UP/DO OWN” arrow w keys. Alar rm should s stop. Press “Set Low A Alarm” contro ol soft key. low ala arm limit be ecomes highlighted Set %O Low alar rm limit...
- Page 38 Description Step Illu ustration Main s screen shou uld now be displayed Block k sample lin e flow by k kinking tubin ng at smoo oth bore po ortion. Alarm m should so ound indic cating SAM MPLE BLOC CKED and N NITRIC OFF.
- Page 39 Description Step Illustration 1. Turn NO cylinder off. 2. Allow oxygen to flow for 30 seconds, and then If AeroNOx 2.0 is going turn flowmeter to off. to be used, perform the 3. Disconnect Test Circuit from flowmeter and following: AeroNOx 2.0.
-
Page 40: Patient Operations
PATIE ENT OPERA ATIONS 3.1. Before Op eration Complete pre-use pro ocedures o utlined in th he Section 2. before c connecting t the AeroNO 2.0 to the e patient’s v ventilator b breathing cir rcuit. 3.2. Connectio n to Ventila ator Circuit (General) Connect th... -
Page 41: Inostat Kit Pre-Use Checkout
When con nected to a an NO cylin der, 0.25 L L/min of NO O gas is inje ected into th he INOstat Bagger. W When the IN NOstat Bag ger is simu ultaneously connected to an oxyg gen gas source at 1 10 L/min, a a 20 ppm co... - Page 42 Descrip ption Step Il l lustration onnect regu ulator to NO cyli inder and h hand tighten btain INOst tat Bagger. 731-9919 (5-Pack) 1. C Connect oxy ygen tubing rom INOsta at Bagger to oxygen flow meter. 2. C Connect INO Ostat Bagg elivery line to backup...
- Page 43 Descrip ption Step llustration Set O flowmete er to 10 L/m min. Let ox xygen flow f for 30 seco onds to flush s system. n NO cylind der by turni valve e fully coun nterclockwis Adju ust outflow from bag b rota ating valve until desire...
-
Page 44: Inostat Kit Instructions For Use
3.5. INOstat Ki t Instruction ns for Use sure pre-us e checkout t has been performed. nnect oxyge en tubing fr rom INOsta at Bagger to flowme eter. nnect INOs tat Bagger delivery lin ne to backu p regulator rify gas sam mple connec ctor is capp ped. -
Page 45: Connection To Various Breathing Systems
3.6. Connectio n to Variou s Breathing g Systems 3.6.1. Con nventional Sample/D Delivery Kit t, AeroNOx x 2.0 e Sample/D Delivery Line e Kit contai ns one sam mple line an nd one deliv very line. T mple line is used to con nnect the A AeroNOx 2. -
Page 46: Connection Diagram - Icu Ventilator Circuit
3.7. Connectio n DIAGRAM M - ICU Ve entilator Circ cuit Patie nt Wye tilator Ventilator Ex xpiratory P Ventilator In nspiratory P Port s Sample In nput Conne ection AeroNO Ox 2.0 s Delivery P Port Conne ection Patient Gas Delivery Li Delive ery Tee... - Page 47 3.7.1. Steps to Connect to an ICU Ventilator Circuit Perform pre-use checkout and alarm verification, Section 2. Attach NO Worries sample and delivery lines to AeroNOx 2.0 and ventilator circuit per Section 3. Connect test lung to ventilator wye. Set-up ventilator per hospital guidelines.
-
Page 48: Connection Diagram - Transport Ventilator Circuit
3.8. Connectio n DIAGRAM M - Transpo ort Ventilato or Circuit Patie nt Wye Ventilator Ex xpiratory Li Exhalat ion Valve tilator Gas Sam mple Line s Sample P Port Conne ction s Delivery P Port Conne ection Delive ery Line Delive ery Tee Inspirat... - Page 49 3.8.1. Steps to Connect to a Transport Ventilator Circuit Perform pre-use checkout and alarm verification, Section 2. Attach NO Worries sample and delivery lines to AeroNOx 2.0 and ventilator circuit per Section 3. Connect test lung to ventilator wye. Set-up ventilator per hospital guidelines.
-
Page 50: Connection Diagram - High Frequency Txp-2D Phasitron
3.9. Connectio n Diagram - High Freq quency TXP P-2D Phasi itron Gas Del ivery Line Gas Sam mple Line Patient C Connection Proximal A Airway Port asitron 3.9.1. Ste ps to Conn nect to a H High Frequ ency TXP- -2D Phasitr Perform m pre-use c... -
Page 51: Connection Diagram - Aeronox 2.0 Bagger
2.0 Bagg ger to oxyg en flowmet ter. Conne ect AeroNO Ox 2.0 Ba agger delive ery line to A AeroNOx 2.0 0. Conne ect AeroNO Ox 2.0 Ba agger samp le line to Ae eroNOx 2.0 0. Conne... -
Page 52: Alarms
Set N O flow on A AeroNOx 2. .0 to 0.25 5 L/min. Adjus t settings a as necessar Wait f for all param meters to st tabilize. Conne ect AeroNO Ox 2.0 Ba agger to pat tient and fo llow institut tion protoco ols. -
Page 53: User Adjustable Monitor Alarms
Pushing th he alarm sil ence button ile alarms a are silenced d will cance el the alarm silence. Pushing th he alarm sil ence button with h no active alarms wil l have no e effect. Alarm Silenc ce Icon Cle ared Violated Va lue Alarm L... -
Page 54: Safety Shut Off
4.5. Safety Shut Off The AeroNOx 2.0 has an incorporated safety shut off system for NO gas. The system is designed to avoid inadvertent high doses of NO being delivered to the patient. The system is activated by either NO or NO analyzed levels. -
Page 55: Alarm Table
4.6. Alarm Tab The follow wing alarm ta able provid es a list of the system ms alarms a long with a a graphic representa ation. (See e Section 5. , CALCULA ATIONS & T TROUBLES SHOOTING G, for a description n of each a larm). - Page 56 her Messa a ges FETY FETY INTER RNAL Par rt No. 715-000 06, Rev. F - 53 -...
-
Page 57: Calculations & Troubleshooting
To determine the initial nitric oxide (NO) flow rate, given your NO source gas concentration, [NO], ventilator minute ventilation & desired NO dose, use the formula below. To determine NO flow for use with the AeroNOx 2.0 Bagger or other respiratory gas administration systems, substitute O flow for ventilator flow in the equation below. - Page 58 NO flow rate. Please note that these are reference points only. The actual dose delivered must be measured by the analysis portion of the AeroNOx 2.0. Minute Volume / Ventilator / Bagger Flow...
- Page 59 5.1.2. What is the diluted FiO Estimating your FiO after dilution with NO gas, given your NO flow setting, and total ventilator gas flow Total NO Flow 100 Estimated FiO Initial FiO - NO Flow / Total Flow O Example: ...
-
Page 60: Gas Supply
5.1.4. Cal culation o f Cylinder Duration How long g will this t tank last? The vol ume of gas s in your cy linder(s) is a function of the filling g pressure and the capacity (s size) of the cylinder. -
Page 61: Troubleshooting Guide
ow Rate (L Pressur .125 45.25 22.5 2000 1500 25.5 1000 22.5 11.25 11.25 4.25 2.75 ime in Hou w much ca alibration g gas do I ne eed? Calibration n gas regula ators have a preset flo ow of 0.5 LP PM. - Page 62 High Priority A Alarms gh Priority A Alarms Poss sible Caus Recomm mended Act tion 1. NO a analyzed ha Disconne ect patient a exce eded set h manually y ventilate w with NO a alarm limit b by 5 INOstat B Bagger.
- Page 63 High Priority A Alarms gh Priority A Alarms Poss sible Caus Recomm mended Act tion 1. Incom mplete purg ge of erform purg ge. See Se ection syste , PRE-USE HECKOUT T/ALARM ERIFICATI 2. Vent ilator flow llow ventila tor gas to f flush stopp rcuit and st...
- Page 64 Medium m Priority Alarms dium Priori ity Alarms ossible Cau Recomm mended Ac ction 1. Ala arm is set a. Make s sure alarm i s set ppropriately appropr riately for th he O setting delivered o on the ventilat 2.
- Page 65 Medium m Priority Alarms dium Priori ity Alarms ossible Cau Recomm mended Ac ction 1. Bat ttery voltag e has a. Disconn nect patien t and opped to a p point manual lly ventilate e with ere data is INOstat t Bagger.
- Page 66 Priority A larms ow Priority y Alarms ssible Caus Recomme ended Act tion 1. Batt tery is runn ing low a. Connect t to AC pow roximately source. minu utes until b. If conne cted to AC letion. powers e ensure gre charging g light is on...
- Page 67 her Messa ages Indicat Cause Recomme ended Act tion Safety S Shut Off sy ystem a. To react tivate push has bee en deactiva ated. hold Sile ence Alarm See Se ection 4., and Bac ck buttons ALARM simultan neously. Device is running a.
-
Page 68: Calibration
CALIB BRATION 6.1. Low Rang e (ZERO) C Calibration (Daily) The low ra ange calibra ation of the AeroNOx 2 2.0 uses r room air to calibrate th he NO, NO and O nsors at the e same time e. The syst tem draws in room air r from the s... -
Page 69: O 2 High Range Calibration (Weekly)
Low R Range Calib bration Press s and hold “Hold to Z ERO” soft k ntil timer com mpletes (~3 3 seconds) hen zero ca al is finished d, it will rea “D DONE”. Mo onitor shou ld indicate: NO - 0 ppm - 0 ppm - 21% 6.2. - Page 70 High Range Ca alibration Connec ct calibratio n circuit (P/ /N 738-185 to 100% gas sou urce. Set O to ~1 L/Min NOTE E: Check v valve will du ump excess ow if oversu upply of O is given. Conne ect sample line plug o f calibration...
- Page 71 6.3. NO High R Range Calib bration (WE EEKLY) Perform lo ow range ca alibration fir rst. NO High h Range Ca a libration Enter Cali bration Mod de by holdi “BACK K” button o n startup. Locat te calibratio on circuit.
- Page 72 NO High h Range Ca a libration onnect cali bration reg ulator to NO O cal gas. Conn nect calibra ation circuit cali bration reg ulator. 1. Cal re gulator (P/N N 731-9141 2. Calibra ation Circuit t (738-185 ess “NO” so oft key.
-
Page 73: High Range Calibration (Weekly)
NO High h Range Ca alibration hen NO dis splay has st tabilized aft fter 2- minutes, us se “UP/DOW WN” arrow keys to adjust rea ading to co oncentration n on bel (i.e., 20 ppm). 6.4. High Range Cali ibration (W EEKLY) Perform lo... - Page 74 High h Range Calibration btain NO Calibration g gas, confirm m the follow wing from th he label: 1. Exp. Da . Concentra ation onnect calib bration regu ulator to NO gas. Conn nect calibra ation circuit cali bration reg ulator.
- Page 75 High h Range C alibration ppm b becomes hi ghlighted a displays c current mea asured valu Turn cylinde er on. (Rep place cylind der if pressu ure is below w 500 psi.) Attach calib bration circu uit to AeroN 0...
-
Page 76: Maintenance
Perform high range calibration Annually Preventive Maintenance 7.2. Cleaning the AeroNOx 2.0 Disconnect external power before cleaning. Apply cleaning solution to a cloth and wipe down outer surface and cable. Use only the following cleaning agents. Allow unit to dry thoroughly before use. Immediate use after exposure to excessive cleaning agents such as Isopropyl Alcohol can affect sensor performance. -
Page 77: Preventive Maintenance
Pack device properly or contact customer service at International Biomedical for proper packaging. Disconnect battery. Pack AeroNOx 2.0 as requested by customer service along with any requested accessories. Put RMA number on outside of packaging and send to location specified by customer service. -
Page 78: Sensors
7.5. Replacing NO, NO and O nsors Sens sor Replace ement Descrip ption Step Illustra tion UTION: DIS SCONNEC BATT TERY AND D EXTERNA ER BEFOR RE SERVIC Remo ove rear se nsor cover loosen ning the 4 s screws (2 m hex wre nch). - Page 79 Sens sor Replace ement Descrip ption Step Illustra tion 1. U Unpackage new senso and remove shorting prings, wire es, or bias board from s sensor if present. 2. C Carefully clip p tabs from ides of sen sors to flus with sensor body.
- Page 80 Sens sor Replace ement Descrip ption Step Illustra tion Instal l new senso ors in rever order of removal . Be sure N and N sensor rs are place in the eir respecti ve location DO N NOT overtig ghten screw Both sensors ha ave the sam...
-
Page 81: Battery Replacement
7.6. Battery Re eplacement Desc cription Ill l ustration The A AeroNOx 2 .0 is supp plied with an i internal rec chargeable 6.0 volt lead a acid battery y. It does n ot require main ntenance by y anyone ot ther than serv vice person... -
Page 82: Replacing The Tip On The Aeronox 2.0 Delivery Regulators
7.7. Replacing the Tip on the AeroNO Ox 2.0 De elivery Reg gulators Replacing the Tip on n Regulato Descriptio Illustra ation move worn- out tip on D Delivery or B Backup Regulator rs (CGA 62 26) by turnin ounterclock kwise. -
Page 83: Parts And Accessories
If the AeroNOx 2.0 is mounted to a cart or other device using the Dovetail mount, the user is responsible for ensuring the safety and stability of the system. -
Page 84: 7.10. Disposal
The device contains a lead acid battery and must be recycled or returned to International Biomedical for proper disposal at end of life. DO NOT discard in trash. The remainder of the device may be disposed of per your hospital’s policy for non-hazardous materials. -
Page 85: Warranty
Biomedical, and if any such products should prove to be defective within such one year period International Biomedical agrees, at its option, (i) to correct by repair or at International Biomedical’s election, by replacement with equivalent product any such defective product, provided that investigation and factory inspection discloses that such defect developed under normal and proper use (ii) to refund the purchase price. - Page 86 Representations and warranties made by any person, including dealers and representatives of International Biomedical, which are inconsistent or in conflict with the terms of this warranty, shall not be binding upon International Biomedical unless reduced to writing and approved by an expressly authorized officer of International Biomedical.
-
Page 87: Product Specifications
PRODUCT SPECIFICATIONS 9.1. Ventilator Compatibility The AeroNOx 2.0 has been validated with the following ventilators: Conventional: 1. Bio-Med Devices MVP-10 (CMV/IMV Mode) 2. Bio-Med Devices CV2i+ (CMV/IMV Mode) 3. Accutronic Fabian/TV-1 Evolution (IPPV Mode) 4. HAMILTON-T1 (PCV Mode) 5. Bio-Med Devices TV-100 (IPPV Mode) High Frequency: 1. -
Page 88: Aeronox 2.0 Delivery Regulator
9.5. AeroNOx 2.0 Delivery Regulator Parameter Specification Inlet Pressure 14-155 Bar Outlet Pressure 1.7-2.3 Bar Cylinder Valve Connection CGA 626 9.6. AeroNOx 2.0 Physical Specifications Parameter Specification Weight (device + protective cover only) 4.0 kg W D H 33 cm ... -
Page 89: Aeronox 2.0 Electrical Specifications
For further sensor details visit the datasheets in Section 10., APPENDIX. 9.10. EMC Compliance The AeroNOx 2.0 has been tested and found to comply with limits for electromagnetic interference and susceptibility as defined by IEC60601-1-2. However, this equipment may radiate radio frequency (RF) energy and may cause harmful interference to other devices. - Page 90 GUIDANCE AND MANUFACTURER’S DECLARATION - EMISSIONS The AeroNOx 2.0 is intended for use in the electromagnetic environment specified below. The customer or user of the AeroNOx 2.0 should ensure that it is used in such an environment. ELECTROMAGNETIC ENVIRONMENT -...
- Page 91 GUIDANCE AND MANUFACTURER’S DECLARATION - IMMUNITY The AeroNOx 2.0 is intended for use in the electromagnetic environment specified below. The customer or user of the AeroNOx 2.0 should ensure that it is used in such an environment. ELECTROMAGNETIC IEC 60601...
-
Page 92: 9.11. Essential Performance
When the external Power supply falls outside of the limits for normal operation, the Power Supply AeroNOx 2.0 will switch to internal power. The operator will be informed of the power state. Alarm annunciation is critical to the device safety. -
Page 93: Appendix
APPE NDIX 10.1. Senso o r Datasheet rt No. 715-000 06, Rev. F - 90 -... - Page 94 Par r t No. 715-000 0 6, Rev. F - 91 -...
-
Page 95: Sensor Datasheet
10.2. NO Senso o r Datashee e t Par rt No. 715-000 06, Rev. F - 92 -... - Page 96 Par r t No. 715-000 0 6, Rev. F - 93 -...
-
Page 97: Oxygen Sensor Datasheet
10.3. Oxygen Se e nsor Data sheet Par rt No. 715-000 06, Rev. F - 94 -... -
Page 98: 10.4. Competency Based Performance Check-Off Tool
100% accuracy is recommended for completion of the clinical performance check-off. Employees are strongly encouraged to review the Operating manual for the AeroNOx 2.0 Nitric Oxide Titration & Monitoring System in order to familiarize themselves with the equipment functions, and to practice performing these functions independently as per the competency based check-off prior to the actual check-off by a clinician. - Page 99 BACK button PURGE SENSORS 26. Disconnect the calibration circuit and allow room air to be sampled into the AeroNOx 2.0 until the NO and NO displays return to zero and the Oxygen sensor reads 21%. This will flush out any calibration gas remaining in the AeroNOx 2.0...
- Page 100 3. SOURCE GAS: Attach high pressure quick connect from regulator(s) to AeroNOx 2.0. 4. DELIVERY: Attach delivery tubing from kit (P/N 738-1853) from AeroNOx 2.0 to pt. circuit at least 30 - 40 cm upstream from the sampling site. 5. SAMPLING: Attach sample line from kit (P/N 738-1853) from AeroNOx 2.0...
Need help?
Do you have a question about the AeroNOx 2.0 and is the answer not in the manual?
Questions and answers