Table of Contents
Advertisement
Quick Links
Advertisement
Table of Contents

Summary of Contents for EASY3CALL GIP300
- Page 1 GIP300/300P User Manual Version 1.0...
- Page 2 Revision History Version Date Description Application scope V1.0 2006-5-10 The first version issue S304...
-
Page 3: Table Of Contents
Mute when making a call ....................... 37 Call Hold ..........................37 Call Waiting and Call Flashing ....................37 Call Transfer........................... 38 Three Way Conference......................38 Appendix............39 The process of Dial Rule matching ..................39 GIP300/GIP300P IP Phone Default Settings................39... - Page 4 Common Problem Analysis....................40 Use safety way to resume software when GIP300/GIP300P IP Phone is failed to boot..40...
-
Page 5: Product Overview
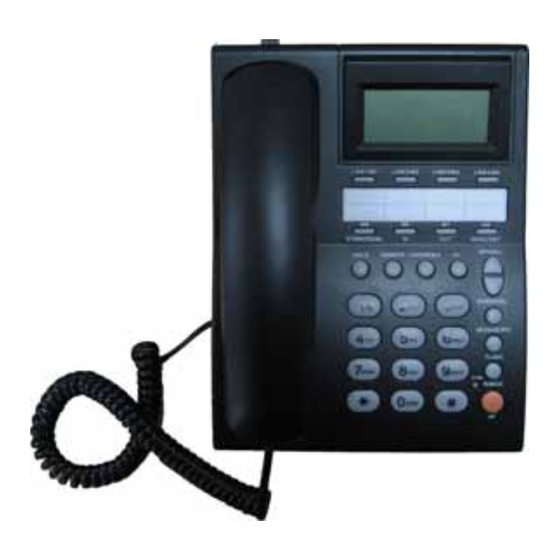
Product Overview Appearance The following photo illustrates the appearance of a GIP300/GIP300P IP phone. Keypad GIP300/GIP300P IP Phone has a 30-button keypad. Buttons Definitions and Functions Digits input “*” is used as “.” when making a Direct IP call. “**” is used as “@”. - Page 6 DOWN/VOL- 1. Reduce Ring Volume in the IDLE Mode. 2. Reduce Handset/Speakerphone Volume in the conversation. 3. Next Menu Item in the keypad configure mode. MENU/SET 1. Enter Menu Mode when the phone is in IDLE Mode. (M8) 2. Enter submenu. 3.
-
Page 7: Interfaces Introduction
1. Browse the last 10 Incoming Call when the phone is (M6) on-hook. 2. Browse the last 10 Incoming Call Records when the phone is Off-hook and make the current call when pressing the “RD/BACK” button. 3. As the sixth fast dial button when M6 work with Fn. 1. -
Page 8: Support Protocol
Call Forward/ Three Way Conference MWI for Voice Message with a button 10 incoming/outgoing numbers check 8 fast-dial buttons Mute when making a call GIP300/300P has 9 kinds of ringing, and you can down load the ringing you like in the Web. -
Page 9: Get Familiar With Lcd
Support dialing prefix Support dialing rule settings and you can down load the dialing rule you like in the Web. Support Private VPN, encryption and NAT traversal Support SIP and RTP encryption Support GMANAGER for centralizing management Support Local Syslog Get Familiar with LCD Here is the display when all segments illuminate:... -
Page 10: Configuration
Missed Call Icon: ON if Phone has missed call and not be read when the phone is On-hook or browse the incoming call records. Call Transfer Icon: ON if enable Call Transfer Unconditionally or Transfer when busy. IN and OUT Icon: ON “IN”... -
Page 11: Menu Configuration
Menu Configuration LCD Menu Configuration: Main menu (LCD display) Submenu (LCD display) 1. IP MODE STATIC DHCP PPPOE 2, IP ADDRESS (WAN) IP ADDRESS (WAN) (xxx.xxx.xxx.xxx) 3. SUBNET (WAN) SUBNET (WAN) (xxx.xxx.xxx.xxx) 4. GATEWAY (WAN) GATEWAY (WAN) (xxx.xxx.xxx.xxx) 5. DNS DNS (xxx.xxx.xxx.xxx) 6. -
Page 12: Web Configuration
WEB Configuration Login the Web Users can login the GIP300/GIP300P IP Phone’s Web via WAN or LAN Interface. GIP300/GIP300P IP Phone Default setting of WAN configuration is DHCP Mode, default LAN IP address is 192.168.1.1. Web Server Default Port is 8080,the Port can be changed via Web. -
Page 13: Browse System Status
Web via WAN Interface. http://GIP300 WAN IP:8080 for example: http://192.168.100.220:8080 The GIP300/GIP300P IP Phone’s default port is 8080, you must input it and you can modify it in the Web. There are 3-level authority: Super, Administrator and General users. The passwords as followings:... -
Page 14: Network Configuration
The page displays GIP300/GIP300P IP Phone’s current status, including current software version, WAN configuration, register status and so on. If you enable the VPN, it also displays the dummy IP. Network Configuration You can click the to login the Network Configuration page. - Page 15 (2) You should set “manual” in the “DNS Mode” if you set “DNS” by yourself. And then fill the DNS in the two following texts. Generally speaking, you can set “Automatic” in the “DNS Mode” and GIP300/GIP300P IP Phone will get “DNS” from DHCP Server automatically.
- Page 16 You can select the “Static” IP Mode if you are familiar with the Network Configuration and you can fill all the parameters in the texts by yourself. You can also select the “DHCP” IP Mode and let GIP300/GIP300P IP Phone get all the parameters from the DHCP Server.
- Page 17 GIP300/GIP300P IP Phone’s LAN. It is suggested that you should use “NAT” Mode. Your PC’s Gateway IP address is the same to GIP300/GIP300P IP Phone’s LAN IP address and your PC’s IP address is the same to the network segment of GIP300/GIP300P IP Phone’s LAN.
- Page 18 However, sometimes it is needed to access the PC which is linked with GIP300/GIP300P IP Phone’s LAN to use the PC’s service. Now, you should use the GIP300/GIP300P IP Phone’s DMZ to realize it. Here, DMZ is the same with mapping ports for network equipment.
- Page 19 Server well. You only need to enable the DHCP Server. After enabling the DHCP Server, your PC can link to Internet if you link your PC to GIP300/GIP300P IP Phone’s LAN and set your PC get IP automatically. The process of setting your PC get IP automatically as followings: Click the “begin”...
- Page 20 2. It will copy “Current PC MAC Address” to “Cloned MAC Address” text if you click “Clone address” button. 3. Click the “save” button and reboot GIP300/GIP300P IP Phone, you can see the GIP300/GIP300P IP Phone’s WAN MAC change to the IP of “Cloned MAC Address”...
- Page 21 MAC address. So you may not pass the provider’s authentication when you use a new GIP300/GIP300P IP Phone. In this case, you can use MAC Clone to copy your PC IP address to GIP300/GIP300P IP Phone’s WAN.
-
Page 22: Protocol Settings
You need to set the item that from other providers if you use others’ VPN. 4. Initial Service IP Given by providers 5. Initial Service Port You should set “53” if you use the Grandi Exceed-I VPN. Generally speaking, you should set ”80” if you use others’ VPN. 6. - Page 23 You can use the GIP300/GIP300P IP Phone’s two SIP accounts. You may disable SIP-2 if you only use one SIP account. SIP account introduction for SIP-1 1. SIP Proxy: It could be IP address or domain name of SIP Server IP.
- Page 24 1.Coding Choice 1.2.3.4 There are 4 kinds of Audio Coding Modes. PRI from 1 to 4. 2. G.723 Coding Rate Choose G.723 Coding Rate. 3. VAD&CNG: If or not enable Vivid Audio Detect and Echo Cancellation. They can improve voice quality. 4.
- Page 25 You should set “STUN” in the “NAT Traversal Mode” text if GIP300/GIP300P IP Phone uses STUN Server traverse NAT/Firewall. 1. NAT Traversal Mode: If or not enable STUN. 2. NAT Server IP: STUN Server IP 3. NAT Server Port STUN Server Port 4.
- Page 26 The interval between two normal Register messages. You can use the default setting. 8. RTP Port GIP300/GIP300P IP Phone will select idle port for RTP if you set “0”, otherwise GIP300/GIP300P IP Phone will use the value you set. Generally speaking, set “0”. 9. Signal Port The local port of SIP protocol.
-
Page 27: Equipment Manage
Network Manager Settings. Device Manage: 1. Time Server: Set Time Server IP Address. If use NTP time, GIP300/GIP300P will get time from the special Server. You can use the default setting if you do not know it. 2. Time Zone: Set a Time Zone. - Page 28 Set Web Login Port Upgrade Software: Upgrade Types: Select upgrade file types: Upgrade Software, Upgrade Ring Voice, and Upgrade Dial Plan. Volume Settings Network Manager Settings...
-
Page 29: Advanced Settings
Common Parameter Update automatically, Software Upgrade forcibly and so on. Distribution Network Manager: It is used by special users, others do not need to set it. Upgrade Interval is the Interval that GIP300/GIP300P IP Phone gets upgrade and configuration files every two times. - Page 30 Some ISP supply QoS services. The QoS services can make the best of improving the quality of Voice application. You can get the settings from the ISP if they supply Qos services. Please connect with them if you need it. Supplement Service Settings: 1.
- Page 31 Press the “MESSAGE/REC” button to send the voice mailbox number when the phone is off-hook. It takes effect after enabling MWI. GIP300/GIP300P IP Phone default setting stands transfer function, including unattended transfer and attended transfer. Please read the chapter of “Use Phone”.
- Page 32 1. Call Mode: Select Call Mode: Line1, Line2, IP Dial. 2. Matching Number: Match the user’s input, there are 3 ways: Mode 1: Match character strings. E.g.: “010*/11” means matching the numbers that begin with “010” and length is 11. Here, “*” means matching 0-n digits. “010xxxxxxx8/11”...
-
Page 33: User Manage
Password can only be changed at current level. If you change successfully, you should Re-login the Web page. System Log You can see the system log in this page. It records GIP300/GIP300P IP Phone’s important events. Reboot When you click the “Reboot” link in the navigation bar, the browser will send a... -
Page 34: Use Gip300/Gip300P Ip Phone
Use GIP300/GIP300P IP Phone View Phone IP and Number When the phone is on-hook, press the “SYS/MUTE/DEL” button again and again, GIP300/GIP300P IP Phone’s LCD will display the information as followings one by one: P1-XXXX: Line-1 Phone Number P2-XXXX: Line-2 Phone Number (Not display if Line-2 is not used.) XXX.XXX.XXX.XXX: WAN IP... - Page 35 off-hook, input the numbers again. Or you can press the “SYS/MUTE/DEL” button to delete it. Re-dial Pick up Handset or press HF button, you will hear the dialing tone (busy tone if not register successfully), LCD will display “INPUT”, press “Line1” or “Line2” button to select one line for making a call(default setting is line1).
-
Page 36: Answer An Incoming Call When The Phone Is On-Hook
omitted.) There are 4 ways: IP address E.g.: 192*168*100*234 IP address*port E.g.: 192*168*100*234*5061 Phone Number**IP address E.g.: 1002**192*168*100*234 Phone Number**IP address*port E.g.: 1002**192*168*100*234*5061 You can use IP Dial at any time except using Outbound Proxy, it is no need to set. Answer an Incoming Call when the Phone is on-hook When the phone is on-hook, there is an incoming call, LCD will display the number and line of incoming call. -
Page 37: View Outgoing Call
View Outgoing Call Press “OUT” button to browse the last 10 Incoming Call when the phone is on-hook. Volume Settings When the phone is on-hook, press “UP/+” to increase ring volume and press “DOWN/-“ to decrease ring volume. LCD will display the corresponding grade. When the phone is off-hook, press “UP/+”... -
Page 38: Call Transfer
1.Assuming that call party A (GIP300/GIP300P) and B are in conversation. A wants to bring C in a conference; 2.Party A (GIP300/GIP300P) presses the “HOLD” key and put the party B on hold. At this time, party A will hear a dial tone again. -
Page 39: Appendix
User inputs Use the first rule Browse rules fully? Match Shortcut Key? Use he next rule Match Numbers? Dial Cut Digits IP Dial? Dial Prefix Make a call GIP300/GIP300P IP Phone Default Settings WAN IP: use DHCP Mode get IP... - Page 40 Can not make a call If GIP300/GIP300P IP Phone uses Proxy to make a call, the IP Phone must register successfully, and then you can make a call. When the phone is off-hook, you will hear dialing tone if current line (2 lines) of IP Phone is registered, otherwise you will hear busy tone.
Need help?
Do you have a question about the GIP300 and is the answer not in the manual?
Questions and answers