Table of Contents
Advertisement
Quick Links
XPW-239
XPW-240
XPW Owner's Manual
The Evergoing Products Group
8803 S. 218th St. Kent, Washington USA 98031
Tel: (253) 373-0166
Fax: (253) 373-0169
Thank you for choosing Maxxon.
Please read this manual completely before you start using
your Maxxon Inflatable watercraft.
www.maxxoninflatableboats.com
Advertisement
Table of Contents

Related Manuals for Maxxon XPW Series


Summary of Contents for Maxxon XPW Series
- Page 1 XPW Owner’s Manual The Evergoing Products Group 8803 S. 218th St. Kent, Washington USA 98031 Tel: (253) 373-0166 Fax: (253) 373-0169 Thank you for choosing Maxxon. Please read this manual completely before you start using your Maxxon Inflatable watercraft. www.maxxoninflatableboats.com...
-
Page 2: Specifications
Important: Check to ensure all components are provided with your boat. Model XPW-239 SPECIFICATIONS Overall Length: 7’9” / 239 cm Interior Length: 5’1” / 155cm Tube Diameter: 14-17”/35.5-43 cm Beam: 4’1” / 124cm Interior Width: 21” / 52cm Air Chambers: Max Persons: Max Load: 606 lbs. -
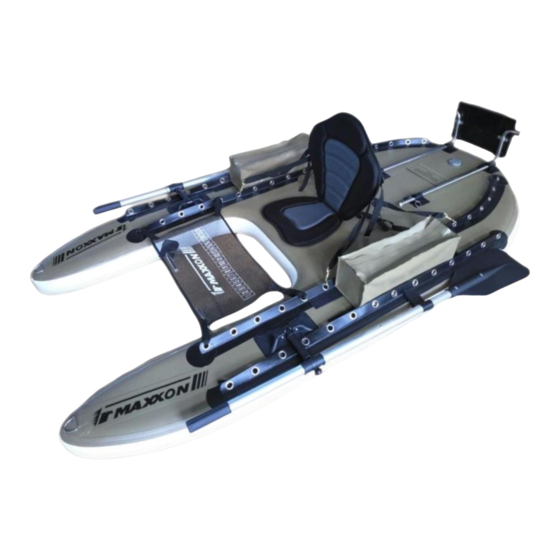
Page 3: Component Images
XPW-239 COMPONENT IMAGES One Transport One Inflatable Boat Backpack/ Storage Bag One Stripping Apron One Seat One Pair Two-Piece Oars One Repair Kit One Side Storage & Valve Wrench Accessory Bag One Bungee Cargo Net One Manual Pump... - Page 4 XPW-240 COMPONENT IMAGES One Inflatable Boat One Transport/Storage Bag Transom Assembly Hardware Four Brackets / Ten Screws & Nuts One Stripping Apron Four Foot Rest/Transom One Pair Two-Piece Oars Securing Pins Two Transom Mounting Bars One Removable Two Gear Saddlebags Electric Motor Transom Two Removable Foot Pegs One Manual Pump...
- Page 5 This will assist you in stowing the boat into the carry bag after each use. Unfold the boat on a flat surface and check the components listed to ensure none are missing. If any components are missing, do not contact your Maxxon retailer, but contact us at: (253)373-0166 or email us: sales@evergoing.us Valve Operation &...
-
Page 6: Boating Tips
repair. Wait 10 minutes for glue to set. Then apply a second thin layer of glue to both the patch and the boat as well. Wait another 8 minutes for glue to set. Then apply a 3rd very thin layer of glue to both the patch and the boat. Let sit for 5 minutes (don’t allow it to completely dry) and then firmly place patch on the damaged area. - Page 7 Assembling the XPW-239 & XPW-240 Inflate the boat by airing up the two Leafield valves on the XPW- 239. (One on the XPW-240) Remove the valve cover cap. Depress spring-loaded centerpin in the center of the valve and give it ¼ clockwise turn until it rises.
- Page 8 Secure oars when not in use with Velcro strap or remove the oars completely. Attaching the Seat Position the adjustable seat at a point where the forward edge of the seat deck rests Grommet System beaneath the bend of your knee.
- Page 9 Attaching the Cargo Net (XPW-239 Only) Tie the elastic, bungee-type Cargo Net to the desired positions on the bow grommet system. Attaching the Stripping Apron Position the Stripping Apron to your desired position by slipping the hook and loop straps through the Grommet System.
- Page 10 XPW-240 – Optional Electric Motor Trolling Transom Assemble the transom plate transom bars shown using four brackets and eight screws and nuts. Slide the the transom bars through both black transom bar receivers on port and starboard side of the stern. Secure with two of the four locking pins.
-
Page 11: Owner Warranty Registration
Water “Rating” While Maxxon Inflatables are extremely durable watercraft, Maxxon makes no statement or claim for watercraft efficiencies in various classes of white water. Owner Warranty Registration Go to the maxxonoutfitters.com web site. Click on “CONTACT” and then proceed to “REGISTER GEAR”. -
Page 12: Limited Warranty
The Authorized Maxxon Dealer sales receipt is the only valid registration identification and must be presented at the time warranty service is required. Warranty claims will not be accepted with presentation of the receipt of purchase.
Need help?
Do you have a question about the XPW Series and is the answer not in the manual?
Questions and answers