Advertisement
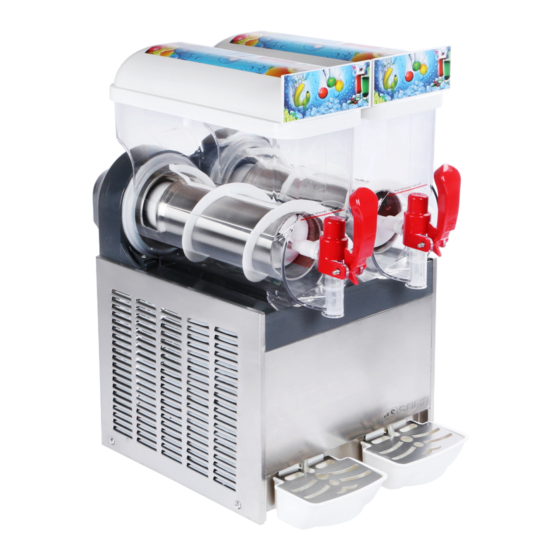
SLUSH MACHINE
USS-SMM00001
This manual should be made available to all users of this equipment. For best results, and for
maximum durability of the equipment, carefully read and follow all instructions. Failure to do so can lead to
serious injury or catastrophic damage to the user, machine, supplies, or surrounding areas. All safety
suggestions must be followed closely, and extreme precaution must be taken to assure proper use of the
equipment by only qualified personnel who have read this guide.
Advertisement
Table of Contents

Subscribe to Our Youtube Channel
Summary of Contents for U.S. Solid SLUSH MACHINE
- Page 1 SLUSH MACHINE USS-SMM00001 This manual should be made available to all users of this equipment. For best results, and for maximum durability of the equipment, carefully read and follow all instructions. Failure to do so can lead to serious injury or catastrophic damage to the user, machine, supplies, or surrounding areas. All safety suggestions must be followed closely, and extreme precaution must be taken to assure proper use of the equipment by only qualified personnel who have read this guide.
-
Page 2: Table Of Contents
Table of Contents I. Introduction.............................1 II. Safety Notes.............................2 III. Parameters............................3 IV. Setting Up the Machine......................4 V. Operating the Machine.......................4 VI. Making your Slush.........................6 VII.Troubleshooting..........................6 VIII. Cleaning the Machine.......................8 IX. Assembling Machine........................10 X. Structure Diagram........................13 Warranty............................14... -
Page 3: Introduction
The slush machine has passed through rigorous testing. Like all of our products, it is made with high quality materials at an affordable price. This slush machine is suitable for use in your restaurant, home, bar, or any other indoor locations. -
Page 4: Safety Notes
II. Safety Notes • Be careful when using the coolant; if large blocks of ice form, immediately turn off the freezing function and the mixer as this can lead to blockages and damage to the machine. • Turn off and unplug the machine when making any physical adjustments or repairs. -
Page 5: Parameters
III. Parameters Tank: 15 Liters *2 tanks Cooling Power: 600 W Cold-beverage Temperature: 26.6°F to 28.4°F (-2 °C to -3 °C) Voltage: 110 V Frequency: 60 Hz Product Dimension: 15.7" x 25.7" x 30.8" Carton Package Dimension: 18" x 23" x 31" Wooden Package Dimension: 18.5"... -
Page 6: Setting Up The Machine
Be sure to monitor the slush machine in the start-up. Always start at a lower level of freezing and work up. If you start with the machine too cold, large blocks of ice will form and can damage the machine. - Page 7 V. Operating the Machine Steps: 1.Turn on the Power. You will hear two clicking sounds. 2.Press MIX1/Set1 and MIX2/Set2 to start the mixers. 3.Press FREEZE, the Light above FREEZE will flash for 5 minutes, then the compressor will start working. If you want to change the consistency level, please follow the steps below: Method 1: a.
-
Page 8: Making Your Slush
If making your own mixture, you mix sugar into the liquid before adding to the bowls. Additionally, make sure that the slush machine is filled up to red line when starting. This will allow the mixer to work properly. - Page 9 VIII. Cleaning the Machine Cleaning the machine is very important for long term health of your slush machine. Preparations: 1.Turn off the cooling function on the machine. Allow the mixers to continue to run while the mixtures melts fully. This may take 30 minutes or more, depending on the amount of liquid left, and the consistency of your slush.
-
Page 10: Cleaning The Machine
VIII. Cleaning the Machine Deep Clean 1. Take apart the handle and faucet assembly. For questions or concerns, e-mail service@ussolid.com, visit www.ussolid.com, or call (800) 243-5428... - Page 11 VIII. Cleaning the Machine 2. Remove each bowl. The bowls have a plastic ridge that holds it in place. To remove the bowl, push gently on the bowl while lifting up to get the plastic ridge above the metal lip. Then pull out the bowl. 3.Remove the assembly mixer, this is the white spiral plastic that wraps around the Evaporator.
-
Page 12: Assembling Machine
VIII. Cleaning the Machine 5. Remove the bowl gasket 6.Take all of the disassembled pieces and wash with food grade soap, rinse fully, and sanitize. 7.Carefully wipe down the top and sides of the machine. 8.Reassemble the machine and allow it to air dry. 9.The machine should now be ready for further use. - Page 13 IX. Assembling Machine 2. Put the inner spiral into the metal tube. 3. Connect the assembly spiral. 4. Put the bowl back.
- Page 14 IX. Assembling Machine 5. Assemble the handle and faucet. Notes: Please kindly apply grease to each parts of the faucet before reassembling them. If parts get stuck, apply grease to the very corner of the faucet. Assembling the parts back, then pull the faucet for several times. For questions or concerns, e-mail service@ussolid.com, visit www.ussolid.com, or call (800) 243-5428...
-
Page 15: Structure Diagram
X. Structure Diagram 17. Magnet for inner spiral Cover 18. Copper bush for motor fixing Bowl Tap pin 19. Plastics motor panel Tap O-ring 20. Motor Handle 21. Cover for motor Tap spring 22. Stainless steel back panel Pin for handle fixing 23. -
Page 16: Warranty
After the first 30 days but still within the first 1 year after the date of delivery, U.S. Solid will send new or refurbished replacement parts at no charge, so you can repair the product.
Need help?
Do you have a question about the SLUSH MACHINE and is the answer not in the manual?
Questions and answers