
Subscribe to Our Youtube Channel
Related Manuals for Thermrup HI616-AK

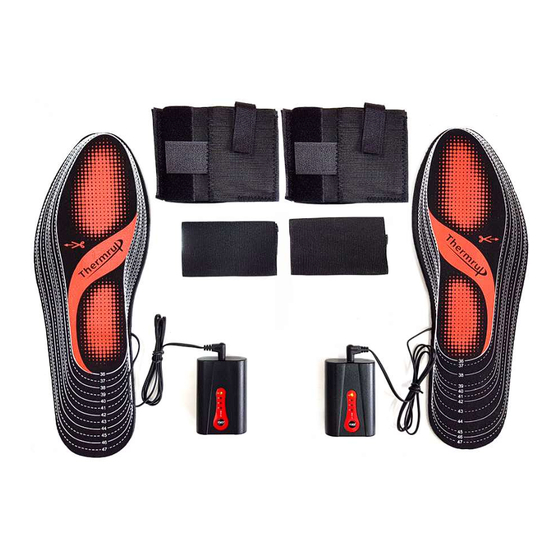
Summary of Contents for Thermrup HI616-AK
- Page 1 Elektrische Beheizbare Einlegesohle Gebrauchsanweisung Art. HI616-AK Bitte sorgfältig lesen!
-
Page 2: Table Of Contents
Deutsch Inhalt 1. Wichtige Anweisungen……………………………………………………….2 2. Funktion ..........…......3 3. Lieferumfang………………………………………………………………………3 4. Anwendung………………………………………………………………….……4 5. Reinigung und Pflege…………………………………………….………..5 6. Spezifikation 7. Hinweis zu Entsorgung……………………………………………………….5 8. Garantie …………………………………………………………………………….6 Wichtige Anweisungen • Ein Nichtbeachten der nachfolgenden Hinweise kann Personen- oder Sachschaden. • Dieser Beheizbare Einlegesohle ist nur zur Erwärmung des menschlichen Körpers bestimmt. -
Page 3: Funktion
Funktion Elektrische Beheizbare Einlegsohle dient dazu, die Fußsohle beim kalten Wetter warm und bequem sowie sicher zuhalten, um die Erfrierungen der Füße zu vermeiden. Diese elektrische Beheizbare Einlegsohle ist sowohl für langen als auch für kurzen Stiefel geeignet, ideal für den Wintersport. Gamasche für Akku Akku Schnittlinie nach der... -
Page 4: Anwendung
Anwendung LED-Anzeige An/Aus-Taste 4.1 Aufladung des Akkus Vor der ersten Benutzung oder nach längerer Nichtbenutzung muss der Akku für mindestens 3 Stunden vollständig aufgeladen werden. Zum Aufladen der Akkus verbinden Sie das Kabel des Ladegeräts mit dem Akku und mit einer Steckdose. Während des Ladevorganges blinkt die LED-Anzeige. -
Page 5: Reinigung Und Pflege
Kabels in die Buchse des Akkus ein. Befestigen Sie die Gamasche entlang dem Bein und stellen Sie den Akkus in den Akkus-Sack. Sie können das Kabel mit dem Klettverschluss binden. Drücken Sie die Power-Taste ca. 2 Sekunden um den Akkus einzuschalten. -
Page 6: Hinweis Zu Entsorgung
Hinweise zur Entsorgung Dieses Gerät darf nicht zusammen mit dem Hausmüll entsorgt werden. Jeder Verbraucher ist verpflichtet, alle elektrischen oder elektronischen Geräte, egal, ob sie Schadstoffe enthalten oder nicht, bei einer Sammelstelle seiner Stadt oder im Handel abzugeben, damit sie einer umweltschonenden Entsorgung zugeführt werden können. - Page 7 Electric heated insole Instruction Manual Art. HI616-AK Please read carefully!
-
Page 8: Important Instructions
Englisch Contents Important instructions……………………………………………………….8 Function................9 Included in delivery ………………………………………………………..…9 Operating……………………………………………………………..………….10 Cleaning and maintenance……………………………….…………..11 Specification ………………………………………………………….………..11 Deposal……………………………………………………….………….……….11 Warranty………………………………………………….………………………12 1. Important instructions • Non-observance of the following notes may result in personal injury or material damage. • This heated insole is only designed to warm up the human body. •... -
Page 9: Function
2. Function Electric heated insole is used to keep the sole of the foot warm and comfortable as well as safe in cold weather in order to avoid the frostbite of the feet. This electric heated insole is suitable for both long and short boots. Gaiter for Battery Battery Cutting line according... -
Page 10: Operating
4. Operating 4.1 Charging the battery LED- indicators Power Button The battery needs to be charged for at least 3 hours prior to initial use or after not having been used for a long time. To recharge the battery, connect the cable from the charger to the battery and a power outlet. -
Page 11: Cleaning And Maintenance
Press the power button for approx. 2 seconds to switch on the battery. Then press the power button briefly (if necessary, several times) to set the desired temperature level (1 to 4). Press the power button to 0% or take the battery from the cable to switch off the battery. -
Page 12: Warranty
This product must not be disposed together with the domestic waste. All users are obliged to hand in all electrical or electronic devices, regardless of whether or not they contain toxic substances, at a municipal or commercial collection point so that they can be disposed of in an environmentally acceptable manner. - Page 13 Oststr.159 47057 Duisburg Germany...
Need help?
Do you have a question about the HI616-AK and is the answer not in the manual?
Questions and answers