Advertisement
Quick Links
SEATPOST INSTRUCTIONS
Thanks for buying a Whisky Parts Company product.
Whisky makes parts that are designed to keep on delivering,
ride after ride, year in and year out.
WARNING
WARNING: CYCLING CAN BE DANGEROUS. BICYCLE PRODUCTS SHOULD
BE INSTALLED AND SERVICED BY A PROFESSIONAL MECHANIC. NEVER
MODIFY YOUR BICYCLE OR ACCESSORIES. READ AND FOLLOW ALL
PRODUCT INSTRUCTIONS AND WARNINGS INCLUDING INFORMATION
ON THE MANUFACTURER'S WEBSITE. INSPECT YOUR BICYCLE BEFORE
EVERY RIDE. ALWAYS WEAR A HELMET.
Additional Product and Safety instructions can be found at the website
www.whiskyparts.co/safety
Intended Use
INTENDED For riding on a variety of terrain and surfaces including dirt
or mud surfaces. Will also work well for all-weather rough road riding
and commuting.
NOT INTENDED For jumping or stunt riding.
Compatibility
Whisky Seatposts are available in 27.2 and 31.6mm diameters, with a zero
and 18mm offset available in both sizes.
Seatpost diameter is critical. The diameter of the new post must precisely
match the diameter of the frameset's seat tube. If the seat tube diameter
is not printed at the base of the current seatpost, measure the post diameter
or seat tube diameter with a pair of calipers. If you are not sure of the right
size, consult your local bike shop. The diameter of the
Carbon Care
Seatposts that have been involved in a crash or show signs of damage
such as cracks, chips, loose fibers, or fatigue marks should be taken out
of use immediately and inspected by a qualified expert to ensure they're still
safe. If evidence of damage is found, the component should be replaced
or repaired.
WARNING Never put a scratch in a carbon seatpost to mark it! Doing so
can ruin the seatpost and cause it to break. Instead mark your seat height
by wrapping a piece of electrical tape around it right at the frame or by
painting a line on it.
WARNING Overtightening the seatpost clamp on the frame can ruin
the seatpost and even damage the frame. Tighten the seatpost to the
recommended torque spec for the frame or seat clamp, whichever is less.
Tools:
4 and 5mm Allen wrenches
Carbon Paste
WHISKY PARTS C o / 6400 W 105th STREET / BLOOMINGTON MN, USA 55438 / 1.877.774.6217 / info@whiskyparts.com / whiskyparts.com/safety
Proper Installation
We recommend the use of a high-quality, reliable torque wrench to install all
Whisky parts. Remember to calibrate your torque wrench.
Seatpost Installation
1. Make sure that the inside of the frameset's seat tube is dry, and free from
any dirt or burrs.
NOTE: Do not use grease on your seatpost as grease can cause damage
to the carbon fiber. Carbon paste is recommended.
2. Insert the seatpost into the frame and lightly tighten the seatpost clamp
to hold the post in place while installing the saddle.
NOTE: The seatpost should be oriented with the MIN. INSERTION and
HEIGHT GRADATION graphics on the back of the post.
NOTE: Before sitting on the bicycle to check for proper seatpost height,
tighten the seatpost bolt clamp on the frame to secure the seat
in place. If it is not tight enough, it may cause the seatpost to slide down
and scratch or gouge the surface which could cause damage and make
the seatpost unsafe to use.
3. Once the desired height is achieved, tighten seatpost clamp bolt on the
frame or the seatpost clamp to the frame manufacturer's specifications.
4. Make sure that the post is not raised above the minimum insertion line
near the bottom of the seatpost.
Saddle Installation
For the ZERO offset seatpost: (figure 1)
1. Make sure that the post is not raised above the minimum insertion line
at the bottom of the seatpost.
2. Loosen the 4mm bolt on the side of the saddle rail clamps enough
to insert the rails of the saddle into the cradle assembly.
3. Lightly retighten the 4mm side rail clamp bolt to hold the saddle in place
and move the saddle to achieve the desired fore and aft adjustment.
4. Tighten or loosen the 4mm bolts at the bottom of the front and the back
of the saddle rail clamp assembly to achieve the desired saddle tilt.
5. When the saddle is in the desired position, tighten all the 4mm bolts
to 5–6Nm.
1
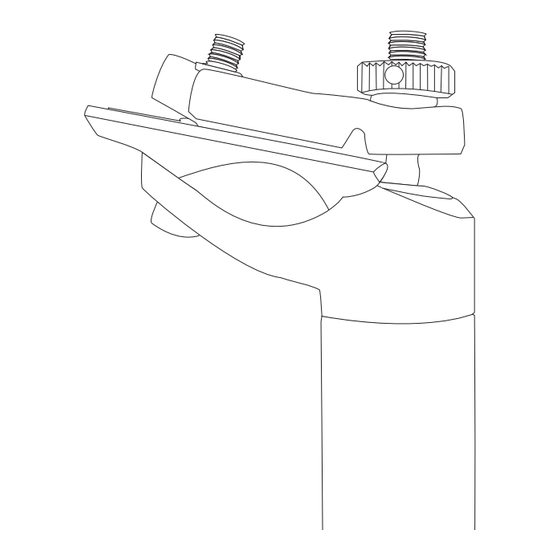
For the 18mm offset seatpost: (figure 2)
1. Make sure that the post is not raised above the minimum insertion line
near the bottom of the seatpost.
2. Loosen both the adjustment wheel at the top of the saddle rail clamp and
the 5mm bolt below the saddle rail clamp enough to get a saddle rail
between the top and bottom clamps on one side of the assembly.
3. Move the rail inward enough to make room for the other rail to get
between the top and bottom clamps on the other side.
4. Position the rails in the saddle rail clamp grooves and begin to tighten the
adjustment wheel and the rearward bolt so that tilt adjustments can begin
to be made. Rotating the wheel and tightening or loosening rear bottom
bolt will allow for tilt adjustments. Make your fore and aft adjustments.
When the desired fore and aft adjustments and saddle angle are achieved,
tighten the rearward bottom 5mm bolt to 9Nm max.
2
Ongoing Maintenance
Clean with light soap and water. Dry with a rag.
If your rag snags on something, it could be a sign of damage. Also, carefully
listen for uncommon sounds when riding, such as creaking, cracking,
or popping, which could mean there's a problem. If you're not sure, don't take
chances. Visit your bicycle shop and ask an expert to take a look.
Avoid exposing your bicycle and components to high temperatures such
as leaving them inside a parked car in the sun or storing them next to heat
sources or radiators. Excessive heat can deteriorate the adhesive which joins
the seatpost parts.
3148 12/13
Advertisement

Related Manuals for WHISKY PARTS Co SEATPOST

Summary of Contents for WHISKY PARTS Co SEATPOST
- Page 1 Intended Use in place. If it is not tight enough, it may cause the seatpost to slide down INTENDED For riding on a variety of terrain and surfaces including dirt and scratch or gouge the surface which could cause damage and make or mud surfaces.
- Page 2 • Damage to carbon fiber caused by any carbon assembly paste This limited warranty is expressly limited to the repair or replacement of a defective product, at the option of Whisky Parts Co. and is the sole remedy of the warranty. This limited warranty applies only to the original purchaser of the product and is not transferrable.
Need help?
Do you have a question about the SEATPOST and is the answer not in the manual?
Questions and answers