Table of Contents
Advertisement
Advertisement
Table of Contents

Subscribe to Our Youtube Channel
Summary of Contents for Improvements DAZZLE
- Page 1 DAZZLE 3-in-1 Jewelry Cleaner and Sanitizer SJC-1601 INSTRUCTION MANUAL...
- Page 2 IMPORTANT – READ BEFORE CLEANING ANY TYPE OF JEWELRY Prior to using the Improvements Dazzle 3-in-1 Jewelry Cleaner and Sanitizer, always confirm if the jew- elry in question may be cleaned either in an ultrasonic cleaner, steam cleaner and/or exposed to UV light.
-
Page 3: Safety Guidelines
SAFETY GUIDELINES WARNING: Be sure to read and follow all safety instructi ons before using your jewelry cleaner. Proper care and maintenance will help expand the life of your jewelry cleaner. When using an electrical appliance, basic precauti ons should always be followed. To reduce the risk of fi re, electric shock, or injury: Carefully read all instructi ons prior to use. - Page 4 GUIDELINE FOR GEMSTONE CLEANING Gemstone Durability Steam Ultrasonic UV light Agates Moderate Not Recommended* Not Recommended* Yes Alexandrite Strong Yes** Amazonite Moderate Not Recommended* Not Recommended* Not Recommended* Amber Fragile Not Recommended* Not Recommended* Not Recommended* Amethyst Moderate Not Recommended* Yes** Not Recommended* Aquamarine Strong...
- Page 5 * When Not Recommended, consult a jeweler prior to using the ultrasonic, steam and UV light features. ** Hard natural gemstones can be put into an ultrasonic cleaner provided that they have few inclusions and have not been treated with heat or chemicals. Treated gemstones become more vulnerable with using the ultrasonic function.
-
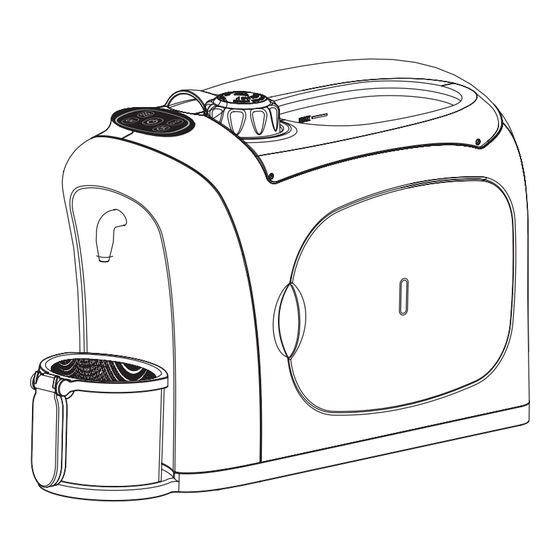
Page 6: Key Features
KEY FEATURES A. Upper cover I. Base plate B. Water tank cap J. Side door C. Power on/off button K. Hanger D. Steam on/off button L. Ultrasonic reservoir E. Steam-ready button M. Measuring cup F. Ultrasonic button N. Stainless steel basket G. -
Page 7: Assembly And Use
ASSEMBLY AND USE Set the jewelry cleaner on a flat, level surface. DO NOT plug in the electrical cord yet. Remove the upper cover and take out the measuring cup and funnel from the ultrasonic reservoir. NOTE: Leave the upper cover off during use. Open the side door and take out the stainless steel basket and tweezers from the UV chamber. - Page 8 To fi ll the jewelry cleaner, unscrew water tank cap and fi ll the water tank with water by using the measuring cup, fi ll with water to the 250ml/9 fl oz mark. The water tank only requires 250ml/9 fl oz (one measuring cup) for the best steam pressure results. Replace water tank cap.
- Page 9 Put the measuring cup on the base plate below the steam nozzle; put the stainless steel basket on the measuring cup. Make sure all loose parts are securely in place. Plug in unit. The power butt on will begin to fl ash. Press the power on/off butt on once to power on unit.
- Page 10 Double click the steam-ready butt on“ ” to generate conti nuous steam to clean the jewelry. Press the steam-ready butt on“ ” to stop steam. NOTE: The steam heati ng takes approximately 3.5 minutes aft er pressing the steam on/off butt on. The steam-ready butt on light will turn RED when the steam is ready to be dispersed.
- Page 11 TO USE THE UV SANITIZER After steam cleaning, remove the jewelry from the stainless steel basket and open the side door to the UV chamber. There are 3 hangers inside to hang rings, earrings or other accessories. Close the side door. Press the UV button“ ”.
-
Page 12: Cleaning And Maintenance
Wipe the jewelry cleaner and accessories with a soft cloth when/if necessary. CUSTOMER SUPPORT For problems with your Improvements Dazzle 3-in-1 Jewelry Cleaner and Saniti zer, please refer to Troubleshooting guide. Additional inquiries should be directed to our Customer Service department by calling 1-888-574-3662 or by e-mail to: customerservice@anvidproducts.com. -
Page 13: Troubleshooting
TROUBLESHOOTING Problem Solution Jewelry cleaner not turning • Ensure power cord is plugged into 120V AC power outlet only. • Ensure circuit breaker is operational. Touch panel has no illuminat- • Unplug the unit from the power outlet for 5 minutes then ing lights plug it back in. -
Page 14: One-Year Limited Warranty
ONE YEAR LIMITED WARRANTY Our Improvements product warranty extends only to the original customer purchaser of the product. It is warranted by the manufacturer to be free from all defects in materials or workmanship for a period of one year from the date of original purchase. This warranty is subject to the following conditions, exclusions and exceptions. - Page 15 any theory of tort, contract or commercial law including, but not limited to, negligence, gross negligence, strict liability, breach of warranty and breach of contract. ANY IMPLIED WARRANTIES, OBLIGATIONS, OR LIABILITIES, INCLUDING, BUT NOT LIMITED TO, THE IMPLIED WARRANTY OF MERCHANTABILITY AND FITNESS FOR A PARTICULAR PURPOSE, SHALL BE LIMITED TO THE DURATION OF THIS WARRANTY.
Need help?
Do you have a question about the DAZZLE and is the answer not in the manual?
Questions and answers