
Summary of Contents for UniFi Security Gateway Pro
- Page 1 Package Contents UniFi Security Gateway Pro Power Cord Mounting Screws (Qty. 4) Cage Nuts (Qty. 4) Installation Requirements Phillips screwdriver Create PDF in your applications with the Pdfcrowd HTML to PDF API PDFCROWD...
-
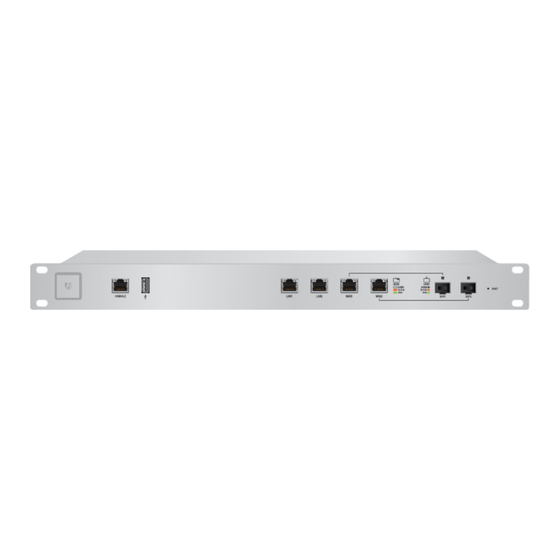
Page 2: Hardware Overview
ESD events with industrial-grade, shielded Ethernet cable from Ubiquiti. For more details, visit: ui.com/toughcable Note: Although the cabling can be located outdoors, the UniFi Gateway itself should be housed inside a protective enclosure. IMPORTANT: We strongly recommend using UPS backup and power regulation to prevent equipment damage due to stability issues with local AC power. - Page 3 System LED Click here for detailed descriptions. Console Port RJ45 serial console port for Command Line Interface (CLI) management. Use an RJ45-to-DB9 serial console cable, also known as a rollover cable, to connect the Console port to your computer. Then configure the following settings as needed: Baud rate 115200 Data bits 8 Parity NONE...
- Page 4 By default, the SFP1 port is set to DHCP Client. Reset Button Resets to factory defaults. The UniFi Gateway should be running after bootup is complete. Press and hold the Reset button for about 10 seconds until the right LED on the WAN2 port starts flashing and then becomes solidly lit.
-
Page 5: Hardware Installation
Hardware Installation Create PDF in your applications with the Pdfcrowd HTML to PDF API PDFCROWD... - Page 6 Create PDF in your applications with the Pdfcrowd HTML to PDF API PDFCROWD...
- Page 7 Create PDF in your applications with the Pdfcrowd HTML to PDF API PDFCROWD...
- Page 8 Create PDF in your applications with the Pdfcrowd HTML to PDF API PDFCROWD...
-
Page 9: Connecting Ethernet
Connecting Ethernet Create PDF in your applications with the Pdfcrowd HTML to PDF API PDFCROWD... - Page 10 Using SFP Ports Create PDF in your applications with the Pdfcrowd HTML to PDF API PDFCROWD...
- Page 11 Create PDF in your applications with the Pdfcrowd HTML to PDF API PDFCROWD...
- Page 12 Note: The corresponding WAN port will be deactivated. Create PDF in your applications with the Pdfcrowd HTML to PDF API PDFCROWD...
-
Page 13: Software Installation
From a management station connected to the same Layer-2 network, launch the installer and follow the on-screen instructions. Note: If you already have UniFi Controller v4.8 or higher installed, go to the section, Adopting the UniFi Gateway. Create PDF in your applications with the Pdfcrowd... - Page 14 After you have installed the software and run the UniFi Installation Wizard, a login screen will appear for the UniFi Controller management interface. Enter the username and password that you created and click Sign In. You can manage your network and view network statistics using the UniFi Controller management interface.
- Page 15 1. From the UniFi Controller dashboard, click Devices in the left menu bar. 2. Locate the UniFi Gateway in the list of devices under the Model column. Click Adopt. Create PDF in your applications with the Pdfcrowd HTML to PDF API...
- Page 16 3. The System LED on the UniFi Gateway will turn blue to confirm that it is successfully adopted. Optional WAN Port Configuration via Layer 3 By default, the WAN1 port is set to DHCP so it can be assigned network settings by the service provider.
- Page 17 2. Enter your Username and Password. Click Sign In. Note: If the UniFi Gateway has not been adopted by a UniFi Controller, the login window will be skipped and the Setup window will appear. 3. Click Edit Configuration to configure the WAN1 port as DHCP, Static IP, or PPPoE.
-
Page 18: Specifications
For information on using the UniFi Controller software, refer to the User Guide located on our website at: ui.com/download/unifi Specifications USG-PRO-4 Dimensions 484 x 44 x 164 mm (19.06 x 1.73 x 6.46") Weight 2.30 kg (5.07 lb) Networking Interfaces... -
Page 19: Safety Notices
USG-PRO-4 Power Supply Internal AC/DC Power Adapter, 60W (24V, 2.5A) Supported Voltage Range 110 - 240VAC LEDs System Status Data Ports Speed/Link/Activity Layer 3 Forwarding Performance Packet Size: 64 Bytes 2,400,000 pps Packet Size: 512 Bytes or Larger 4 Gbps (Line Rate) Processor Dual-Core 1 GHz, MIPS64 with Hardware Acceleration for Packet Processing... -
Page 20: Electrical Safety Information
WARNING: To reduce the risk of fire or electric shock, do not expose this product to rain or moisture. WARNING: Do not use this product in location that can be submerged by water. WARNING: Avoid using this product during an electrical storm. There may be a remote risk of electric shock from lightning. -
Page 21: Limited Warranty
Limited Warranty ui.com/support/warranty The limited warranty requires the use of arbitration to resolve disputes on an individual basis, and, where applicable, specify arbitration instead of jury trials or class actions. Compliance Changes or modifications not expressly approved by the party responsible for compliance could void the user’s authority to operate the equipment. -
Page 22: Weee Compliance Statement
environment this equipment may cause radio interference. CE Marking CE marking on this product represents the product is in compliance with all directives that are applicable to it. WEEE Compliance Statement Declaration of Conformity Online Resources Create PDF in your applications with the Pdfcrowd HTML to PDF API PDFCROWD... - Page 23 © 2020 Ubiquiti Inc. All rights reserved. Create PDF in your applications with the Pdfcrowd HTML to PDF API PDFCROWD...
Need help?
Do you have a question about the Security Gateway Pro and is the answer not in the manual?
Questions and answers