Table of Contents
Advertisement
Head Office/Factory
687-5, Sangoan-ri, Hongcheon-eup, Hongcheon-gun,
Gangwon-do, Korea (zip.250-804)
Tel : + 82-33-434-9041
Fax : + 82-33-434-9043
Seoul Office/R&D
1406, Masters Tower, 553, Dohwa-dong, Mapo-gu,
Seoul, Korea (zip.121-748)
Tel : + 82-2-714-2960∼2
Fax : + 82-2-714-2963
Customer Service Dept.
Tel : + 82-2-714-2962
Fax : + 82-2-714-2963
Address of Region Representative
ET MEDICAL DEVICES SPA
VIA DE ZINIS 6, 38011 CAVARENO (TN) ITALY
Tel : + 39 0463 85 01 25
Fax : + 39 0463 85 00 88
Operation Manual
BFM-900L
FETAL MONITOR ( Ver 1.1 )
Advertisement
Table of Contents

Summary of Contents for Bionics BFM-900L
- Page 1 Operation Manual BFM-900L FETAL MONITOR ( Ver 1.1 ) Head Office/Factory 687-5, Sangoan-ri, Hongcheon-eup, Hongcheon-gun, Gangwon-do, Korea (zip.250-804) Tel : + 82-33-434-9041 Fax : + 82-33-434-9043 Seoul Office/R&D 1406, Masters Tower, 553, Dohwa-dong, Mapo-gu, Seoul, Korea (zip.121-748) Tel : + 82-2-714-2960∼2 Fax : + 82-2-714-2963 Customer Service Dept.
- Page 2 OPERATION MANUAL BFM-900L FETAL MONITOR ( Ver 1.1 ) ( MAR. 27. 2009 )
-
Page 3: Table Of Contents
1.3 Meaning of Symbols in the User’ s Manual Chapter 2. Precautions for Us 2.1 Precautions for Using-Environment 2.2 Precautions for Electric Safety 2.3 Maintenance and Cleanness Chapter 3. Overview of BFM-900L 3.1 Principle and Features of BFM-900L 3.2 Composition 3.3 Parts 3.4 Symbols... - Page 4 Chapter 4. How to install BFM-900L 6.4 Time Setting 4.1 Precautions for Installation 6.5 Default Setting 4.2 Installation of Main Body 4.3 Cable Connection Chapter 7. Solution for Precaution and Warning 4.4 Pinter Paper Loading Chapter 8. Power Chapter 5. How to use BFM-900L 8.1 AC Power...
-
Page 5: Introduction
INTRODUCTION GENERAL Thank you for buying BFM-900L (Fetal Monitor). For safe use, stable performance and follow-up management, please read this manual before using the device. Before using the device, please read this manual to perfectly understand the basic function, using method and maintenance method of the device, so that you can assure the safe use and long-term stable performance of the device. -
Page 6: Warranty Period
This product is made through strict quality management and test process. This product can be person certified of such service by Bionics. If the device is repaired or tried to be repaired by any repaired, replaced or refunded in accordance with “Consumer’s Damage Compensation person other than such certified person for the warranty period, the warranty period shall be void. -
Page 7: How To Contact Us
Bionics service is always open to you. Please contact us at the number as follows: This device provides you with the exact and stable values (fetus’s heart rate, patient’s uterus shrinking level and etc) measured on the patient and fetus and correct information of the fetus’s status. -
Page 8: Meaning Of Symbols In The User' S Manual
FETAL MONITOR ( Ver 1.1 ) BFM-900L 1.3 Meaning of Symbols in the User’ s Manual CHAPTER 2 Precautions for Use We have marked on the user manual to emphasize the following agreements. The user must follow all warnings and remarks. -
Page 9: Precautions For Electric Safety
Inaccurate reading may show in case above mentioned We WILL NOT be responsible under completely installed. devices are nearby. The BFM-900L requires a separate power source and stable connection. any circumstances in this case. Otherwise, it may be damaged. -
Page 10: Maintenance And Cleanness
If the device is overused and damaged, do not use it. pain and frequency. BFM-900L is that the adjustments and values of the signals can easily be controlled with simple key controls. BFM-900L is capable of measuring twin fetus, and supports an optional central monitoring system on serial communication. -
Page 11: Parts
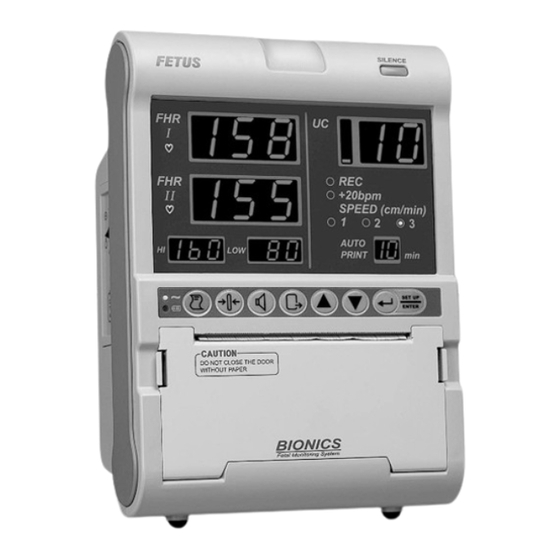
(4) A/C & Battery Power LED (7) ID Label (5) Warning On/Off Key (6) Display for UC Value (7) Display for Printer setting (8) Key Control Panel 4˝ Printer (10) Alarm LED Lamp 14 Overview of BFM-900L Overview of BFM-900L 15... -
Page 12: Symbols
Necessity of Ground Potential Do not disassemble the device. Otherwise, you may be electrically shocked. The device shall not be disassembled by other than the person qualified for our product service. Working by Battery 16 Overview of BFM-900L Overview of BFM-900L 17... -
Page 13: Chapter 4 How To Install Bfm-900L
4.1 Precautions for Installation Precautions for Installation of BFM-900L: - BFM-900L shall be used at the ambient temperature of 10°~45° and humidity of 30% ~ 85%. - Check the connection status of Power Cord. - Do not plug various cords into an electric consent. -
Page 14: Pinter Paper Loading
- Make sure the paper’s printing side is facing up and then close the printer door. Printer paper should be printed side upward. If not, it will not be printed on the paper. 20 How to install BFM-900L How to install BFM-900L 21... -
Page 15: Chapter 5 How To Use Bfm-900L
It makes you harmful. (9) Printer Status (10) Offset Setting Status (11) Printing Cycle for Printer Auto-Printing. Indicate remain print time during printing “ DO NOT CLOSE THE DEVICE TO THE EAR!” 22 How to use BFM-900L How to use BFM-900L 23... -
Page 16: Functions Of Keys
5.5 Measurement of FHR and UC Apply ample amount of Supersonic Gel on the surface of the Probe. The DOP and UC Probe used in BFM-900L previous models are designed to be used under water. Doppler and UC probes are applied by IPX7 so they can be used for the underwater delivery in the water. - Page 17 FND. The error code will also displays in the Auto Print FND. And information sound(ding dong ding dong) will be heard. 26 How to use BFM-900L How to use BFM-900L 27...
-
Page 18: How To Use Event Mark
(4) It is important to apply ample amount of Supersonic gel on the probe surface to get rid of air bubbles in between the abdomen and the probe. (5) BFM-900L uses a Button-Top styled DOP Probe. Insert the protruding buttons on the opposite side of the DOP Probe surface to the Button-Hole on the belt under the patient. -
Page 19: How To Use The Printer
■ ■ SPEED Operation (1) Control the print speed.(1cm/min, 2cm/min and 3cm/min) The printer used in BFM-900L is a 4 inch Porti-M400V, made by Wooshim System. It uses 9V (2) After finishing the setting by users, it will apply to the initial printing Power and the width of the printing paper is 112mm. -
Page 20: Volume Control
). The volume level will be twinkled in the “LOW” area. sound happens, you can turn off the sound to use Exit key. (5) Press the Up/Down key( ) to control the volume during twinkling. 32 How to use BFM-900L How to use BFM-900L 33... -
Page 21: Alarm On/Off
(4) The alarm sound and information sound cannot be adjusted. 5.11 AST(Optional) This function is for waking up the baby. BFM-900L is designed to use AST to connect DOP 2 Probe connector. BFM-900L shows “AST” on the FHR2 area. - Display during the silence for 3 minutes(Below screen will be displayed in rotation) Press the button on the AST probe on the patient°Øs abdomen. -
Page 22: Chapter 6. Setting By Menu Function
FETAL MONITOR ( Ver 1.1 ) BFM-900L CHAPTER 6 Setting by Menu Function Step 3) Press the Enter key( ) on the item desired to be set. Then, each relevant setting screen will be displayed. The setting screen will be described in more detailed later. -
Page 23: Record Setting
FETAL MONITOR ( Ver 1.1 ) BFM-900L 6.1 Record Setting Step 1) Press the Setup key( ) to move to menu setting mode in the basic screen. If you press the Exit key( ) , menu will return to the basic screen. -
Page 24: Alarm Setting
FETAL MONITOR ( Ver 1.1 ) BFM-900L 6.2 Alarm Setting Possible to set the Alarm Sounding Area Symbol Description Setting Range High If HR value is measured not smaller than 50 ~ 240 bpm the top limit, ALARM will be made. -
Page 25: Volume Setting
FETAL MONITOR ( Ver 1.1 ) BFM-900L 6.3 Volume Setting Possible to set the volume level for DOP1 and DOP2 respectively Symbol Description Setting Range DOP1 Sets DOP1 volume 0 ~7 Step Initial setting : 4 DOP2 Sets DOP2 volume... -
Page 26: Time Setting
FETAL MONITOR ( Ver 1.1 ) BFM-900L 6.4 Time Setting(Date and Time) Possible to set the time Symbol Description Setting Range YEAR Sets year 2000 ~2099 year (Display last 3 digits) MONTH Sets month 1 ~12 month Step 5) Press the Enter key( ) in Step 4 and desired the level will be twinkled. - Page 27 FETAL MONITOR ( Ver 1.1 ) BFM-900L Step 1) Press the Setup key( ) to move to menu setting mode in the basic screen. If you press the Exit key( ) , menu will return to the basic screen. Step 2) Press the Up/Down key( ) to move to the Time menu in the menu setting mode.
-
Page 28: Default Setting
FETAL MONITOR ( Ver 1.1 ) BFM-900L 6.5 Default Setting CHAPTER 7 Solution for precaution and warning Every basic parameter except for time on the device is initialized. Error Code Step 1) Press the Print key( ) + UC REF key( ) at once in the turning the device off condition. - Page 29 FETAL MONITOR ( Ver 1.1 ) BFM-900L - Probe is disconnected with silence for 3 minutes : Display “AL oFF” and “3 MI” with error ② The beep sounds “ding dong” every 5 minutes when no paper until error is released or press code by turns.
- Page 30 FETAL MONITOR ( Ver 1.1 ) BFM-900L - Probe is disconnected with paper out and silence : Display “AL oFF” with error code by turns. - Paper out with silence : Display “AL oFF” with error code - Low Battery : Display “bAt Lo” with error code(if internal batter is instlled : optional) - Paper out : Display “PAP oUt”...
-
Page 31: Chapter 8 Power
If the battery is connected by AC power, LED for AC power will be lit and the battery will be show a green light. If the device is not in use, it will revert to auto charge mode. charging automatically. When charging is finished, BFM-900L will be finished charging automatically. -
Page 32: Chapter 9. Simple Troubleshooting
FETAL MONITOR ( Ver 1.1 ) BFM-900L CHAPTER 9 Simple Troubleshooting CHAPTER 10 Specification This chapter covers simple troubleshooting methods. You may sometimes not be able to control Mechanical the device as you want or may not know what to do with the device while using the device. At this Base Unit Size : 180mm(W) x 248 mm(H) x 175 mm(D) moment, check the followings instead of thinking “It’s broken”... - Page 33 FETAL MONITOR ( Ver 1.1 ) BFM-900L Dual Fetal Movement Detection Sound IPX7 Doppler Sound with Volume Control Information Sound Alarms Sound External Type Key Sound Frequency Response : DC ~ 0.5 Hz Reference(Zero) Control External Link Measurement Range : 0 ~ 99 units...
- Page 34 Name: Tel: Seller Manufacturer ※Thank you for buying BFM-900L. ※This product is a medical device. ※This product is under thorough quality management and complied with strict test. ※This product can be repaired, replaced or refunded in accordance with “Consumer’s Damage Compensation Regulation” noticed by Economic...
Need help?
Do you have a question about the BFM-900L and is the answer not in the manual?
Questions and answers