Advertisement
Advertisement
Table of Contents

Summary of Contents for Keenox DV1303
- Page 1 Digital Video Camera User Guide English...
- Page 2 Copyright Information: All rights reserved. No part of this publication may be reproduced, transmitted, stored in a retrieval system, or translated into any language in any form by any means, optical, electronic, recording, or otherwise, without the written permission of our company. We reserve the right to revise this manual and to make changes to any or all parts at any time, without obligation to notify any person or entity of such revisions and changes.
- Page 3 Specification: Image Sensor: 300K Pixels CMOS Sensor Image Resolution : High:2M , Middle:1.3M Low:VGA(640*480pixels) Display: 1.5’’ CSTN LCD Video: (VGA/QVGA) 640*480/ 320 * 240 Preview Zoom: 4X(only in the camera mode) Internal Memory: 8*16Mb External Memory: SD card / MMC Card (not included) Photo/Audio: JEPG/AVI Lens:...
-
Page 4: Usb Device Unplugging Notice
1.System Requirements: Pentium 166MHz processor or higher Microsoft Windows 98SE/Me/XP Available USB port Super VGA card and color monitor CK-ROM or DVD-ROM drive At least 64MB RAM 200MB available HD space Mass Storage : Windows Me, 2000, XP PC Camera Driver: Windows98se,Me, 2000, XP 2.USB device Unplugging Notice: If you want to unplug the digital Video from your computer, be sure to stop the device before hand. - Page 5 Key instruction Power: Slide the power button on/off Shutter: Start or Stop to take a picture/video Zoom out/zoom in: 4 times digital zoom in camera mode only Preview/Play:Change three mode: Capture, Video, Preview mode. Menu/Ok:Confirm Up/Down: Select setting. Up botton can play video on preview mode. Left: Back/Preview pictures and video one by one/Self-timer setting(10seconds &...
-
Page 6: Table Of Contents
Table Of Contents: Specification USB device Unplugging Notice Getting to know your digital video Strap Install Power on/off/low Taking Pictures Taking Video Playback Video/ Picture Files Erase USB. Connected to PC Installing the Drive and Photo-editing Software... -
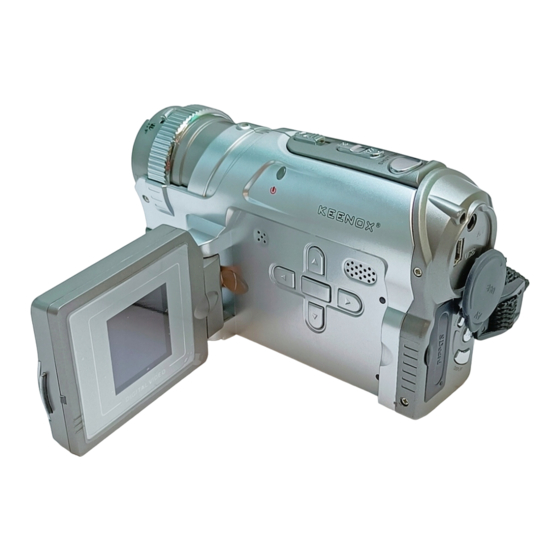
Page 7: Getting To Know Your Digital Video
Getting to Know Your Digital Video... - Page 8 1. 1.5” CSTN LCD 2.Power Indicator 3.Power On/Off 4.Zoom out/ Zoom in 5.Shutter/Play 6.AV port 7.USB port 8.Preview/Play 9.Menu/ok 10.Display 11.SD slot 12.Up 13.Left 14.Down 15.Right 16.Lens 17.Microphone 18. Function Incicator 19. Tripord port 20. Battery case...
-
Page 9: Strap Install
Strap Install Following the instruction steps as below figures to attach the strap to the camera. -
Page 10: Power On/Off/Low
Power On/Off To POWER ON -- slide the power button down for 3 seconds and released to activate your Digital Video. Slide it again for 3 seconds to TURN OFF. If you leave your Digital Video unused for 1 minute or more, the power will automatically turn off to save battery. - Page 11 Remark! Please make sure the focus adjusting button is either like A or B according to the project distance, or the picture quliaty will be poor. Keep the camera steady when releasing the shutter Make sure you have adequate light when taking still pictures or movies. For best quality video, move the camera slowly during recording.
-
Page 12: Taking Pictures
Taking pictures/Single shot Power on the camera , Press Preview/play to photo mode.A small camera is displayed on the top right-hand corner of the screen. Zoom-in or Zoom-out by T/W to frame your picture. Press SHUTTER to start and the total number showing on the LCD will be increase one by one LCD will say MEMORY FULL when the memory is fully used “... -
Page 13: Taking Video
On the shot mode, you can adjust the Resolution , quality , BRUST by press menu OK button, press Up or Down button for selection, then press menu ok again for final confirm. or press right button to set up mode.( Quality have 3 chose:fine standard , economy: 7. - Page 14 LCD will say when the memory is fully used. Playback Videos & Pictures Playback a Video or Picture Press Preview/play to select playback mode The files will be displayed . it mean no image with showed on screen.
- Page 15 Move the course by press to choose the file you want and press to play. If you are playback video,you also can press to stop. Playblack video & audio on TV Connect the camera to your TV set via AV cable, insert the black end to the AV port in the camera.
-
Page 16: Erase
Caution: If the AVI file cannot be played smoothly, you may need to upgrade your Windows Media Player or directly play the file enclosed Arcsoft Video Impression Erase Press Preview/play to switch to Playback mode PressMenu/ok,LCD will say: PressMenu/ok again, LCD will say:1) (delete one only) -
Page 17: Usb
2) (delete all), choose Then press Menu/ok to confirm. There are no files,LCD will say: Press Preview/Play to recorder mode. Notice: If the file is protect and you will not be able to erase file. MSDC : Mass Storage (for PC Windows2000 and XP) For Windows98 user need to install Mass storage driver. -
Page 18: Connected To Pc
AC Power 50Hz Match up with the frequency of the main power supply in your country. Frequency 50Hz: Europe, China, Hong Kong etc 60Hz 60Hz: America, Canada, and Korea Exposure Exposure Value White Balance White Balance Sharpness Normal, Sharp or Soft. TV out. - Page 19 (Note: For Windows Me 2000 and XP, there is no need to install the mass storage driver form the CD ROM. Driver installation is only needed for Windows 98) PC Camera Mode Power on your digital camera and connect it to your PC via USB cable provided, press shutter button till you see the screen showed PC camera: .
-
Page 20: Installing The Drive And Photo-Editing Software
You will see it works as a PC cam! If you have a MSN Messenger or Yahoo account, you can have a video conference face to face Online. Installing the driver and photo-editing Software You must install all software before connecting the Digital Video to your computer... - Page 21 Using Arcsoft (Not Available for Mac) By connecting your Digital Video to a computer, the Arcsoft opens. Meanwhile your Digital Video switches to Mass Storage Mode too. You may choose either to transfer the camera data through Arcsoft program or through Mass Storage Mode.
- Page 22 Note: This equipment has been tested and found to comply with the limits for a Class B digital device, pursuant to part 15 of the FCC Rules. These limits are designed to provide reasonable protection against harmful interference in a residential installation. This equipment generates, uses and can radiate radio frequency energy and, if not installed and used in accordance with the instructions, may cause harmful interference to radio communications.
Need help?
Do you have a question about the DV1303 and is the answer not in the manual?
Questions and answers