Table of Contents
Advertisement
Advertisement
Table of Contents
Troubleshooting

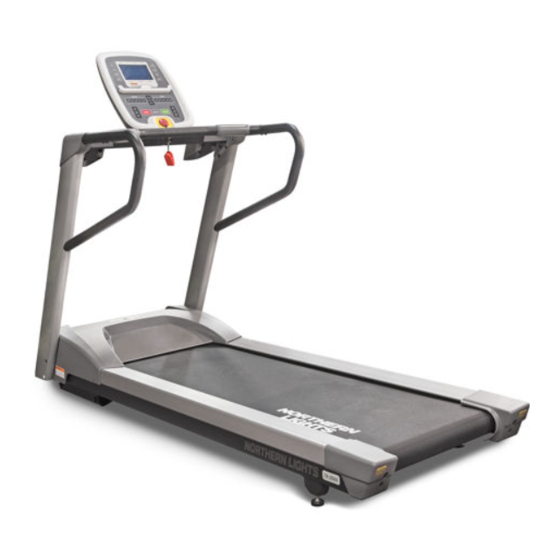
Summary of Contents for Northern Lights TA-258
-
Page 2: Obtaining Service
IMPORTANT Read all assembly instructions and safety precautions; reference all safety guidelines and warning labels before using this product. Please save the instructions afterward for future reference as the instructions are written for your safety and to protect the unit. Lisez toutes les instructions de montage et les consignes de sécurité, se référer à... -
Page 3: Important Safety Instructions (English/French)
Important Safety Instructions (English) CAUTION To reduce the risk of burns, fire of burns, fire, electric shock, or injury to persons, always unplug the unit from its power source before cleaning it or performing any maintenance. Special care must be taken when adjusting running belt. Remove any loose clothing and tie back your hair. - Page 4 Do not attempt to use your treadmill for any purpose other than for the purpose it is intended. Do not carry this treadmill by supply cord or use cord as handle. Route power cable so that they are not walked on, pinched, or damaged by items placed upon or against the, including the equipment itself.
- Page 5 Important Safety Instructions (French) ATTENTION Afin de réduire le risque de brûlures, de brûlures d’incendie, d'incendie, de choc électrique ou de blessure, débranchez toujours l'appareil de sa source d'alimentation avant de le nettoyer ou d'effectuer un entretien. Des précautions ê ê ê ê particulières doivent tre prises lors de l'ajustement du tapis de course.
- Page 6 Ne pas l’utiliser à l'extérieur. Pour débrancher, mettez toutes les commandes à la position d'arrêt, débranchez le cordon d'attache, puis retirez la fiche de la prise. N'essayez pas d'utiliser votre tapis roulant à toute autre fin autre que l'usage auquel il est destiné.
-
Page 7: Table Of Contents
Table of Contents Obtaining Service ………………………………………………………………………………………. Important Safety Instructions (English/French) …………………………….……….…… Table of Contents ……………………………………………………….………….……..…..…..….. Assembly Guide (English / French) …………………..……………..……………………….… 7-15 Parts List ……………………………………………………………………………………………….……………..…..… Exploded View ………………………………………………………………………….……………………………….…. Assembly Steps ………………………………………………………………………………………………………….…. 11-15 Console Display Information …………………………………….………..………….……….…. 16-21 LCD display……………………………………………………………………………………………….…..………..…….. Key Pad …………………………………………………………………………………………………….…..….………….. Build-In Programs …………………………………………………………………………………………………………. -
Page 8: Assembly Guide (English / French)
Assembly Guide (English) The unit is shipped in one box. You will need assistance to assemble this unit, especially when assembling multiple parts or moving the equipment. Ask for help from two or more people to unpack and assemble the treadmill. Do NOT attempt assembly by yourself. WARNING It is very important to follow the assembly instructions correctly and to make sure all parts are firmly tightened. - Page 9 Assembly Guide (French) L'appareil est livré dans une boîte. Vous avez besoin d'aide pour assembler cet appareil, surtout lorsque vous assemblez de pièces multiples ou déplacez l'appareil. Demandez l'aide de deux ou plusieurs personnes pour déballer et assembler le tapis roulant. Ne tentez pas d'assembler par vous-même.
-
Page 10: Parts List
Si vous prévoyez de déplacer l'appareil, obtenez de l'aide et soulevez-le correctement. Saisissez l'extrémité arrière du tapis roulant. Soulevez le tapis roulant et le rouler sur ses roues avant. Ne saisissez pas toute autre partie en plastique en soulevant et en déplaçant l'appareil. Les autres parties en plastique ne sont pas renforcées et elles peuvent se briser. -
Page 11: Exploded View
Exploded View Assembly Guide and Owner’s Manual... -
Page 12: Assembly Steps
Assembly Steps Hardware required: Assembly Step: (a) button head screw Qty: 4 #1: Unwind the wire tie from the base of the right upright (b) washers Qty: 8 and feed it through the large hole. Unwrap the cable (c) socket head screw Qty: 4 and tie it to the wire tie securely. - Page 13 Assembly Steps Hardware required: Assembly Step: (a) button head screw Qty: 6 #5: Connect the cables on main handrail assembly (19-0001) (b) washers Qty: 6 and right upright (19-0029). Remove the wire tie and (d) button head screw Qty: 4 place any excess cable inside the upright.
- Page 14 Assembly Steps Hardware required: Assembly Step: (d) button head screw Qty: 3 #10: Attached the console holding bracket with three button (e) washer Qty: 3 head screws (d) and three washers (e). Fingers tighten. (a) button head screw Qty: 2 #11: Insert 2 button head screws (a) and 2 washers (b) to the (b) washer Qty: 2...
- Page 15 Assembly Steps Back Side of Console Display Assembly Hardware required: Assembly Step: (d) button head screw Qty: 4 #13: Connect the cables to their appropriate receptacles on (e) washer Qty: 4 the back of the console display, and feed any excess cable into the main handrail.
- Page 16 Assembly Steps detail A CAUTION: Before installing or changing ATTENTION: Avant d'installer ou de changer power cords, make sure the power is OFF and les cordons d'alimentation, assurez-vous que unplug the treadmill from the power outlet. l'appareil est hors tension et débranchez le tapis de la prise de courant.
-
Page 17: Console Display Information
Console Display Information PULSE TIME CALORIES DISTANCE ○ MANUAL POWER WALKER WALKER HILL INTERVAL ○ H1~H2 FATBURN TARGET H.R.C. ... -
Page 18: Lcd Display
LCD display ○ A WORKOUT statistics: displayed your heart rate, workout time, calories burned, and distance travelled. ○ B Display Banner: It changes to the program profile when you select a program or press START. A blinking column in the profile indicates your position. ○... -
Page 19: Key Pad
Key Pad PROGRAM Keys: Press the key and the available programs will be displayed cycles. The program profile appears in the center display and the abbreviated name of the program lights along the base of the display. With the desired program displayed press the START key to select the program. DISPLAY Keys: Press DISPLAY Key to switch the Incline profile to either Speed profile or SCAN mold on the LCD display banner. -
Page 20: Build-In Programs
Build-In Programs: Programs code Programs MANUAL WALKER FATBURN WEIGHT LOSS POWER WORKER HILL INTERVAL USER1 USER2 FATBURN HR CARDIO HR Program Profile and Default Value Summary: 1/62/6 Default Value Adjustable Period P0 MANUAL 10 ~ 99 min. or 0 as unlimited Time 0 (unlimited) 40 ~ 350lbs (or 30kg ~ 160kg) - Page 21 1/62/6 Default Value Adjustable Period P2 FATBURN 10 ~ 99 min. or 0 as unlimited Time 20 min. 40 ~ 350lbs (or 30kg ~ 160kg) Weight 155lbs (or 70kg) Speed starts at 1.0MPH (or 1.0KPH) 0.5 ~ 12 MPH (0.5~ 20KPH) Incline starts at 0% ~ 15% Warm Up...
- Page 22 1/62/6 Default Value Adjustable Period P5 HILL INTERVAL 10 ~ 99 min. or 0 as unlimited Time 20 min. 40 ~ 350lbs (or 30kg ~ 160kg) Weight 155lbs (or 70kg) Speed starts at 1.0MPH (or 1.0KPH) 0.5 ~ 12 MPH (0.5~ 20KPH) Incline starts at 0% ~ 15% Warm Up...
-
Page 23: Operate The Treadmill
Operate the Treadmill WARNING To reduce the risk of burns, fire of burns, fire, electric shock, or injury to persons, read the precautions before assembling or using your new product. Before starting any fitness program, see your physician for physical examination and seek advice about your appropriate target heart rate. -
Page 24: Getting Started (French)
AVERTISSEMENT Afin de réduire le risque de brûlures, de brûlures d’incendie, d'incendie, de choc électrique ou de blessures, lisez les précautions avant d'assembler ou d'utiliser votre nouveau produit. Avant de commencer un programme de remise en forme, consultez votre médecin pour un examen physique et obtenez des conseils sur votre fréquence cardiaque cible appropriée. -
Page 25: Using Safety Magnetic Stop Key & Clip
Using Safety Stop Key & Clip Attach the safety clip to part of your clothing before each workout, and attach the red STOP magnetic key to the key dock of the console to start the safety power switch. Make sure the clip is secure and will not become detached during operation. -
Page 26: Workout Options
Workout Options: You have two options to start your workout on this product. When the power is turned on, all the lights on the display will light for a short time. Then the Time, Age, and Distance windows will display Odometer readings for a short time. -
Page 27: Selecting A Heart Rate Program & Beginning Your Heart Rate Program
2. Enter TIME by using any arrow keys (+/-) to adjust your preference workout time between 0 and 10 –99 minutes. Note: If you select zero (0) as the program time limit, it designates an unlimited workout time. Stronger recommend you to incorporate a cool-down period at the end of your workout. 3. - Page 28 ATTENTION Consultez votre médecin pour un examen physique complet, et renseignez-vous pour connaître votre fréquence cardiaque cible correspondant à votre niveau de forme physique. Ne pas utiliser le programme de rythme cardiaque jusqu'à votre médecin vous l’autorise. Votre fréquence cardiaque ne doit jamais dépasser 85% de votre fréquence cardiaque aérobique maximale.
- Page 29 Beginning your Heart Rate program: 1. While the display banner scrolls, press PROGRAM key to select program. Continually press the PROGRAM key to view the list of programs and select the Heart Rate Programs (H1 or H2). Then press ENTER. 2.
-
Page 30: Selecting An User Programs & Starting Workout With User Key
Selecting an USER Programs: Customize two your-own programs at USER programs (U1 or U2). Once you create your-own workout program and enter your personal information, press START to begin workout. To start creating your own exercise session, follow below steps. Create your-own program: 1. -
Page 31: The Importance Of The Warm Up And Cool Down
4. Use the arrow keys (+/-) of SPEED to increase or decrease the speed of running belt between 0.5MPH to 12MPH (0.5KPH ~ 20KPH) by 0.1MPH (or 0.1KPH) increment. Or to use the quick SPEED keys in increments of 2, 4, 6, 8, and 10 for single touch control. 5. -
Page 32: Pausing During A Warm Up/Workout/Cool Down Period
Pausing during a Warm Up/Workout/Cool Down period Press the red STOP key to pause anytime during a warm up, workout, or the cool down period. The pause mold has a 5 minutes time limit. The display posts the time and counts down the minutes that remain. -
Page 33: Cleaning The Treadmill
ATTENTION Afin de réduire le risque de brûlures, de brûlures d’incendie, d'incendie, de choc électrique ou de blessure, débranchez toujours l'appareil de sa source d'alimentation avant de le nettoyer ou d'effectuer un entretien. Des précautions ê ê ê ê particulières doivent tre prises lors de l'ajustement du tapis de course. - Page 34 4) Walk around to the rear of the unit and observe the belt for a few minutes. The belt should remain centered along the running bed. If the belt drifts off center, you must make adjustments. Refer to “Belt tension adjustment” below. 5) To stop the running belt, press STOP.
-
Page 35: Troubleshooting
Troubleshooting Before contacting your dealer for aid, please review the following information. It may save you both time and expense. This list includes common problems that may not be covered under the treadmill warranty. For future reference, write the model, serial number, and date of purchase for your unit in the space provided. -
Page 36: Troubleshooting Heart Rate Issues
Problem Cause Solutions The console does not Make sure if the unit is plugged in Plug the AC power cord of the treadmill light on and the power switch is turn on. into the AC household wall outlet, and set the power switch to "I"... -
Page 37: Troubleshooting Error Codes
Important: You should not attempt to service the treadmill except for maintenance tasks as described in this manual. The treadmill does not contain any user-serviceable parts that require lubrication. Contact Information: Corporate headquarters Northern Lights Fitness Products Inc. PO Box 1748 Tel: 613-938-8196 700 Wallrich Ave, Cornwall...
Need help?
Do you have a question about the TA-258 and is the answer not in the manual?
Questions and answers
Model TA-258A. Need to replace 2 rubber wheels. Where I can have replacement parts?