
Summary of Contents for Switched on Products UK113
- Page 1 Light Switch Timer Installation & Programming Manual Please read before using this timer.
- Page 2 Thanks for Purchasing the New Light Switch Timer – Please read the instructions to learn how to install and use your new timer correctly. Whilst you will not be accessing or touching any wiring before attempting any installation turn off the electricity supply at the mains switch, fuse box or consumer unit during installation of the cradle.
- Page 3 Features Your ‘Light Switch Timer’ allows you to turn your lights on and off according to the programmed settings. This instruction manual will provide guidance on how to install & programme the timer. Installation requires no wiring, and the timer will work on single, double or triple gang switches. Perfect for: •...
- Page 4 Installation Installing the cradle Installing the batteries Control Layout Programming the Timer Setting the Time and day Installing Control Wheels Selecting the correct wheels Programming the Timer Quick Start Random Night Timer Feature Prog 0 Review Programming Clear Programming Daily Operation Setting the mode of operation Removing and storing the timer Removing the cradle...
- Page 5 Quick Start Guide - Installing & setting up your Light switch timer STEP 1 - Installing the Cradle • Turn off the power to the lights at the mains • Using a screw driver, loosen both screws on the switch plate - Eight to Ten full turns of the screw is enough for you to install the cradle.
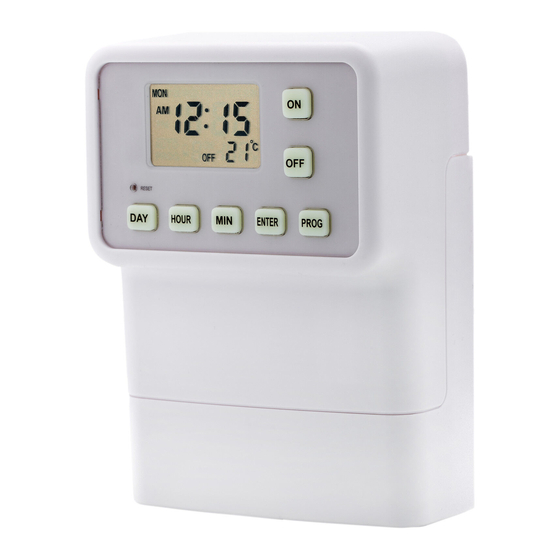
- Page 6 Control Layout The screen displays: 1. Day of the week 2. AM and PM hrs/min 3. Timer mode (auto or manual) 4. Low Battery indicator 5. Temperature Display 6. Reset Hole DAY: Press to set current day and programme day(s) of week HOUR: Press to set hour of current time and for programme operation MIN: Press to set minute(s) of current time and for programme operation ENTER: Press to begin day/time setup and confirm the setups or press to select programme numbers.
- Page 7 STEP 3 – Setting Time & Day Press ENTER to start the day/time setup – The temp display will disappear and the colon will stop flashing 1. Press DAY button until the current day of the week appears at the top of the display 2.
- Page 8 STEP 4 – Installing Control Wheels The Light switch timer operates your lights by rolling the control wheel over the switch to move it from the on position to the off position & vice versa. 1. Control wheels 2. Control wheel Slots 3.
- Page 9 STEP 5 – Insert the unit into the cradle Slide the unit into the cradle. Test by pressing the on / off button to ensure the unit correctly operates your light switch. If the unit fails to operate the lights check you have placed the control wheels in the operate control slot for the switch.
- Page 10 Quick Start Follow these steps to set one programme that will switch the light automatically for each of the seven (7) days of the week. 1. Press PROG button, PROG will start blinking 1 ON -:- - on the LCD, (The days and times you enter will remain as Programme No.
- Page 11 Set up Programme 0: Random Night Timer Feature Programme 0 is a special programme that suggests to would-be intruders that your home is inhabited, by turning ON your lights for 3 min at a randomly selected times between 1:00AM and 5:00AM automatically. The times are random and different each day of the week.
- Page 12 Review Programming To review your programmed times • Press PROG. This will display the first programmes ON time on the screen • Press ENTER repeatedly to cycle through each ON and OFF programme settings in sequence. • Press PROG to return to current day/ time/temperature display. Clear Programming: To clear a previous programme •...
- Page 13 Daily Operation Using your lights You can use the On OFF buttons to control the lights when the unit is in place as required. Alternatively you can remove the unit and use the switch as normal with the cradle in position. Manual an Automatic mode The unit can run in, Automatic (runs programmed times) or in Manual where the unit will not run any of the pre-programmed times.
- Page 14 Trouble shooting / FAQ LOW Battery Warning indicator flashes Replace the batteries when the “low-battery” indicator begins to flash or when the LCD dims. WARNING: Always dispose of old batteries properly. Resetting the Timer To reset the timer and erase all preset programmes, use a pointed object, such as a straightened paper clip, to gently press the rest button.
- Page 15 Usage – Important To enjoy long-term use of your Switched On Products: Light Switch Timer: • Keep the timer dry and away from dust and dirt. • The timer should only be used Indoors • To clean wipe the timer with a damp cloth only.
- Page 16 Programming Examples: The following demonstrate how to set your timer to operate multiple programmes at a variety of times on various days. Example 1: Every day Programming Monday-Sunday: ON at 5:00 PM; OFF at 10:00 PM Programme Settings: ON 1 MON TUE WED THU FRI SAT SUN 5: 00 PM OFF 1...
- Page 17 Mon Tue Wed Thu Fri Sat Sun...
- Page 18 Guarantee Your Switched On Products Light Switch Timer (model UK113) is guaranteed for one year from the date of purchase. Please retain your till receipt as proof of purchase as this will be required to process any returns. This guarantee does not apply to defects resulting from action of the user such as misuse, improper installation, operation outside of specification, improper maintenance, repair, or unauthorized modification.
- Page 19 © 2013 Switched on Products Limited SwitchedOnProducts.com Protected by international patents. Designed in the UK...
Need help?
Do you have a question about the UK113 and is the answer not in the manual?
Questions and answers