Table of Contents
Advertisement
Advertisement
Table of Contents

Related Manuals for Mitsubishi MOTORS MZ360500EX

Summary of Contents for Mitsubishi MOTORS MZ360500EX
- Page 1 Display Audio with Smartphone link OWNER’S MANUAL MZ360500EX...
- Page 2 Thank you for purchasing this Display Audio with Smartphone link This user manual explains how to use the Display Audio with Smartphone link. Before using the product, read the contents of this user manual carefully. Please use this product safely.
- Page 3 General Read the following safety cautions for Notations used in this User Manual your safety. WARNING Before using the product, read the contents of Failure to observe the safety instructions within this this user manual carefully. Please use this product category could result in serious injury or death.
-
Page 4: Table Of Contents
Table of Contents General Warnings and Cautions Trademark Key Product Features Component Names and Functions Starting the System for the First Time Rear camera display Radio Mode Media Mode Discs - Disc CD - Disc DVD - Disc VCD Bluetooth Audio - USB Audio - USB Image iPod... - Page 5 MEMO...
-
Page 6: General
General Warnings and Cautions Trademark Key Product Features Component Names and Functions Starting the System for the First Time Rear camera display... - Page 7 General Warnings and Cautions WARNING Do not touch the antenna during thunder or lightening Do not stare at the screen while driving. Staring at the as such acts may lead to lightning induced electric screen for prolonged periods of time could lead to traffic shock.
- Page 8 Warnings and Cautions CAUTION Operating the device while driving could lead to accidents Turn on the car ignition before using this device. Do due to a lack of attention to external surroundings. not operate the this system for long periods of time First park the vehicle before operating the device.
-
Page 9: Trademark
General Trademark iPod® This device complies with Part 15 of the FCC Rules. iPod® is a registered trademark of Apple Inc. Operation is subject to the following two conditions: (1) this device may not cause harmful interference, Bluetooth® and (2) this device must accept any interference The Bluetooth®... -
Page 10: Key Product Features
Key Product Features Key Product Features Wide TFT-LCD - Provides high quality video through a Wide TFT-LCD using an LED Back light Display Display - Provides improved touch sensitivity through capacitance touch panel Android™ 4.4, Provides stable system performance using the latest Android Platform KitKat®... -
Page 11: Component Names And Functions
General Component Names and Functions Head Unit Reset ∧SEEK/TRACK∨ When key is pressed quickly Resets the system • Radio mode : plays previous/next frequency • MEDIA (Disc/USB/iPod/BT music) modes : DISC Insert Slot changes the track, file or title (except USB Image) DISC insert/eject slot When key is pressed and held •... -
Page 12: Starting The System For The First Time
Starting the System for the First Time Turning the System On/Off System Reset Press the engine start button or set the key to IGN or ACC. The system needs to be reset in cases of product insta- Once the system is turned on, the booting process will start. bility or malfunction. - Page 13 General Starting the System for the First Time Restrictions on Features for Safety Measures If you try to use features such as video mode that may distract you when you are driving, the system will turn the screen off or the function will be disabled and a warning message will be displayed.
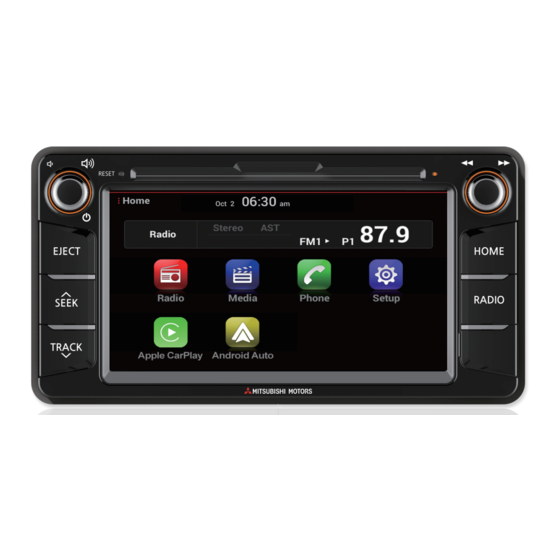
- Page 14 Starting the System for the First Time Home Screen Phone Media Widget Moves to the phone screen • Shows brief information on the media currently play- Touch the area to move to the currently playing mode. Setup • Moves to the Setup screen Radio Apple CarPlay Operates FM/AM mode and displays the radio screen...
- Page 15 General Starting the System for the First Time On-Screen Touch Controls Press and Hold Learn how to touch the screen to operate the system. Pressing the [l l] buttons will fast forward/rewind ◀◀ ▶ ▶ or search the music or video. Select Tap lightly on a menu or item to select it.
-
Page 16: Rear Camera Display
Rear camera display About Rear Detection Camera • This system has been equipped with a rear camera for user safety by allowing a wider rear range of vision. • The rear camera will operate automatically when the ignition KEY is turned ON and the transmission lever is set to R. - Page 17 MEMO...
-
Page 18: Radio Mode Media Mode Discs
Radio Mode Media Mode Discs Disc CD - Disc DVD - Disc VCD - Bluetooth Audio USB Audio - USB Image - iPod... - Page 19 Radio Mode Radio Mode Screen Programme Service Name Mode Frequency Displays currently operating mode Displays the current frequency and preset number Preset Radio Band Tab Shows saved presets for user selection • Displays currently operating mode • If you select the desired tab, the selected Radio mode will operate Autostore Saves frequencies with superior reception to Preset...
- Page 20 Radio Mode Starting Mode Using TUNE Press the [RADIO] key ▶ Select the desired tab. Turn the TUNE knob left/right to select the frequency. Pressing the [RADIO] key on the head unit will change the mode in order of FM1 → FM2 → AM. ice Name •...
- Page 21 Radio Mode Saving Radio Frequency Saving Manually After selecting frequency ▶ Press the [Preset] button ▶ Press and hold the preset list. A ‘beep’ will sound to indicate that the frequency was saved to the selected preset button. Saving Automatically Press the [Autostore] button to automatically save receiv- able frequencies to Preset buttons.
- Page 22 Media Mode Starting Mode Press the [HOME] key ▶ Press the [Media] button ▶ Select the desired mode.
- Page 23 Discs About Discs Precautions for Handling Discs After using a disc, put the disc back in its original case Do not use water to clean the device. Exposure to water to prevent disc scratches. could lead to product malfunction. Do not use abnormally shaped discs (8cm, heart- Do not introduce foreign substances into the disc shaped, octagon-shaped) as such discs could lead insert/eject slot.
- Page 24 Discs Supported Disc Format Ordinary Disc Compatibility • This device has been designed/manufactured to be com- Disc Type patible with software bearing the following logo marks. Disc Type Disc Format Device Support 5inch (12cm) O (Read Only) CD-R O (Read Only) CD-RW O (Read Only) Multisession-CD...
- Page 25 Discs Dual-Layer DVD Video Discs Compressed Audio Compatibility • When playing a dual-layer disc, video/sound lags may • Physical formats of CD: Model 1, Model 2 XA format 1. occur for up to several seconds. Such phenomena are not • This device supports audio file compressed through unusual when using a dual-layer disc and do not signal a MPEG-1 audio stream layer 3 (MP3) using 8kbps ~ 320kbps...
- Page 26 Discs Before playing a MP3 Disc Recognition occurs through the same folder structure used within the disc. Supported MP3 File Specification • Acceptable standard: MPEG1 AUDIO LAYER 33 • Acceptable sampling frequency: 8, 11.025, 12, 16, 2.05, 24, 32, 44.1, 48 (kHz) •...
- Page 27 Discs About DVD Titles Icon Description Understanding of the DVD Titles Shows the supported region codes. • Contents of DVD Titles The video and sound recorded on a DVD are divided into titles and can be recognized by their title numbers. Each title is sub-divided into smaller units called chapters and Up to 32 subtitles can be recorded within each chapter can be recognized by the chapter number.
-
Page 28: Disc Cd
Disc CD Disc CD Screen Play/Pause Mode Plays/pauses the current track Displays currently operating mode Next Track Player tab This is the main screen in which Disc CD operates • When button is pressed quickly - Moves to the next track List tab •... - Page 29 Disc CD Starting Mode Selecting Tracks While playing ▶ Press the [∧SEEK/TRACK∨] key or press Press the [HOME] key ▶ Press the [Media] button ▶ Press the [ l◀ ◀, ▶ ▶ l ] button to select the previous/next track. the [Disc CD] button.
- Page 30 Disc CD Searching CD Tracks Repeat Press [ Searching from the Player Screen Turn the TUNE knob ▶ Search tracks ▶ Once the desired track name is displayed, press the TUNE knob. Each time the button is pressed, the option is changed from Repeat all ( ) ▶...
-
Page 31: Disc Dvd
Disc DVD Disc DVD Screen Play/Pause Mode Plays/pauses the current chapter Displays currently operating mode Next Chapter Player tab This is the main screen in which Disc DVD operates • When button is pressed quickly - Moves to the next chapter List tab •... - Page 32 Disc DVD Starting Mode Selecting Chapters Press the [HOME] key ▶ Press the [Media] button ▶ Press While playing ▶ Press the [∧ SEEK , TRACK ∨] key or the [Disc DVD] button. press the [ l◀ ◀, ▶ ▶ l ] button to select the previous/next chapter.
- Page 33 Disc DVD Searching Titles/Chapters Title/DVD Menu Press the [List] tab to search DVD titles and chapters. Press the [TMenu] or [Menu] button. Push the controller up/down/left/right directions to select the desired menu and press the [OK] button. Searching Titles Press the [Title] button ▶ Turn the TUNE knob ▶ Search titles ▶...
- Page 34 Disc DVD Subtitle Language Press the [Next] button ▶ Press the [Subtitle ] button. Each time the button is pressed, the subtitle language is changed. Angle Press the [Next] button ▶ Press the [Angle] button. Each time the button is pressed, the angle is changed.
-
Page 35: Disc Vcd
Disc VCD Disc VCD Screen Play/Pause Mode Plays/pauses the current track Displays currently operating mode Next Track Player tab This is the main screen in which Disc VCD operates • When button is pressed quickly - Moves to the next track •... - Page 36 Disc VCD Starting Mode Selecting VCD Tracks Press the [HOME] key ▶ Press the [Media] button ▶ Press While playing ▶ Press the [∧ SEEK , TRACK ∨] key or the [Disc VCD] button. press the [ l◀ ◀, ▶ ▶ l ] button to select the previous/next track.
- Page 37 Disc VCD Searching VCD Tracks Press the [PBC] button to display PBC screen. Press the [List] tab ▶ Turn the TUNE knob ▶ Search tracks ▶ Once the desired track number is displayed, press TUNE knob. Input the page number you want to play ▶ Press the [Select] button.
-
Page 38: Bluetooth Audio
Bluetooth Audio Bluetooth Audio Screen Phone Name Next file Mode • When button is pressed quickly Displays currently operating mode - Moves to the next file Player tab • When button is pressed and held - Search the next file This is the main screen in which Bluetooth Audio oper- ates Connections... - Page 39 Bluetooth Audio Using Bluetooth® Audio Mode Selecting Bluetooth Audio files • Bluetooth® Audio Mode can be used only when a Blue- While playing ▶ Press the [∧ SEEK , TRACK ∨] key or tooth® phone has been connected. press the [ l◀ ◀, ▶ ▶ l ] button to select the previous/next file. •...
- Page 40 Bluetooth Audio Setting Connections Press the [Connections] button to add, connect/disconnect, delete and delete all devices. Phone Name Phone Name For details on setting connection, refer to “Bluetooth Con- nection” page 57.
-
Page 41: Usb
About USB CAUTION Connect the USB device after turning on the engine. Please wait until the device fully recognizes the USB The USB device may become damaged if it is already devices. The device supports only USB devices used connected when the ignition is turned on. to play music/image files. - Page 42 Image Specification (USB) Product Plug-in type connector Description ▶ Name Image For- JPG, BMP, GIF, PNG Product Name Manufacturer Image 4,000 x 3,000 max/5MBytes Resolution XTICK BMK Technology • Files with unsupported specifications SKY-DRV Skydigital • Format modified files (Files with modified file formats) Unsupport- TRANSCEND JetFlash...
-
Page 43: Usb Audio
USB Audio USB Audio Screen Music1.mp3 Play/Pause Mode Plays/pauses the current file Displays currently operating mode Next file Player tab This is the main screen in which USB Audio operates • When button is pressed quickly - Moves to the next file •... - Page 44 USB Audio Starting Mode Selecting USB Audio files Press the [HOME] key ▶ Press the [Media] button ▶ Press While playing ▶ Press the [∧ SEEK , TRACK ∨] key or the [USB Audio] button. press the [ l◀ ◀, ▶ ▶ l ] button to select the previous/next file.
- Page 45 USB Audio Searching USB Audio files Repeat Press [ Searching from the Player Screen Turn the TUNE knob ▶ Search files ▶ Once the desired file name is displayed, press the TUNE knob. Each time the button is pressed, the option is changed from Repeat all ( ) ▶...
-
Page 46: Usb Image
USB Image USB Image Screen Next Image Mode Shows next image Displays currently operating mode Slideshow Player tab This is the main screen in which USB Image operates View images as slideshow in 5, 10, 20, 30 second intervals List tab Rotate Moves to the list screen Rotate image in clockwise direction... - Page 47 USB Image Starting Mode Searching from the USB Image List Screen Press the [List] tab ▶ Flick the lists or press [▲, ▼] but- Press the [HOME] key ▶ Press the [Media] button ▶ Press tons ▶ Search files ▶ Once the desired file is displayed, the [USB Image] button.
- Page 48 USB Image Rotate Press the [Rotate] button. Each time the Rotate button is pressed, the image is rotated from 0˚ → 90˚ → 180˚ → 270˚ degrees. Information The image will be restored to its original position when returning to it after viewing a different image. Adjusting Image Size Press [+, -].
-
Page 49: Ipod
iPod Using iPod Devices CAUTION iPod is a registered trademark of Apple Inc. To listen to the iPod sound, re-connect the USB cable or exit then re-enter iPod mode. iPod mode will not operate if the connected iPod can- not be recognized due to operation of unsupported In order to use the iPod while operating the keys, you versions that do not support related protocols, iPod must use a dedicated iPod cable. - Page 50 iPod Supported iPod devices Device / 6.5G Generation iPod clas- Not re- Not Supported (iPod with (iPod (iPod leased video) Classic) Classic) Not re- iPod nano leased iPod mini Not Supported iPod shuf- Not Supported iPod Not Supported touch △ : Unable to charge, not verified, normal operation not guaranteed iPad △...
- Page 51 iPod iPod Screen No Artist Info No Album Info No Song Info Play/Pause Mode Plays/pauses the current file Displays currently operating mode Next file Player tab This is the main screen in which iPod Music operates • When button is pressed quickly - Moves to the next file •...
- Page 52 iPod Starting Mode Playing iPod Music Press the [HOME] key ▶ Press the [Media] button ▶ Press the [iPod] button. No Artist Info No Album Info No Song Info If the iPod is not connected, then the iPod icon will be disa- bled.
- Page 53 iPod Selecting iPod Music files Searching iPod Music files Press the [List] tab ▶ Turn the TUNE knob ▶ Search files While playing ▶ Press the [∧ SEEK , TRACK ∨] key or ▶ Once the desired file is displayed, press the TUNE knob. press the [ l◀...
-
Page 54: Using Bluetooth
Using Bluetooth Before Using Bluetooth® Hands-free Bluetooth Connection Bluetooth Phone... - Page 55 Using Bluetooth Before Using Bluetooth® Hands-free What is Bluetooth ® Wireless Technol- Bluetooth® connection may be intermittently discon- ogy? nected on some cellular phones. Follow these steps to try again. Bluetooth® refers to a short-distance wireless network- 1. Turn the Bluetooth® function within the mobile phone ing technology which uses a 2.45GHz frequency to connect OFF/ON and try again.
- Page 56 Bluetooth Connection Pairing and Connecting a Phone When a phone is already paired Press the [HOME] key ▶ Press the [Phone] button ▶ Press Before you can use the Bluetooth feature, you must first the [Connection Settings] button. pair/connect your mobile phone to your car. Up to 5 Bluetooth devices can be paired.
- Page 57 Using Bluetooth Bluetooth Connection When your phone is connected Disconnecting a Device Press the [HOME] key ▶ Press the [Phone] button to Press the [HOME] key ▶ Press the [Phone] button ▶ Press display the following screen. the [Connection Settings] button ▶ Select the Phone name you want to disconnect ▶...
- Page 58 Bluetooth Phone Bluetooth Phone Screen Phone Name Send Mode Calls the number has been entered Displays currently operating mode Connection Settings Dial tab This is the main screen in which Bluetooth Phone Displays the Bluetooth® Connections screen operates BT Settings History tab Displays the Bluetooth Setting screen Moves to the History screen...
- Page 59 Using Bluetooth Bluetooth Phone During a Call Contact Name 0000000000 Dial Pad Mode Displays the dial pad Displays currently operating mode Private Phone tab This is the main screen during a call During a handsfree call, this function is used to switch the call to the mobile phone Info Display Window Upon switching the call to Private, the vehicle mic and...
- Page 60 Bluetooth Phone Making a Call Making a Call from Contacts Within the Phone screen, press the [Contacts] tab ▶ Select Calling by Dialing a Number the desired contact ▶ Press the [Call] button. Enter number on the Dial Pad ▶ Press [ Information Information •...
- Page 61 Using Bluetooth Bluetooth Phone Answering a Call Operating features during a Call Incoming call notice ▶ Press the [Accept] button. Switching Call to Bluetooth® Phone During Handsfree call ▶ Press the [Private] button. When a call is received on the connected phone, the bell will sound and the phone number of the other party will be displayed on the incoming call pop-up, as shown here.
- Page 62 Bluetooth Phone Ending a Call Adjusting the Ring/Call Volume While on a call ▶ Press the [END] button. While on a call ▶ Use the VOL knob on the head unit or the steering wheel to adjust the ring/call volume. Contact Name Contact Name 000000000...
- Page 63 Using Bluetooth Bluetooth Phone Contacts Downloading Mobile Phone Contacts Press the [Download] button in the Contacts screen. Press the [HOME] key ▶ Press the [Phone] button ▶ Press the [Contacts] tab. Contact Name 000000000 Contact Name 000000000 Contact Name 000000000 Contact Name 000000000 Contact Name...
- Page 64 Bluetooth Phone Call History Checking Mobile Contacts Details Press [ ] of the desired phone number from the mo- Entering Call History Screen bile contacts list to check details about the contact Press the [History] tab in the Phone screen. Contact Name 00000000000 Contact Name...
- Page 65 Using Bluetooth Bluetooth Phone Bluetooth® Settings Download Contacts Press the [Contacts] tab ▶ Select the desired option. Press the [HOME] key ▶ Press the [Phone] button ▶ Press the [Bluetooth Settings] button. Contact Name When connecting a Bluetooth® device, it is possible to automatically download contacts.
-
Page 66: Connectivity
Connectivity Apple CarPlay Android Auto... - Page 67 Connectivity Apple CarPlay About Apple CarPlay Information Apple CarPlay puts iPhone apps—the ones you want • Before using Apple CarPlay, make sure that your iOS to use while driving—on your car’s built-in display. With phone has a data plan. Most features of Apple CarPlay Apple CarPlay, you can get turn-by-turn directions, require data usage so it’s important that you’re famil- make phone calls, exchange text messages, listen to...
- Page 68 Apple CarPlay Speak to Siri Press and hold the voice control button on the steering wheel, or touch and hold the Home button on the Apple CarPlay Home screen, until Siri beeps. Then make your request. Open an app Tap the app on the touchscreen. Return to the Apple CarPlay Home screen Tap the Home button on the touchscreen.
- Page 69 Connectivity Android Auto What is Android Auto Android Auto extends the Android platform into the car. • When users connect their handheld devices running Android You can securely manipulate your smart phone while • 5.0 or higher to a compatible vehicle, Android Auto user driving by using this feature.
- Page 70 Android Auto Talk to Google Information 1. Tap the voice command [ ] button on the display. • Before connecting your mobile phone, check whether 2. Say commands you want to use. Then you can do things Android Auto is set to be used in Setup > Connec- like send or reply to a text, search for a location, make tivity Settings.
- Page 71 MEMO...
- Page 72 Setup Using Setup...
- Page 73 Setup Using Setup Setup Screen System info Mode Checks system software version and receives updates Displays currently operating mode Sound Connectivity Sets sound related settings Sets Apple CarPlay related settings Display Screen OFF Sets display related settings Turn device display on/off (The device power will not be turned off) Clock Home...
- Page 74 Using Setup Starting Mode EQ Settings Press the [Sound] button ▶ Press the [EQ] tab ▶ Use the Press the [HOME] key ▶ Press the [Setup] button. [◀, ▶] button to adjust EQ settings. Within SETUP, you can check and change the settings Press the [Default] button to initialize the settings.
- Page 75 Setup Using Setup Display Ratio Press the [Display] button ▶ Press the [Ratio] tab ▶ Select Press the [HOME] key ▶ Press the [Setup] button ▶ Press the menu to set Screen ratio. the [Display] button. Adjusting Brightness Press the [Display] button ▶ Press the [Adjust] tab ▶ Use the [◀, ▶] button to adjust the Brightness.
- Page 76 Using Setup Clock View Press the [Clock] button ▶ Press the [Clock Setup] button Press the [HOME] key ▶ Press the [Setup] button ▶ Press ▶Press the [View] tab ▶ Select the clock type. the [Clock] button. Standby Screen View Press the [Clock] button ▶...
-
Page 77: Setup Using Setup
Setup Using Setup Time Zone System Info Press the [Clock] button ▶ Press the [Clock Setup] button Press the [HOME] key ▶ Press the [Setup] button ▶ ▶ Press the [Time Zone] tab ▶ Set the desired time zone. Press the [System info] button. SW Info Press the [System info] button ▶... - Page 78 Using Setup Update Screen Off Press the [HOME] key ▶ Press the [Setup] button ▶ Press the [System info] button ▶ Press the [Update] tab Press the [Screen OFF] button to turn off the display. ▶ Press the [OK] button. Touch anywhere on the touch screen to turn the display Once updating is complete, the system will automatically back on.
-
Page 79: Q&A
Q&A Question Answer 1. USB STORAGE may be incompatible with the device. 2. Files within the USB STORAGE may be damaged. Q : The USB does not operate even 3. Check to see whether there are any foreign substances on the multi- after connecting the USB Storage. - Page 80 MEMO...
- Page 81 MEMO...
- Page 82 1ET0DK0338B...
Need help?
Do you have a question about the MZ360500EX and is the answer not in the manual?
Questions and answers