Table of Contents
Advertisement
Advertisement
Table of Contents

Summary of Contents for American Printing House PageBlaster 1-08075-00
- Page 1 PageBlaster User Guide Copyright © 2020...
-
Page 3: Table Of Contents
Table of Contents Introduction to the Embosser Safety Information Getting Started Unpacking the Embosser In the box Physical Description Top Face Under the Lid Control Panel Embosser Status Backlight Speech Feedback Left Side Right Side Back Side How to Set up PageBlaster Before Use Installing the Printer Driver Installing the Windows Driver Mac OS X... - Page 4 Updating Using an Internet Connection Updating Using a USB Flash Drive Embossing in Braille Using an External Braille Translator Embossing with BrailleBlaster Translator Embossing with Direct-Braille-Braille Translator Embossing Tactile Graphics Using Firebird App Loading and Usage of Braille Paper Supported Paper Sizes Loading Paper into the Embosser Utilizing the Buttons and Menu Embosser Button Overview...
-
Page 5: Introduction To The Embosser
Introduction to the Embosser The PageBlaster embosser provides double-sided embossing for braille text with capabilities to include single-sided tactile graphics. PageBlaster is compatible with third party products such as BrailleBlaster™ and Duxbury version 12.5 or above, Braille 2000 version 2.275 or above, braille translation software. You can use it to print braille from braille note takers such as the Braille Note Touch and Braille Note Touch Plus. -
Page 6: Getting Started
Getting Started Unpacking the Embosser Please unpack the embosser gently, and check to make sure all listed items are in the box. IMPORTANT: Save the box, packing material, and Transport Lock. If any damage occurred during shipping, the packaging is required to settle the insurance claim. The packaging materials are also required to ship the embosser for service. -
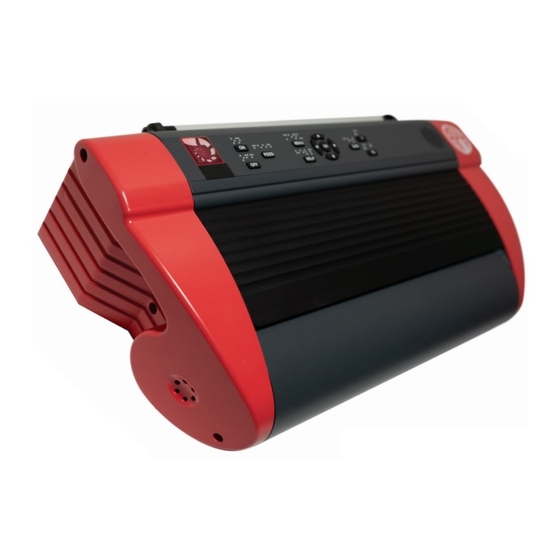
Page 7: Physical Description
Physical Description The embosser has a roughly rectangular shape with the front side curved downwards. This curved edge should be facing you. 1. Control panel 9. Left tractor 16.Wi-Fi and Bluetooth 2. Lid 10.Paper rollers antenna 3. Speaker 11.Hole for 17.USB 2.0 Type B Transport Lock 4. -
Page 8: Top Face
Top Face The top face is divided into two sections: the front section and the back section. On the front section is a metallic lid with eight horizontal grooves. This lid covers the embosser's paper feeding mechanism and opens by pulling the front upwards and raising it towards the back of the embosser. -
Page 9: Control Panel
Control Panel The Control panel is located above the lid on the top face and consists of a wide rectangular strip containing buttons with braille identification above them, an LED-backlit embosser status area, and a speaker. From left to right: •... -
Page 10: Embosser Status Backlight
Embosser Status Backlight There are four rows of indicators in the Embosser Status backlight area. The indicators light up when a connection is established or a message is being relayed. Starting with the top row, from left to right: Row 1: •... -
Page 11: Speech Feedback
Row 3: • Paper Move – Indicates paper is moving through embosser • Fan – Lights up when the fan is on • Paper Jam – Lights up when there is a paper jam Row 4: • Error – Lights up when there is an error; press Help button for more info •... -
Page 12: Right Side
Further back is a deeper and larger hollow area used for holding and carrying your embosser. Right Side On the right side and close to the curved front is a large concave circle of 31 holes. This is the ventilation outlet. Make sure this area is never covered. - Page 13 With the back side positioned toward you, to the right of the rollers is a metal cover with a lattice pattern. This is the ventilation intake. Make sure this area is never covered. Slightly below the rollers and directly to the left of the ventilation intake is the Transport Lock.
-
Page 14: How To Set Up Pageblaster Before Use
How to Set up PageBlaster Before Use the following steps to begin setting up your PageBlaster embosser: 1. Connect the multi-pronged end of the power adapter cord into a power outlet, and the other end into the back of your embosser. The Power port is circular and is located in the back of your embosser, in the center bottom. -
Page 15: Installing The Printer Driver
You now have the choice to connect your embosser directly to a computer using the included USB cord, or connect it using Wi-Fi, an Ethernet cable, or Bluetooth wireless technology. ® NOTE: Drivers must be installed before establishing any connection. Be sure to install drivers BEFORE connecting the USB cord as this ensures the embosser is properly recognized. -
Page 16: Mac Os X
NOTE: For Windows 7 and later versions, the plug and play Found new hardware wizard completes the USB installation. Mac OS X To install PageBlaster printer driver for Mac OS X 10.8 and newer: 1. Double-click on the printer driver file. 2. -
Page 17: Making Network Connections
Making Network Connections Connecting to a Wired Network To connect to a wired network, you need the IP address for the embosser. Print the IP address by pressing the Help key followed by the 1 key on the embosser Control panel. Alternatively, you can do the following: 1. -
Page 18: Connecting To A Wi-Fi Network
Connecting to a Wi-Fi Network Before connecting to a Wi-Fi network, you must edit the Wi- Fi Setup file. To do this, you need to download a text/source code editor application to change the Network Name and Password. If you do not already have one, two installers for the free source code editor Notepad++ are included in the Additional Software folder on your PageBlaster flash drive. -
Page 19: Connecting Via Wireless Protected Setup (Wps)
Connecting via Wireless Protected Setup (WPS) To connect using WPS, do the following: 1. Press Menu on the embosser Control panel and select Communication. 2. Select Wi-Fi Network. 3. Turn On Wi-Fi network. 4. Enable WPS by selecting Enable Wireless protected setup. 5. -
Page 20: Pairing To Your Embosser Using Bluetooth
3. On a device connected to your network (computer, tablet, smartphone, etc.), type the embosser’s IP address in the web browser address bar. 4. Press Enter. BrailleApp opens in your browser and is ready for use. Pairing to Your Embosser Using Bluetooth To pair your embosser with a device using Bluetooth: With the Control Panel:... -
Page 21: Updating The Embosser Firmware
With BrailleApp: 1. Open a Web browser on your device. 2. Access BrailleApp by typing your embosser’s IP address into your browser and pressing Enter. To obtain your embosser’s IP address, press the Help button quickly followed by the 10 button on the embosser Control panel. -
Page 22: Updating Using An Internet Connection
Updating Using an Internet Connection When connected to an active network port or Wi-Fi connection with Internet access, PageBlaster automatically checks for an update. On the control panel, UPDATE is lit when a new update is available. Start update by selecting the following options in this order: 1. -
Page 23: Embossing In Braille
Embossing in Braille For Braille mathematics, music, tactile graphics, complex documents, and proofreading, we recommend using a separate braille translator. Using an External Braille Translator Most independent braille translators have good functionality with the PageBlaster embosser. BrailleBlaster is a free translation software developed by APH to help transcribers provide braille textbooks on the first day of class. - Page 24 • Word XML (*.docx) files • PDF (*.pdf) files • Text (*.txt) files • Page numbering • Volume handling (for braille books) • APH embossers BrailleBlaster relies on Liblouis, a well-known open-source braille translator, for translating text and mathematics to braille.
-
Page 25: Embossing With Direct-Braille-Braille Translator
Embossing with Direct-Braille-Braille Translator Direct-Braille supports the following: • Braille in grade 0 (computer), 1 (literary) and 2 (contracted) • Word (*.doc) files • Word XML (*.docx) files • PDF (*.pdf) files • Text (*.txt) files • Page numbering • Volume handling (for braille books) •... -
Page 26: Embossing Tactile Graphics Using Firebird App
To emboss using Direct-Braille for Mac: 1. Open the document in your preferred editor/viewer program (e.g., Preview OS X). 2. Go to file and select Print. 3. Select PageBlaster. 4. Click Ok to complete setup. The file transmits to the PageBlaster embosser. A tone and a flashing IdB icon on the Control panel indicates an ongoing text-to-braille translation process. -
Page 27: Loading And Usage Of Braille Paper
To print a graphic: 1. Open an image. 2. Click the Edit button, to open the Braille Edit Display window, on the top left corner of the Page Image section, the right section of the program window. 3. Click to open the File drop down menu. 4. -
Page 28: Loading Paper Into The Embosser
Loading Paper into the Embosser 4. Optical paper movement sensor 5. Optical paper edge sensor 6. Right tractor 7. Speaker 8. Tractor release lever 9. Left tractor To load paper into the embosser: 1. Open the lid and raise the right and left tractor doors to an Open position. -
Page 29: Utilizing The Buttons And Menu
Utilizing the Buttons and Menu Embosser Button Overview • On: Blinking On–indicates ongoing start up process; Solid Light On–the embosser is on. • Feed: Used for feeding paper through the embosser • Menu: Opens the Menu mode; Solid Light Menu–Menu is open. -
Page 30: Button Function Tables
Button Function Tables Table 1: General-Use Buttons Button Function Power On Online mode Cancel Menu function without saving After Offline (Off button), continues printing Power Off, hold for 5 seconds Stops embossing Feed Feeds to a new page Ejects a page Help Voices help information After Off, voices remaining number of copies... - Page 31 Table 2: Menu Buttons Button Function Menu Opens/closes Menu mode Up Arrow Moves to previous Menu item Down Arrow Moves to next Menu item Left Arrow Moves to a higher Menu level Moves to previous step in a wizard Right Arrow Moves to lower Menu level Moves to next step in a wizard Select, confirm, save, open, close, and start...
- Page 32 Table 4: Button Commands Button Combination Function Off then Feed Stops embossing Feed then Feed Places paper in emboss position Feed then Off Reverses paper out of the embosser Help then Help Prints help information in letter graphics and braille Help then CHS Toggle temporarily between English and other local speech...
-
Page 33: Menu Function Tables
Button Combination Function Help then Down Arrow Starts Insert Transport Locking wizard–follow wizard instructions; when completed embosser restarts Menu Function Tables Table 5: Print Menu Directory Submenu Function Info Print previous Print complete Number of copies document document Print previous Print part of From page to page document... - Page 34 Submenu Function Info Print test document Print network Information about information your network in graphic letters and braille Print service Print, internal Lists technical document parameter value information about list your embosser in graphic letters and braille Table 6: Braille Layout Menu Directory Submenu Function Info...
- Page 35 Submenu Function Info User-defined Wizard to Customize your own paper. paper create user- Includes paper size unit, paper defined width, paper length, paper User-defined Delete user- Customize your own paper. paper defined Includes paper size unit, paper paper width, paper length, Add layout Add layout The new layout gets the lowest...
- Page 36 Submenu Function Info Restore Restore layouts layouts from USB flash drive Restore Restore layouts layouts from internal system memory Restore Restore layouts distributor default layouts Restore Restore layouts factory default layouts Select active Select the Layouts 1-9 may be defined layouts active layout...
- Page 37 Table 7: Communication Menu Directory Submenu Function Info Press Ok to safely remove USB Flash Drive Manage Wi-Fi Set Wi-Fi power Sets Wi-Fi on or off network Manage Wi-Fi Current Wi-Fi Voices the currently network network connected Wi-Fi network, and gives the option to disconnect or forget Manage Wi-Fi List known Wi-...
- Page 38 Submenu Function Info Manage Make printer Forget known Bluetooth Bluetooth discoverable devices Manage Forget device Sets Bluetooth on or off Bluetooth Speech Select Volume low/ medium/ high Feedback Speech Select language From list Feedback Table 8: User Service Menu Directory Submenu Function Info...
- Page 39 Submenu Function Info Paper out settings Paper out offset Paper remains in print head Paper out settings Wizard to adjust paper cut- Hood with off position knife Sensor control To be adjusted by factory authorized service personnel only Braille adjustment To be adjusted by factory authorized service personnel only...
-
Page 40: Utilizing Layout Settings
Utilizing Layout Settings PageBlaster embosser is equipped with 1-9 user-defined adjustable layouts. The "active" layout is always the one currently in use. All changes to the layout settings happen in the active layout. Layout settings include paper size, braille page setup, pagination parameters, and Direct-Braille text-to-braille language and grade (literary or contracted braille). -
Page 41: Layout Wizards Tables
5. Press Ok to save. The speech feedback supplies further instructions. 6. Press Ok to start the automatic wizard process. When completed, you hear "Wizard completed." 7. Press Ok to save. Layout Wizards Tables Table 9: Edit Active Layout, Standard Wizard Example Submenu Function Info... - Page 42 Submenu Function Info Top margin Select from list When space for margins are available Braille page Select from list When top and/or bottom number with position on margins are available the page Characters Select from list per line Binding Select from list When space for a binding margin margin is available.
- Page 43 Table 10: Edit Active Layout, Advanced Wizard Example Submenu Function Info Paper size Select from list User-defined Changed paper paper size may be sizes sets all defined margins to zero Print type Select from list Double/single, Changed print type Z-folded double/ sets all margins to single, zero...
- Page 44 Submenu Function Info Braille page Select from list number with position on the page Characters per line Select from list Binding margin Select from list When space for binding margin is available. In booklet format, the minimum binding margin is 1 character.
-
Page 45: Proper Trademark Notice And Attributions
Contacting APH Customer Service In addition to support material available on our webpage, please do not hesitate to contact American Printing House (APH) for your technical support questions. • E-mail to cs@aph.org; or • Call APH Customer Service at +1 (800) 223-1839. -
Page 46: Warranty
Warranty HumanWare will provide the end users of the Product with a warranty covering parts and labor on any part found defective through normal use of the Product within two years from the date the Product is shipped to the end user. HumanWare will supply parts and labor of such warranty, and all costs of inspection, shipping and packaging incurred in relation to warranty claims shall be paid by HumanWare or the end... -
Page 47: Approvals
Approvals FCC Compliance This device contains FCC ID: PVH0953. This equipment has been tested and found to comply with the limits for a Class B digital device, pursuant to Part 15 of the FCC Rules. These limits are designed to provide reasonable protection against harmful interference in a residential installation. -
Page 48: Ic Compliance
IC compliance This device contains IC: 5325-0953. This device complies with Industry Canada license-exempt RSS standard(s). Operation is subject to the following two conditions: This device may not cause interference, and this device must accept any interference, including interference that may cause undesired operation of the device. -
Page 49: Conformité Aux Normes D'ic
Conformité aux normes d’IC Cet appareil est conforme à la(aux) norme(s) RSS sans licence d’Industrie Canada. Son utilisation est soumise aux deux conditions suivantes : Cet appareil ne doit pas causer d’interférences et il doit accepter toutes interférences reçues, y compris celles susceptibles d’avoir des effets indésirables sur son fonctionnement. -
Page 50: Bluetooth Qualification
Bluetooth Qualification This device contains Bluetooth module qualified as "Controller system" - QD ID 5817. - Page 52 PageBlaster Catalog No. 1-08075-00 Copyright © 2020 1839 Frankfort Avenue, Louisville, KY 40206 502-895-2405 info@aph.org www.aph.org...
Need help?
Do you have a question about the PageBlaster 1-08075-00 and is the answer not in the manual?
Questions and answers