Advertisement
Advertisement

Related Manuals for Hiboy HC02


Summary of Contents for Hiboy HC02
- Page 1 Hoverboard Kart HC02 USER MANUAL...
- Page 2 WARNING Read the warnings on the board and at the beginning of this manual. Always wear a helmet. Other protective equipment is highly recommended (knee pads, long sleeves, wrist guards) Find an open, flat area with clean pavement for your first ride. Do not ride through puddles or other bodies of water.
-
Page 3: Table Of Contents
CONTENTS 1. Riding Safety 2. Packing List 3. Assembly Introduction Operation Instructions 5. Service and Warranty 6. Question & Answer... - Page 4 Thanks for choosing Hiboy Hoverboard Kart HC02 (hereinafter referred to as Hiboy HC02). To enjoy the many features of your Hiboy HC02 you must read and follow these instructions. Have fun and enjoy your ride! 1...
-
Page 5: Riding Safety
RIDING SAFETY 1. The hoverboard kart has been designed a recreational product. Before mastering riding skills, you need to practice. Freeman Inc. is not responsible for any injuries or damage caused by a rider's inexperience or failure to follow the instructions in this document. 2. - Page 6 6. The safety speed is 6.2mph. When the speed is over 7.5mph, the kart will be out of control for 0.3-0.5s and user can’t apply the brakes immediately. 7. The hoverboard kart is not for users weighing less than 44lbs than 44lbs/20kg or more than 270lbs/120kg.
-
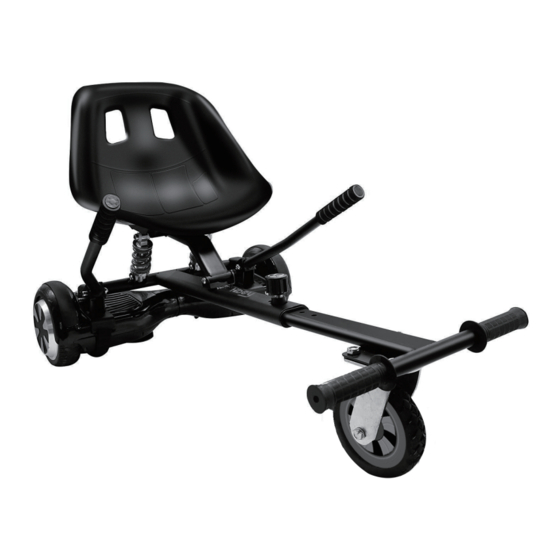
Page 7: Packing List
PACKING LIST 1x Adjustment knob 4x Velcro 1x Wheel 1x Frame (2 parts) 2x Handles 1x Kart seat 1x Gasket Screw washer 2x Screw A 4x Screw B 2x Screw C 4x Screw D 4x Nut 1x Wrench 3x Allen Wrench 4... -
Page 8: Assembly Introduction
ASSEMBLY INTRODUCTION 1. Install the handles on the frame on both sides with the nuts . 2. Insert and install the rear suspension with screws A and screws C. 3. Cut the gasket into 4 pieces and insert the gaskets into the metal pads to protect your hoverboard from scratches. - Page 9 4. Fasten the ajustment knob into the hole to connect front frame and rear frame. 5. Install the seat on the frame with screws D. Install the wheel on the frame with screws B. Screw D Screw washer Screw B 6...
- Page 10 6. Place the kart on your hoverboard, and adjust the slidable metal plates to fit your hoverboard. then fasten the nut tight. slidable metal plates 7...
- Page 11 Put and adjust the velcro straps tight. 8. Your kart is ready to go. Velcro straps *Search "How to assemble Hiboy Seat Attachment" on YouTube.com for the video tutorial. 8...
-
Page 12: Operation Instructions
OPERATION INSTRUCTIONS 1. FORWARD Move both handles down 2. BACKWARD Move both handles up 3. TURN LEFT left handle down, right handle up 4. TURN RIGHT right handle down, left handle up 9... -
Page 13: Service And Warranty
2. Maintenance costs beyond the warranty period and beyond the scope of the warranty only incur maintenance costs. 3. If there is any help or accesorry replacement needed, please try to send messages to Hiboy: us.support@hiboy.com HiboyUS @Hiboy_Official www.hiboy.com... -
Page 14: Question & Answer
A: Please feel free to contact Hiboy Support Team by sending emai: us.support@hiboy.com And Hiboy Support Team will reply you soon and send correct accessory or part replacement. Q: Don’t like the user manual. Is there a Hiboy kart assembly video to follow? A: There is a video in YouTube about Hiboy kart assembly, by searching “how to assemble a hiboy kart”... - Page 15 www.hiboy.com...
Need help?
Do you have a question about the HC02 and is the answer not in the manual?
Questions and answers