Table of Contents
Advertisement
Advertisement
Table of Contents

Summary of Contents for TAJIMA USB LINKER
- Page 1 TAJIMA USB LINKER User’s Guide...
-
Page 2: Table Of Contents
4-6. Firmware upgrade 5. Calling the design at the machine 5-1. TAJIMA TMEF Series 5-2. TAJIMA TMEG Series 5-3. TAJIMA TMEF, TMFD, TLFD, TFKN(SOP) Series etc. 5-4. TAJIMA TMFX,TMEX-C, TMLH,TMCE TEHX-C/TFHX(SOP) Series etc. 5 5 TAJIMA TEHX C/TFHX/TFGN 5-5. TAJIMA TEHX-C/TFHX/TFGN (LCD by Windows CE) Series etc. -
Page 3: Features
1. Features TAJIMA USB Linker is able to transfer the design data stored in a USB Sti k t USB Stick to a Tajima Embroidery Machine. T ji E b id Moreover, reliability and transmission speed are improved in comparison with the similar solutions using FDD. -
Page 4: Usb Stick To Use
2. Product TAJIMA USB Linker USB Stick (4GB) Connecting Cables (Please see the next page.) User’s Guide TAJIMA USB Linker Stand Screw TAJIMA USB Linker Manual... - Page 5 SERIAL 25 → 9 Pin Converter Power Adapter Remarks : Remarks : TAJIMA Machines do not need Plug type of Power Adaptor for Extra Power cables. Serial Cable is Category E. Please arrange necessary Plug Adaptor. TAJIMA USB Linker Manual...
- Page 6 2. Product Method of stand installation TAJIMA USB Linker Manual...
-
Page 7: Cautions
3. Cautions * General Cautions - Please do not connect the TAJIMA USB Linker to an embroidery machine when the power is turned on to the machine as it will damage the unit on to the machine as it will damage the unit. -
Page 8: Using The Tajima Usb Linker
TAJIMA USB Linker Remarks : 1.The TAJIMA USB Linker package does not include an AC Plug Adaptor so please prepare at the customer side. 2.The location of Parallel/Serial port on Operation Panel is different, depending on the models. TAJIMA USB Linker Manual... - Page 9 4. Using the TAJIMA USB Linker * Exceptional Connection to TMFD new type by Parallel Cable The Operation Panel of TMFD new type is assembled in a plastic case. Loosen the locking screws of the Operation Panel and turn the Operation Panel as shown in the above picture.
- Page 10 4. Using the TAJIMA USB Linker Find the blue connector in the lower left part of the Operation Panel. Remove the housing of the Connecting Cable with a Philips screwdriver. TAJIMA USB Linker Manual...
- Page 11 4. Using the TAJIMA USB Linker Insert the connector to the hole below the fixing bracket of the Operation Panel. Pull up the cable like the above picture. TAJIMA USB Linker Manual...
- Page 12 4. Using the TAJIMA USB Linker Connect the opposite end of the cable to the blue connector in the Operation Panel. Cover the Operation Panel and replace the screws. TAJIMA USB Linker Manual...
- Page 13 4. Using the TAJIMA USB Linker Cover the Connecting Cable with the housing. Connect the Cable to the TAJIMA USB Linker. Picture to the left shows that the installation has been completed. TAJIMA USB Linker Manual...
-
Page 14: Layout Of The Display
4. Using the TAJIMA USB Linker 4-2. Layout of the display 1) The following logo screen appears in a few seconds when you turn on the TAJIMA USB Linker. Please see page 21 when the machine type does not match. -
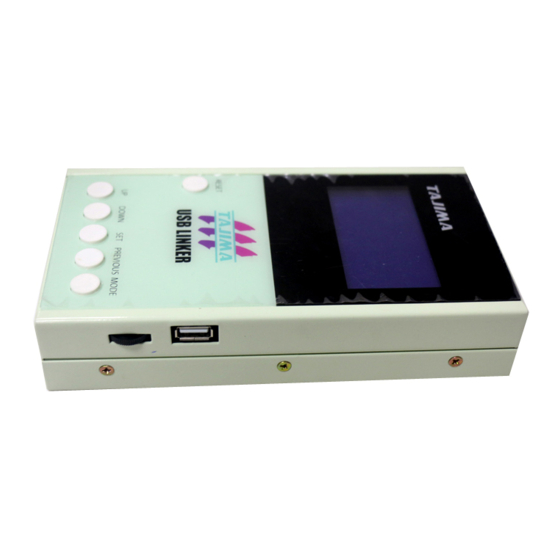
Page 15: Control Keys
4. Using the TAJIMA USB Linker 4-3. Control Keys RESET RESET DOWN PREVIOUS MODE UP, DOWN Keys: Moving the cursor on the screen. SET Key: Selecting the menu item where the cursor is located on. PREVIOUS Key: PREVIOUS Key: Going back to the previous menu after selecting Going back to the previous menu after selecting a design. -
Page 16: Using The Tajima Usb Linker
4. Using the TAJIMA USB Linker 4-4. Using the TAJIMA USB Linker Logo screen, displayed while the power is on Displaying the software version Screen for when the USB Stick is not inserted TAJIMA USB Linker Manual... - Page 17 4. Using the TAJIMA USB Linker Screen for when USB Stick is inserted Displaying the information read from Displaying the information read from the USB Stick Showing the designs existing in the current directory TAJIMA USB Linker Manual...
- Page 18 4. Using the TAJIMA USB Linker <Example> Selecting a TAJIMA design and transferring the data to the machine Press the DOWN Key two times. Press the SET Key. In case of the left picture, confirm the design the design. If the design is not correct, press the PRE Key.
- Page 19 4. Using the TAJIMA USB Linker Press MODE key. Then design information and a thumbnail picture will be displayed. Press SET Key to send the Press SET Key to send the design. TAJIMA USB Linker is ready to send the design.
- Page 20 4. Using the TAJIMA USB Linker How to switch the directory <Example> To select the "DOG" design in "SAMPLE" directory and transfer the data to the embroidery machine. Press the DIR/FILE Key. Press the DOWN Key. Select “SAMPLE” directory. Press the SET Key.
- Page 21 4. Using the TAJIMA USB Linker Displaying the information read from the USB Stick the USB Stick Showing the designs existing in the current directory Move the cursor to “DOG” and transfer the data, following the instruction in pages 17 to 18.
-
Page 22: Setting The Machine Type
TMEG, TMLG, TME-DC, TMFD, TLFD -> 9,600bps TMFX, TMCE, TMLH, TMEX-C, TEHX-C/TFHX(SOP) ->Baud Rate ->Please follow the instruction in the “TAJIMA User’s Please follow the instruction in the TAJIMA User s Manual”. TFKN(SOP), TEHX-C/TFHX/TFGN(LCD by Windows CE), TEJT-C ->Please follow to the machine parameter setting. -
Page 23: Firmware Upgrade
Turn on the TAJIMA USB Linker. Then the left screen will be displayed. Insert a USB Stick. And press SET Key. Process is upgraded. When it is finished, turn off and on the power of the TAJIMA USB Linker. TAJIMA USB Linker Manual... -
Page 24: Calling The Design At The Machine
1. Please use Parallel Cable and connect it to the ll l C bl t it t th Reader Connector of the Controller Box. 2. For more details, please see the “TAJIMA User’s Manual” of each machine. Procedure for Data Input: D t I 1) Select “T.CODE”, “2”... -
Page 25: Tajima Tmeg Series
5. Calling the design at the machine 5-2. TAJIMA TMEG, TMLG Series Data input < TMEG Operation Panel> Press “A DATA INPUT” Key on the menu. If the data set lamp is on, terminate the data set. In case you use Parallel Cable, press the “F2” Key to select... - Page 26 (Connector for Reader). Serial Port located on the Power Supply Box (Connector for Serial I/F). For more details please see the “TAJIMA User’s For more details, please see the TAJIMA User s Manual“ of each machine. TAJIMA USB Linker Manual...
-
Page 27: Tajima Tmef, Tmfd, Tlfd, Tfkn(Sop) Series Etc
5. Calling the design at the machine 5-3. TAJIMA TMEF, TMLE, TME-DC, TMFD, TLFD, TFKN(SOP) Series etc. < TMFD Operation Panel > - In general, the LED lamp on the left part of the Panel is selected in the 4 column like the above picture. - Page 28 Move the cursor to the second digit from the left end. Press ‘1’ Key and ‘SET’ Key to select “1. TAJIMA”. Input the design number and mirror effect (P direction), and scale up/down values. If you continue to press the “SET’ Key, 10 digit would blink in general.
-
Page 29: Series Etc
If you press the A Key 4 times, the following screen will appear. 3 T : A > M : 12 50623 (in case Parallel) 4 S : A > M : 12 50623 (in case Serial) Code Code Save Save Residual Residual type position memory TAJIMA USB Linker Manual... - Page 30 “TAJIMA User’s Manual” of each machine. When you change the communication speed, please change the DIP switch setting of the CPU card of the machine. For more details, please see the TAJIMA “User’s Manual“ of each machine. TAJIMA USB Linker Manual...
-
Page 31: (Lcd By Windows Ce) Series Etc
(Baud Rate). But please check the value of the machine parameter setting. For more details, please see the “Inputting From Serial Connecting Device” in h “I S i l C ” i “TAJIMA User’s Manual“ of each machine. Serial Port is located under FDD port. TAJIMA USB Linker Manual... -
Page 32: Tajima Tejt-C Series
In case of Serial connection, you can select any Communication Speed (Baud Rate). But please check the value of the machine parameter setting. For more details, please see the “Input Data (Serial Connection)” in “TAJIMA User’s Manual“ of each machine. TAJIMA USB Linker Manual... -
Page 33: Troubleshooting
The number of designs in the USB - We support only *.dst. (Tajima format) Stick and displayed on the screen Check if there are any designs in other formats. are different. -
Page 34: Parts List
7. Parts List ITEM Part No. Remarks USB Linker Case TUP00001 TUP00002 Power Switch & Cable TUP00003 CPU Board TUP00004 CPU board cable CPU board cable TUP00005 TUP00005 Switch board TUP00006 Cover TUP00007 TAJIMA USB Linker Manual... - Page 35 Manual Edition 2010 11 04758, Yulsan B/D 6F, 302, Majang-ro, Sungdong-gu, Seoul, Korea TEL 82 2 2295 7771/6771 2 TEL : 82-2-2295-7771/6771~2 FAX : 82-2-2295-6778 http://www.koreatajima.com Email: seoul@koreatajima.com...
Need help?
Do you have a question about the USB LINKER and is the answer not in the manual?
Questions and answers