Table of Contents
Advertisement
Advertisement
Table of Contents

Summary of Contents for Kaba SILCA BRAVO II
- Page 1 OPERATION AND MAINTENANCE HANDBOOK D407270XA vers. ®...
- Page 2 Thank you for choosing one of Silca’s high quality key cutting machines. This machine has been designed, tested and produced in our factory using the most modern technology to provide you with many excellent years of precision key duplicating. Before using the machine, we suggest that you read the information presented in this manual throughly.
-
Page 3: Table Of Contents
INDEX BRAVO FEATURES ................... 1 TECHNICAL DATA ..................... 1 ACCESSORIES ....................1 PARTS OF THE BRAVO ..................2 CHECKING CALIBRATION OF THE MACHINE ..........3 TO CUT WORN KEYS ..................3 SPACE SETTING ....................4 THE JAWS ......................5 USE OF THE PINS ..................... 6 CUTTING CRUCIFORM KEYS WITH ONE SHOULDER ......... -
Page 5: Bravo Features
Operating Manual BRAVO II BRAVO FEATURES • Professional key cutting machine for automobile, household cylinder keys and cruciform keys. • Micrometer adjustment for the tracer. • Removable chip tray. • Tynex brush. • Carriage operates on twin rods with sealed bushings. •... -
Page 6: Parts Of The Bravo
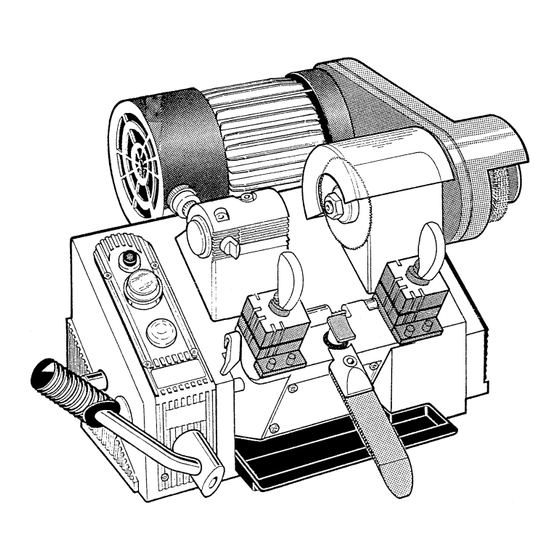
Operating Manual BRAVO II PARTS OF THE BRAVO Original key Key blank Cutter Tracer point D1) Tracer point support Complete carriage assembly G) Jaw Jaw handle Transparent cutter shield Brush M) Tracer point locking screw M1) Tracer point lock nut Key gauge O) Carriage lever Brush switc... -
Page 7: Checking Calibration Of The Machine
Operating Manual BRAVO II CHECKING CALIBRATION OF THE MACHINE The machine is calibrated and tested before leaving our factory, however, before operating the machine it is advisable to check the machine. Whenever you change the cutter the machine must be recalibrated. 1) Place the machine on a high enough bench to give you an overall view. -
Page 8: Space Setting
Operating Manual BRAVO II SPACE SETTING 1) Place the set up blanks in the jaws as shown in fig. 2-A using the key gauge (N) with the grooves facing the cutter. 2) Make sure to leave the main switch off. Release the carriage and position the blanks so that the grooves come in contact with the cutter and tracer point. -
Page 9: The Jaws
Operating Manual BRAVO II THE JAWS The jaws rotate to allow perfect clamping of all cylinder keys against the back and the profile. Side A & B of the jaws are used for keys that are cut on one side such as normal household cylinder type keys. -
Page 10: Use Of The Pins
Operating Manual BRAVO II USE OF THE PINS For broken keys use one of the steel pins #D401224ZZ or #D401225ZZ and insert into the groove of the key so that the key is properly aligned for cutting as shown in fig. 7. Fig. -
Page 11: Replacing The Cutter
Operating Manual BRAVO II REPLACING THE CUTTER 1) Raise the cutter shield (J) and insert the locking bar (#D400754BA) into the slot in the base and the hole in the cutter shaft next to the cutter as shown in fig. 9. 2) Use the wrench (#D300783ZZ) that was provided to loosen the nut. -
Page 12: Belt Tension And Replacement
Operating Manual BRAVO II BELT TENSION AND REPLACEMENT If the belt should come loose, remove the shield, and loosen the four nuts (*) holding the motor to the base (fig. 11). Adjust the position of the motor until the belt tension is tight (about 1/2” play in the belt).The belt is replaced the same way. -
Page 13: To Set The Stop Position Of The Carriage
Operating Manual BRAVO II TO SET THE STOP POSITION OF THE CARRIAGE Raise the carriage to the cutter. A space of 0.004” should remain between the cutter and the jaw. If this is not the case then the adjustment should be carried out as follows: 1) Remove the chip tray. -
Page 14: Electrical Diagram
Operating Manual BRAVO II ELECTRICAL DIAGRAM grey grey brown blue black grey purple Fig. 15 1) Main switch 2) Brush button 3) Microswitch 4) Motor 5) Fuses (6,3) - Page 15 SILCA S.p.A. Via Podgora, 20 (Z.I.) 31029 VITTORIO VENETO (TV) Tel. 0438 9136 Fax 0438 913800 www.silca.it Member of the Kaba Group...
Need help?
Do you have a question about the SILCA BRAVO II and is the answer not in the manual?
Questions and answers