Table of Contents
Advertisement
Available languages
Available languages
Quick Links
Advertisement
Table of Contents

Subscribe to Our Youtube Channel
Related Manuals for Steren PRO-100

Summary of Contents for Steren PRO-100
- Page 1 Mini proyector multimedia portátil PRO-100 V0.0 0116v V0.1 / 0216v...
- Page 2 . Por favor, revíselo completamente para estar seguro de cómo utilizar apropiadamente el producto. Para apoyo, compras y todo lo nuevo que tiene Steren, visite nuestro sitio web: www.steren.com La información que se muestra en este manual sirve únicamente como referencia sobre el producto.
- Page 3 IMPORTANTE • No intente abrir el • No coloque cerca • Límpielo con un • No lo limpie con equipo de fuentes de agua paño seco químicos • No obstruya el • Colóquelo en • Colóquelo en • Desconecte el lente ni las salidas posición horizontal lugares ventilados...
- Page 4 CARACTERÍSTICAS Con este mini-proyector multimedia disfruta de películas, eventos deportivos, videos, fotografías y más, en un tamaño de hasta 60 pulgadas, y pasa horas de diversión con tu familia o amigos. Conecta tu DVD o Blu-Ray en alguna de sus 2 entradas digitales HDMI o envía video desde tu computadora de escritorio o laptop a través de su puerto VGA.
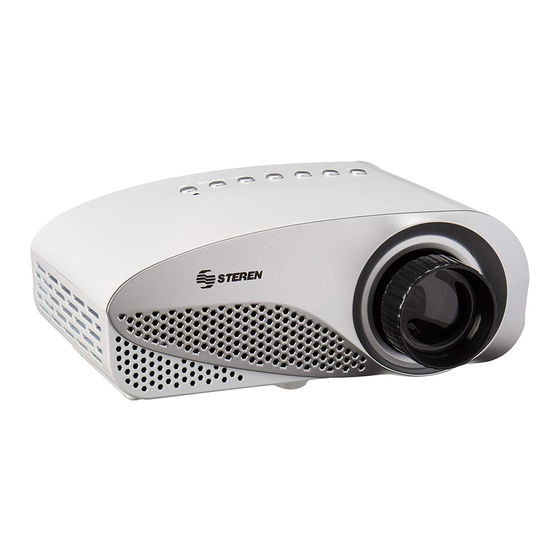
- Page 5 PARTES PANEL FRONTAL Enfoque Lente Cubierta del lente PANEL LATERAL Entrada para tarjeta SD Salida auxiliar 3,5 mm PANEL TRASERO PUERTOS DE ENTRADA HDMI 1 HDMI 2 USB AV (RCA) Entrada de Receptor IR alimentación HDMI 1 HDMI 2 Altavoz interno Salidas de ventilación...
- Page 6 PANEL SUPERIOR abajo/arriba Selector de fuente Indicador de funcionamiento MENU SOURCE Izquierda/derecha Menú / OK Encendido/ volumen -/+ apagado CONTROL REMOTO 1. Encendido/apagado 2. Silencio 3. Retroceso/avance rápido 4. Atrasar/adelantar 5. Menú 6. Seleccionar fuente 7. VGA 8. HDMI 9. USB 10.
- Page 7 INSTRUCCIONES CONEXIONES Antes de realizar las conexiones, apague las fuentes de entrada (Blu Ray, PC, consola de videojuegos, etc.) y el proyector. A) Conexión por RCA (AV) Utilice el cable 3,5 mm a RCA (incluido) HDMI 1 HDMI 2 B) Conexión por HDMI HDMI 1 HDMI 2 HDMI 1...
- Page 8 C) Conexión por VGA (PC) HDMI 1 HDMI 2 D) Conexión USB/SD HDMI 1 HDMI 2 La capacidad máxima soportada es de 1TB en USB y 32GB en SD E) Conexión de audio por 3,5 mm...
- Page 9 MODO DE USO 1. Encienda el equipo MENU SOURCE Presione una vez Al encender, podrá visualizar el menú de inicio * *Este menú está disponible sólo para conexión USB/SD. Consulte el manual de usuario para conocer el modo de uso.
- Page 10 2. Seleccionar la fuente de entrada Presione el botón SOURCE o mediante el control remoto oprima INPUT, seleccione con las teclas de navegación la fuente de entrada deseada. HDMI 1 PC-RGB HDMI 2...
- Page 11 3. Coloque el equipo sobre una superfi cie estable y enfoque la imagen. Gire el lente hasta que la imagen sea nítida 4. Ajustar el volumen En el mini proyector MENU SOURCE En el control remoto...
- Page 12 ESPECIFICACIONES Alimentación: 12 V - - - 2 A Relación de aspecto: 4:3 o 16:9 Relación de contraste: 500:1 Resolución mínima soportada: 480 x 320P Resolución máxima soportada: 4 k Distancia de proyección: 70 cm a 4,5 m Convertidor de voltaje Alimentación: 100-240 V~ 50/60 Hz 600 mA Salida: 12V - - - 2 A Control remoto...
- Page 13 1.- Para hacer efectiva la garantía, presente esta póliza y el producto, en donde fue adquirido o en Electrónica Steren S.A. de C.V. 2.- Electrónica Steren S.A de C.V. se compromete a reparar el producto en caso de estar defectuoso sin ningún cargo al consumidor. Los gastos de transportación serán cubiertos por el proveedor.
- Page 14 Portable mini projector PRO-100 V0.0 0116v V0.1 / 0216v...
- Page 15 Portable mini projector PRO-100 Thank You on purchasing your new Steren product. This guide includes all the feature operations and troubleshooting necessary to install and operate your new Steren´s Portable mini projector. Please review this manual thoroughly to ensure proper installation and operation of this product.
- Page 16 IMPORTANT • Do not try to open • Do not place near • Clean with a soft, • Don’t clean with water dry cloth. chemical. • Don’t cover the • Place it in • Place it in • Disconnect when lens or vents.
- Page 17 HIGHLIGHTS With this multimedia mini projector you can enjoy movies, sports, videos, pictures and more, like if you were watching a 60” screen. Plug your DVD or Blu-Ray in one of the two available HDMI digital inputs or send video from your computer through the VGA port.
- Page 18 PARTS FRONT PANEL Focus Lens Lens cover SIDE PANEL SD card input Auxiliary 3.5 mm input REAR PANEL INPUT PORTS HDMI 1 HDMI 2 USB AV (RCA) Power input IR reciver HDMI 1 HDMI 2 Internal speaker Vents...
- Page 19 HIGH PANEL down/up Source In-use indicator MENU SOURCE Left/right Menu On / off volume -/+ REMOTE CONTROL 1. On/off 2. Mute 3. Backward/fast advance 4. Previous/next 5. Menu 6. Source selection 7. VGA 8. HDMI 9. USB 10. SD 11. Navigation keys: Up/Down, Left /Right (Volume -/+) 12.
- Page 20 INSTRUCTIONS CONNECTIONS Before to make the connections, turn off all the input sources(Blu Ray, PC, video game console,) and the projector. A) RCA (AV) connection Use the 3.5 mm cable to RCA (included) HDMI 1 HDMI 2 B) HDMI connection HDMI 1 HDMI 2 HDMI 1...
- Page 21 C) VGA (PC) connection HDMI 1 HDMI 2 D) USB/SD connection HDMI 1 HDMI 2 The maximum supported capacity is 1TB in USB and 32GB in SD E) Audio connection...
- Page 22 HOW TO USE 1. How to turn on the device MENU SOURCE Press When turn on, you visualize the start menu * PHOTO MUSIC MOVIE E-BOOK *This menu is only available for USB/SD connection. Refers to the user manual to know the mode of use.
- Page 23 2. Selecting the input source Press the SOURCE button or press INPUT in the remote control, select with the navigation keys the desired input source. HDMI 1 PC-RGB HDMI 2...
- Page 24 3. Place the device into a stable surface and focus the image. Turn the lens until the image will be clear. 4. Adjusting the volume In the portable projector MENU SOURCE In the remote control...
- Page 25 SPECIFICATIONS Input: 12 V - - - 2 A Aspect ratio: 4:3 or 16:9 Contrast relation: 500:1 Minimum supported resolution: 480 x 320P Maximum supported resolution: 4 k Projection distance: 70 cm to 4.5 m Power converter Input: 100-240 V~ 50/60 Hz 600 mA Output: 12V - - - 2 A Remote control Input: 3V - - - (2x AAA)
- Page 26 Part number: PRO-100 Brand: Steren WARRANTY This Steren product is warranted under normal usage against defects in workmanship and ma- terials to the original purchaser for one year from the date of purchase. CONDITIONS 1.- This warranty card with all the required information, invoice, product box or package, and product, must be presented when warranty service is required.
- Page 27 Este instructivo puede mejorar con su ayuda, llámenos al: Help us to improve this instruction manual, call us to: 01 800 500 9000 Centro de servicio a clientes Customer Service Center...
Need help?
Do you have a question about the PRO-100 and is the answer not in the manual?
Questions and answers