
Related Manuals for Software Bisque TheSky Fusion

Summary of Contents for Software Bisque TheSky Fusion
- Page 1 TheSky Fusion User Guide Revision 1.1, July 2020 © 2020 Software Bisque, Inc. All rights reserved.
- Page 2 Information in this document is subject to change without notice and does not represent a commitment on the part of Software Bisque, Inc. The software described in this document is furnished under a license agreement or nondisclosure agreement. It may be used or copied only in accordance with the terms of the agreement.
-
Page 3: Table Of Contents
Hardware Overview ........................7 Front View ..........................7 Rear View ..........................9 Bottom View ..........................10 Attaching TheSky Fusion to the Telescope .................. 12 Wiring TheSky Fusion ........................14 Connecting Communication Cables to TheSky Fusion ..............14 Passwords ..........................15 Connecting .......................... -
Page 4: Introducing Thesky Fusion
TheSky Fusion User Guide Introducing TheSky Fusion Figure 1: TheSky Fusion provides remote access and power to your astronomical equipment. TheSky Fusion™ marries TheSky™ Imaging Edition, the world’s single-most capable object- acquisition and imaging software, with exquisitely designed hardware to connect, power and integrate your imaging equipment. - Page 5 TheSky Fusion User Guide Photos collected by TheSky Fusion can easily be shared with your desktop or laptop computer so that they can be viewed/analyzed/processed later. TheSky Fusion’s built-in computer is very capable of running astronomical equipment and acquiring photos. A primary purpose of TheSky Fusion is to be a reliable image acquisition workhorse.
-
Page 6: Packing List
TheSky Fusion User Guide Packing List The table below lists the components included with TheSky Fusion. Please contact Software Bisque if anything is missing. TheSky Fusion Packing List Photo Description TheSky Fusion Shipping Box Specifications • Total weight: 3.2 kg (7 lbs.) •... -
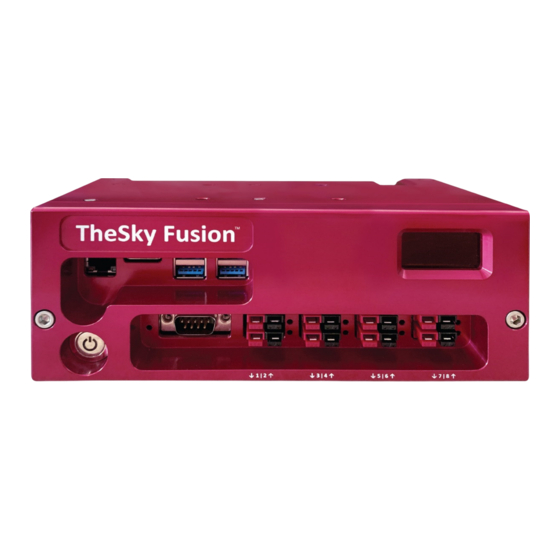
Page 7: Hardware Overview
TheSky Fusion User Guide Hardware Overview Front View Figure 2 and the tables below describe each TheSky Fusion component. Figure 2: TheSky Fusion’s external components. For a description of each component, match the number in Figure 2 with the Number column in the table below. - Page 8 The power button does not operate like a traditional on/off switch. • TheSky Fusion is booted each time the external power cable is plugged in. In this case, there is no need to click the power on/off button. The boot process takes about one minute before TheSky Imaging Edition is ready to use.
-
Page 9: Rear View
Figure 4: TheSky Fusion rear view. Power In Port If you purchased a TheSky Fusion power supply unit (PSU), plug the it into the mains power supply and plug the Powerpole connector into the Power In port. Custom PSUs should supply 12V DC at up to 40A maximum (480 W max). -
Page 10: Bottom View
Power Output Text The voltages and amperages for each of the eight power output ports that are located on the front panel are etched into the bottom of TheSky Fusion case and provide a handy reference when plugging in your equipment. - Page 11 Threaded Mounting Holes TheSky Fusion is shipped with the dovetail plate attached to the top of the housing with four mounting bolts. The six threaded mounting holes on the bottom of the housing can also be used to attach the dovetail in any of the three different positions.
-
Page 12: Attaching Thesky Fusion To The Telescope
Figure 6:TheSky Fusion attached to a refractor's OTA mounting rings. TheSky Fusion is intended to be attached to top of the telescope mount along with the telescope to minimize the number of cables run through, or on the exterior of the mount. - Page 13 TheSky Fusion User Guide Dovetail Mounting Configurations P a g e 13...
-
Page 14: Wiring Thesky Fusion
Equipment that communicates with TheSky Imaging Edition via USB communication can be connected to one of the four USB 3.0 ports located on TheSky Fusion’s front panel. If more ports are required, consider adding an optional four-port powered USB 3.0 hub is available from the Software Bisque Store, or other reliable, powered USB 3.0 hub (a powered hub is strongly... -
Page 15: Passwords
TheSky Fusion turns on automatically when power is connected. If TheSky Fusion is powered on, the power button will turn it off. If TheSky Fusion is plugged in, and powered off, because it was shut down, the power button will power it back on. -
Page 16: Web Browser
4. Login to TheSky Fusion using the default Wi-Fi network password. VNC App Software Bisque recommends VNC Viewer by VNC Connect as we have validated and tested it on multiple platforms. To download the VNC Viewer app visit the URL below or scan the QR code in Figure 7. -
Page 17: Transferring Images From Thesky Fusion
8. Enter the Password (default: fusion) and feel free to have the app save the password. From now, just tap or double click on the icon for TheSky Fusion in the VNC app and enter the password, if prompted, to connect. - Page 18 Figure 8: The Connect to Server command on macOS Finder. 3. Enter the IP address of TheSky Fusion; the default IP address is shown in Figure 9 and click Connect. When prompted, click Connect again to verify that you want to connect to this server.
- Page 19 Enter the username and password. The default username is admin and the password fusion. Click Connect to proceed. Figure 10: Enter the name and password to connect to TheSky Fusion from macOS. 5. On the next window, click OK. Figure 11: Choose the name of TheSky Fusion's volume to mount.
-
Page 20: Transferring Files To Windows 10 Pc
TheSky Fusion User Guide TheSky Fusion’s ImageRuns folder now mounted and is shown under Locations in the Finder sidebar. Your images can be copied from this folder to anywhere on your computer. Transferring Files to Windows 10 PC To share files between TheSky Fusion and a Windows 10 computer: 1. -
Page 21: Troubleshooting Windows File Sharing
Windows caches network connection information, so that attempting to share files from a second TheSky Fusion on a single machine may result in the following error message. The solution is to restart the computer to the cache before connecting to the shared folder. -
Page 22: Thesky Fusion Desktop
Figure 15 shows TheSky Fusion Desktop. The Desktop shortcuts include TheSky Imaging, TheSky LTI Full Screen, LTI, TheSky Fusion Settings and ImageRuns. The Home folder contains the Desktop, Documents, Downloads and other folders commonly used to store files. The BOOT folder stores system-specific files and access is prohibited. - Page 23 TheSky Fusion User Guide Startup Tab The Startup tab lets you select how TheSky Fusion starts. • TheSky LTI Full Screen: TheSky LTI’s window is sized to occupy the entire screen. • TheSky Imaging Edition: The first time TheSky is launched, the window is size using the default screen size.
- Page 24 Figure 18: Setting the Remote Screen Resolution. Security Tab The Security tab is used to change the Wi-Fi password and the password to access TheSky Fusion’s desktop from a web browser. Figure 19: The Security tab configures TheSky Fusion's password. P a g e 24...
- Page 25 Networking Tab The Networking tab lets you configure: • The Network Device Name, which is how other devices see TheSky Fusion on a network. • The Network SSID, which is the name of the ad hoc Wi-Fi network or “hotspot” TheSky Fusion creates.
- Page 26 The OLED Display tab lets you enter text in the Test Text control; clicking Set shows the text on TheSky Fusion’s external display. The Brightness slider changes the display’s brightness. Figure 22: Show a test message to TheSky Fusion’s OLED display.
-
Page 27: Hardware Configuration
Software Updates The Software Updates tab is used to choose a file archive that can be used to update TheSky Fusion’s software, for example, updates to TheSky Imaging Edition, TheSky Fusion Configuration Settings, or new Plug Ins for instrument control. -
Page 28: Power Output Port Basics
1, 2, or 8. 1. Loosen the two bolts on the front of TheSky Fusion about four turns. 2. Remove the two bolts on the top of TheSky Fusion. Flip the top of Fusion over to access the inside. -
Page 29: Using Thesky Imaging Edition
Enable LEDs checkbox to illuminate the LEDs next to the ports on the front panel. 7. Under Circuit State When TheSky Fusion Boots, turn the checkbox on or off as desired. The state of these ports is saved and restored each time TheSky Fusion is turned on. Turn on the Enable LEDs checkbox to illuminate the LEDs next to the ports on the front panel. -
Page 30: Appendix A: Power Out Port Configuration
TheSky Fusion User Guide Appendix A: Power Out Port Configuration The maximum output power supplied to three of TheSky Fusion’s eight power out ports is configurable. See “Hardware Overview” on page 7 for the specifications of each power out port. - Page 31 TheSky Fusion User Guide Figure 26: Gently rotate the top counterclockwise and set it next to the bottom. Once the two halves are separated, the power out port configuration switches are located on the PCB attached to the bottom of the housing (Figure 27). Move the switch or switches to the desired position and you are ready to reassemble the housing.
- Page 32 TheSky Fusion User Guide Figure 28: The maximum power for Ports 1, 2 and 8 is configurable. Port Switch Position Power Specification 1.5A 7.5W max. 12V DC 3A max. 3A 36W max. 1.5A 7.5W max. 3A 36W max. P a g e 32...
- Page 33 Switch Position Power Specification 3A 24W max. 3A 15W max. Once the switches are set, reassemble the external housing, power up TheSky Fusion, and verify the output voltage on each port with TheSky Fusion voltmeter. P a g e 33...
-
Page 34: Appendix B: User Guide Revision History
TheSky Fusion User Guide Appendix B: User Guide Revision History Revision Changes Number • Revised and expanded Appendix A instructions. • Added Power Control documentation. Original document P a g e 34...
Need help?
Do you have a question about the TheSky Fusion and is the answer not in the manual?
Questions and answers