
Related Manuals for Denver MRD-52


Summary of Contents for Denver MRD-52
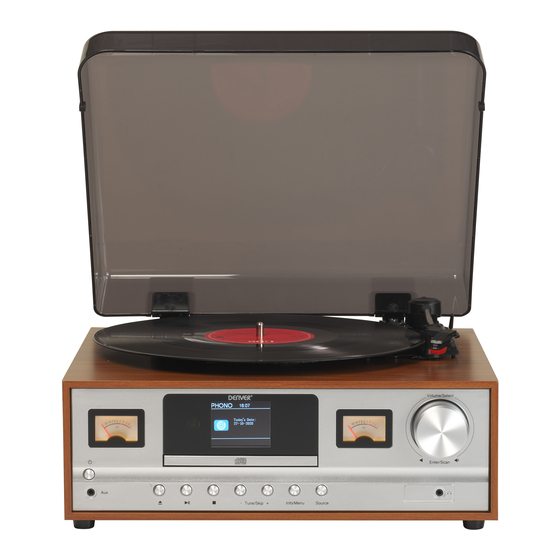
- Page 1 DEVICE DESCRIPTION AND FUNCTION KEYS Spindle adapter. Turntable auto stop on/off Turntable platter Tone arm Tone arm lever Tone arm clip 33/45/78 RPM turntable speed Stylus and stylus cover selection...
- Page 2 2.4" color display 18 Source (Phono/CD/DAB/FM radio/BT/Aux in) 10 Power on/Standby button 19 Headphone socket 11 Aux in socket 20 Rotary volume control 12 CD drawer 21 VU meters 13 CD drawer open/close 22 Turntable dust cover 14 Play/Pause and Disconnect (BT mode) 15 Stop (CD mode) 16 Tune/Skip buttons...
- Page 3 Remote control Standby (ON/OFF) 0-9 Keyboard Scan Select Vol + / - Tune + / Skip Forward Mode (Phono / DAB / FM / CD / BT / Aux) Play / Pause 10 Tune - / Skip Backward 11 Stop 12 Mute 13 Infor/Menu 14 CURSOR...
- Page 4 SETUP Positioning the Retro Turntable Where will your Retro Turntable and speakers be situated? If you place the Retro Turntable on the same surface and very close to the speakers, the sound quality can be affected by the airborne movements coming from the speakers and from any vibrations from the surface on which they have been placed.
- Page 5 FIRST STEPS AND USE Set the clock In standby mode: 1. Short press the POWER button. 2. A '0000' will now flash in the display. Short press the Tune/Skip buttons to display the correct hour and then short press the Play button to confirm. 3.
-
Page 6: Record Player
RECORD PLAYER Check that your Retro Turntable is in PHONO/Turntable mode. If you are not already in PHONO mode, repeatedly short press the Source button until you are in PH mode (check the display). PHONO will be displayed. Auto Stop On/Off Under the dust cover and to the right of the tone arm, there is an OFF/ON slide switch. - Page 7 5. Select the correct speed for your record using the RPM selector switch. Tone arm lock 6. Choose to turn the auto stop for the turntable on or off, as required. Needle guard 7. Use the tone arm lever to lift the tone arm. 8.
- Page 8 CD controls Play/Pause: Short press the button The track number will show in Pause mode. Short press the Next track: Short press the Tune/Skip + button Previous track: Short press the Tune/Skip - button Stop: Short press the ■ button. Repeat and Random modes Short press the Preset/Repeat button on remote control.
- Page 9 Remove the CD Short press the button. The CD drawer will open and 'Open' will be displayed. Remove the CD from the compartment. . button to close the CD drawer. ‘- - -’followed by 'NO Disc' will be Short press the displayed.
- Page 10 FM RADIO If you are not in FM mode, repeatedly short press the Source button to go to FM mode (check the display). If you were listening to an FM station when you switched the product to standby mode then this station will be automatically selected when you switch the product back on.
-
Page 11: Dab Radio Mode
Tuning to an FM station preset In FM mode: 1. Short press the Preset button on remote control to the preset locations (1-20). 2. Short press the ▲ or ▼ button on remote control or use the Tune/Skip + or - button on the Retro Turntable to move the preset number that you would like to listen the radio station. - Page 12 In DAB mode: Press and hold the MENU button or Scan button of Retro Turntable or press the MENU button of remote control, short press the ▲ or ▼ buttons on remote control or use Turn/Skip + or - on Retro Turntable to select full scan then press Select button to full scan.
- Page 13 7. Your device will remain paired with the Retro Turntable unless you decide to disconnect or 'unpair' it. Note: If your previously paired device is within range but does not automatically connect, go to the BT connectivity settings on your device and select 'MRD-52' to reconnect. Controlling a paired BT device Once paired you can adjust the volume using the right hand rotary volume control.
-
Page 14: Aux In Mode
2. You can use the controls on your paired BT device as well as those on the Retro Turntable when listening to music via BT. Controls available on your product are: Play/Pause Short press to play/pause Note: If you long press the button for 3 seconds, you can disconnect the current BT device and search for new devices. - Page 15 Technical specification Power Input DC 9 V/2 A Audio output 2 x 5 W RMS Frequency range 87.5 - 108 MHz 174.928 - 239.2 MHz Bluetooth 2402 - 2480 MHz Version Pairing name MRD-52...
- Page 16 Additional information is available at the technical department of your city. Hereby, Inter Sales A/S declares that the radio equipment type MRD-52 is in compliance with Directive 2014/53/EU. The full text of the EU declaration of conformity is available at the following internet address: www.denver-electronics.com...
- Page 17 Operating Frequency Range: FM 87.5-108MHz / DAB 174.928-239.2MHz/Bluetooth 2402-2480MHz Max Output Power: 2 x 5 W DENVER ELECTRONICS A/S Omega 5A, Soeften DK-8382 Hinnerup Denmark www.facebook.com/denverelectronics...
Need help?
Do you have a question about the MRD-52 and is the answer not in the manual?
Questions and answers