Table of Contents
Advertisement
Advertisement
Table of Contents

Subscribe to Our Youtube Channel
Related Manuals for TOA-DKK HM-30P


Summary of Contents for TOA-DKK HM-30P
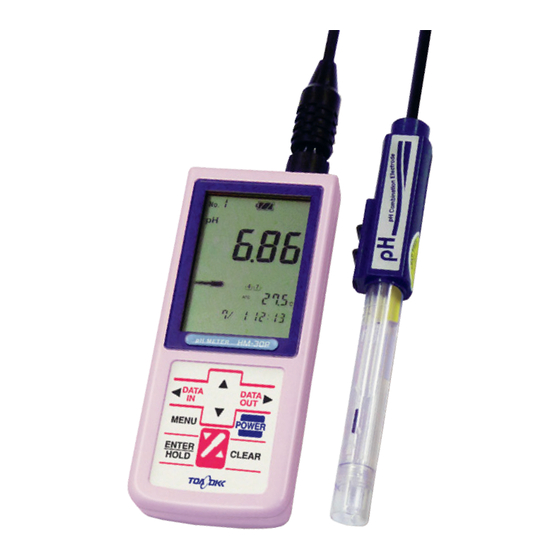
- Page 1 HAND HELD pH METER MODEL HM-30P Please keep this instruction manual close at hand of the persons who are in charge of the operation of this product. Before operating this product, please read this instruction manual carefully for its correct handling.
- Page 2 Introduction Introduction (a) Thank you for your purchase of the Model HM-30P Hand Held pH Meter (hereinafter called the instrument or the product). The instrument has a waterproof construction suitable for on-site measurements and a clock function and data memory function indispensable in data management.
-
Page 3: Safety Information
Model: HM-30P Safety Information Safety Information (1) Meaning of markings The signal terminology and symbols related to warnings in the instruction manual are defined below. The alert symbol mark ( : General caution mark) indicates the possibility of hazard or damage and also means “Refer to the instruction manual.”... -
Page 4: Notes On Use Of The Instruction Manual
Model: HM-30P Safety Information Tumbling When working at the measurement point, take tumbling prevention measures such as a safety belt, etc. In addition, to prevent injury, wear a helmet, life jacket, safety boots, etc. Injury Part of the electrode is made of glass. Be careful not to break it. If accidentally broken, you may be injured by pieces of glass. - Page 5 Model: HM-30P Safety Information (d) The contents of the manual may be changed without prior notice for reasons such as to improve performance. (e) Intellectual property right of the manual belongs to DKK-TOA. All or part of the manual must not be reproduced without permission.
- Page 6 Model: HM-30P Warranty Warranty (1) Warranty Coverage DKK-TOA Corporation (DKK-TOA) warrants its products against defective material or workmanship for the warranty period. (a) The warranty period is two years from the date of delivery to the original user. (b) Specific written agreements with DKK-TOA, if any, shall take precedence over this warranty.
-
Page 7: Reading Guide
Model: HM-30P Reading Guide Reading Guide Refer to the necessary sections of this instruction manual depending on your purposes such as understanding the outline of this product or starting the product as shown below. The numbers in circles indicate sections to be referred to in sequential order. -
Page 8: Table Of Contents
Model: HM-30P Table of Contents Table of Contents ●Introduction ··········································································································· 1 ●Safety Information ··························································································· 2 (1) Meaning of markings ⋅⋅⋅⋅ 2 (2) Safety compliance items ⋅⋅⋅⋅ 2 (3) Notes on use of the instruction manual ⋅⋅⋅⋅ 3 ●Warranty ·················································································································· 5 ●Reading Guide... - Page 9 Model: HM-30P Table of Contents 5.5 pH measurement ····························································································· 31 (1) Measurement in beaker work ⋅⋅⋅⋅ 31 (2) Immersion measurement ⋅⋅⋅⋅ 32 5.6 Ending measurement ······················································································ 34 (1) Short-term electrode storage ⋅⋅⋅⋅ 34 (2) Long-term electrode storage ⋅⋅⋅⋅ 35 6. How to Use Various Functions ··································...
- Page 10 Model: HM-30P Table of Contents 8.4 How to reset the system ·················································································· 65 (1) Returning all data and parameters to their factory setting ⋅⋅⋅⋅ 65 (2) Returning data other than the clock data and measured data to their factory setting ⋅⋅⋅⋅ 65 9.
-
Page 11: Content Of Package
Model: HM-30P 1. Content of Package 1. Content of Package Accessories list Classification Description Model Quantity Appearance Main body Hand held pH meter HM-30P Accessories pH combination electrode for P GST-2739C series *1 − Standard solution 1 each pH 6.86, 100mL pH 4.01, 100mL... -
Page 12: Specifications And Functions
Model: HM-30P 2. Specifications and Functions 2. Specifications and Functions (1) Specifications Product name Hand held pH meter Model HM-30P Classification JIS 1st class (pH) Measuring method(pH) Glass electrode method Display Digital Simultaneous display of pH, temperature, and time Temperature compensating range ATC (Automatic temperature compensation): 0.0 to 100.0ºC... -
Page 13: Functions
Model: HM-30P 2. Specifications and Functions (2) Functions Clock function Built-in Data storage 1000 data (measured time, pH, temperature) Interval time function Short interval (1 sec to 99 mins 59 secs) data memory Long interval (2 mins to 99 hrs 59 mins) data memory... -
Page 14: Name And Function Of Each Part
Model: HM-30P 3. Name and Function of Each Part 3. Name and Function of Each Part (1) Main body and operation panel Names of main body Types and functions of operation panel keys Type of key ( Notation in text) Function •... -
Page 15: Display
Model: HM-30P 3. Name and Function of Each Part (Continued from previous page) Type of key ( Notation in text) Function • Saves the measured value. Data in/left arrow key • Selects the “ATC/MTC”, “No.”, “INT.” “Clock”, or “etc.” mark at the “Menu”... - Page 16 Model: HM-30P 3. Name and Function of Each Part Names and functions of display Names Functions (Notation in text) ① • Displays the data number. Data number display ② • Displays the remaining battery capacity (4-step display). Battery mark ③...
-
Page 17: Ph Electrode
Model: HM-30P 3. Name and Function of Each Part (3) pH electrode ① ③ ④ ⑦ ② ⑤ ⑥ pH electrode Names and contents of pH electrode Names Contents ① • Used when internal filling solution is filled Refilling hole for internal solution ②... -
Page 18: Preparations
Model: HM-30P 4.1 Attaching the hand strap 4. Preparations 4.1 Attaching the hand strap Attach the hand strap as shown in the below figure. (The attachment method is the same as that of the hand strap of a mobile telephone.) -
Page 19: Loading The Batteries
Model: HM-30P 4.2 Loading the batteries 4.2 Loading the batteries ① Remove the battery cover. After sliding the battery cover holder in the arrow direction with your finger, remove the battery cover while pulling both ends of the battery cover with your fingers. - Page 20 Model: HM-30P 4.2 Loading the batteries ③ Check the packing. Verify that the packing is properly installed to the battery cover (inside). Checking the packing 【IMPORTANT】 When installing the battery cover, confirm that the packing and the rib (part which seals the packing) are not scratched, deteriorated or dusty.
- Page 21 Model: HM-30P 4.2 Loading the batteries End of battery cover End of battery cover holder is firmly inserted holder is not firmly into the notch of the inserted into the notch battery cover. of the battery cover. Checking the end of the battery cover holder...
-
Page 22: Electrode Connection
Model: HM-30P 4.3 Electrode connection 4.3 Electrode connection Fire and electric shock Always verify that the power is off before connecting or disconnecting the electrode plug. Water or reagent entering the product may short the circuits and cause electric shock or fire. -
Page 23: Electrode Preparation
Model: HM-30P 4.4 Electrode preparation 4.4 Electrode preparation Before performing calibration and measurement, inspect the electrode. For details, refer to 7.2 “pH electrode maintenance” and the instruction manual supplied with the electrode. Injury Part of the electrode is made of glass. Be careful not to break it. If accidentally broken, you may be injured by pieces of glass. -
Page 24: Basic Operation
Model: HM-30P 5.1 Operation screens map 5. Basic Operation 5.1 Operation screens map Operation screens map - 23 -... -
Page 25: Turning On The Power
Model: HM-30P 5.2 Turning on the power 5.2 Turning on the power Press for 2 seconds or more (until you hear a beep). The instrument power is turned on, the measurement screen is displayed and the instrument enters INT. the measurement state (... -
Page 26: Time Setting
Model: HM-30P 5.3 Time setting 5.3 Time setting Set the current time in accordance with the following procedure. Time setting procedure Operation Screen example ① Display the menu screen. Press at the Year measurement screen in the measurement state ( INT. -
Page 27: Ph Calibration
Model: HM-30P 5.4 pH calibration 5.4 pH calibration (1) Calibration execution (2-point calibration) Before making any measurements, always calibrate the instrument. 2-point calibration operation using the prepared standard accessory pH6.86 and pH4.01 standard solution is described here. 【IMPORTANT】 For 2-point calibration, use the pH6.86 standard solution and one of the other standard solutions (pH1.68, pH4.01, or pH9.18). - Page 28 Model: HM-30P 5.4 pH calibration ③ Immerse the electrode into the first standard solution. Immerse the electrode into the beaker of pH6.86 standard solution and move it back and forth 2 or 3 times. At this time, be sure that the electrode protective cover is amply immersed in the standard solution.
-
Page 29: Calibration Execution (1-Point Calibration, 3-Point Calibration)
Model: HM-30P 5.4 pH calibration ⑥ Second calibration execution Using the pH4.01 standard solution, perform the second calibration by repeating steps ③ to ⑤. 【IMPORTANT】 During calibration, set the instrument at a stable location or hold it securely with your hands so that it will not move. -
Page 30: Displaying The Newest Calibration Data
Model: HM-30P 5.4 pH calibration (5) Displaying the newest calibration data ① Display the menu screen. INT. In the measurement state ( off), press at the measurement screen. etc. ② Display the calibration history display screen. Press to select (blinking) and press The calibration history display screen appears and the newest calibration date and time are displayed (newest calibration data initial screen). - Page 31 Model: HM-30P 5.4 pH calibration [Electromotive force display [Slope display screen between screen at pH7 standard solution] pH4, 7 standard solutions] (Example) (Example) ④ Return to the measurement screen. Press (less than 2 seconds). The display INT. returns to the measurement screen in the measurement state ( off).
-
Page 32: Ph Measurement
Model: HM-30P 5.5 pH measurement 5.5 pH measurement In normal measurement, set the temperature compensation method to ATC (Automatic Temperature Compensation). 6.4 “Manual temperature compensation setting” (1) Measurement in beaker work ① Clean the electrode tip. Clean the tip of the electrode with pure water and wipe off the water drops with tissue paper, etc. -
Page 33: Immersion Measurement
Model: HM-30P 5.5 pH measurement 【IMPORTANT】 During measurement, set the instrument at a stable location or hold it securely with your hands so that it will not move. If the instrument is moved during measurement, the measured value may become unstable. - Page 34 Model: HM-30P 5.5 pH measurement ① Clean the electrode tip. Clean the tip of the electrode with pure water and wipe off the water drops with tissue paper, etc. Cleaning the electrode tip ② Immerse the electrode into the sample.
-
Page 35: Ending Measurement
Model: HM-30P 5.6 Ending measurement 5.6 Ending measurement ① Turn off the power. Press for 2 seconds or more (until you hear a beep). The instrument power is turned off (OFF). ② Clean the electrode tip. Clean the tip of the electrode with pure water and wipe off the water drops with tissue paper, etc. -
Page 36: Long-Term Electrode Storage
Model: HM-30P 5.6 Ending measurement (2) Long-term electrode storage When measurements will be stopped for a long time (one week or more as a guideline), after pulling the electrode plug straight out from the instrument, store the electrode by referring to the instruction manual supplied with the electrode. -
Page 37: How To Use Various Functions
Model: HM-30P 6.1 Auto hold function 6. How to Use Various Functions 6.1 Auto hold function (a) The auto hold function automatically judges that measurement is stable and holds the measured value and switches to the hold standby state. At this time the measured value is automatically stored. - Page 38 Model: HM-30P 6.1 Auto hold function (Continued from previous page) Operation Screen example ④ End of stability check When the measured value is HOLD stabilized, a buzzer sounds and lights. The measured value is held and the instrument automatically switches to the hold standby state.
-
Page 39: Data Memory Function
Model: HM-30P 6.2 Data memory function 6.2 Data memory function (a) With the data memory function, the data number to store up to 1000 measured values can be set. In addition, the stored data can be individually recalled. (b) Before the start of measurement, set the data number of the measured value storage destination. -
Page 40: Memory Execution By Manual Key
Model: HM-30P 6.2 Data memory function (2) Memory execution by manual key Each time the key is pressed, the current pH measured value is stored. Memory execution procedure by manual key Operation Screen example ① Prepare the electrode. Confirm that the electrode is properly immersed in the sample. -
Page 41: Memory Data Recall
Model: HM-30P 6.2 Data memory function (3) Memory data recall (a) With the data memory function the stored measured value of each data number can be recalled and displayed on the screen. (b) The stored data can also be erased. -
Page 42: Interval Function
Model: HM-30P 6.3 Interval function 6.3 Interval function When the interval function is enabled, the instrument enters the interval standby state and memory using interval can be executed. The measured value is automatically stored at each set time. In the interval standby state ( INT. - Page 43 Model: HM-30P 6.3 Interval function (Continued from previous page) Operation Screen example ⑤ Set the interval time. When the interval function was enabled at step ④, change the blinking number and set the interval time by pressing Setting range: Short interval...
-
Page 44: Memory Execution By Interval
Model: HM-30P 6.3 Interval function (2) Memory execution by interval By enabling the interval function, pH measurement is performed and the measured data is automatically stored at the set interval time. (a) Interval memory start Interval memory start procedure Operation Screen example ①... - Page 45 Model: HM-30P 6.3 Interval function (b) Interval memory stop Interval memory stop procedure Operation Screen example ① Stop interval execution. Press during interval memory execution. The display returns to the measurement screen in the interval standby state ( INT. blinking) and memory execution stops.
-
Page 46: Manual Temperature Compensation Setting
Model: HM-30P 6.4 Manual temperature compensation setting 6.4 Manual temperature compensation setting (a) Set to manual temperature compensation (MTC) to conduct measurements when performing pH measurements by using a constant temperature oven or other device with a sample at a constant temperature or when performing pH measurements as an emergency procedure while there is a problem with the temperature sensor. -
Page 47: Calibration History Function
Model: HM-30P 6.5 Calibration history function 6.5 Calibration history function (a) The calibration history function is effective only when the instrument is combined with a pH combination electrode with “Cal-memo” sensor (Model GST-2729). Three past calibration data, including the newest calibration data, can be stored in the electrode itself. - Page 48 Model: HM-30P 6.5 Calibration history function (Continued from previous page) Operation Screen example ④ Check the newest calibration data. The newest calibration date and time are displayed. (Newest calibration data initial screen) Each time is pressed, calibration date and time...
-
Page 49: Storing The Calibration Data
Model: HM-30P 6.5 Calibration history function (2) Storing the calibration data When storing the calibration data as history, perform the following operations immediately after the end of calibration. Calibration history display procedure Operation Screen example ① Display the menu screen. -
Page 50: Temperature Calibration Function
Model: HM-30P 6.6 Temperature calibration function 6.6 Temperature calibration function (a) When performing stringent measurement, temperature calibration (1-point calibration) can be performed by matching the temperature measured with another standard thermometer to compensate for the temperature error of the electrode. - Page 51 Model: HM-30P 6.6 Temperature calibration function (Continued from previous page) Operation Screen example ⑦ Return to the original screen. After the end of temperature calibration, press (less than 2 seconds). The display returns to the original measurement screen. When temperature calibration was performed, an underline is displayed at the temperature value of the temperature display section.
-
Page 52: Kind Of Ph Standard Solution Setting
Model: HM-30P 6.7 Kind of pH standard solution setting 6.7 Kind of pH standard solution setting (a) This instrument performs pH automatic calibration. However, pH9.18 and pH10.02 standard solution cannot be automatically judged. Therefore, when performing calibration using pH10.02, set the kind of standard solution at this screen. - Page 53 Model: HM-30P 6.7 Kind of pH standard solution setting (Continued from previous page) Operation Screen example ⑤ Return to the original screen. Confirm the set value, and press . After entry, the display returns to the original measurement screen. 1, 4, 7, 9, or 12...
-
Page 54: Ph Calibration Interval Management Setting
Model: HM-30P 6.8 pH calibration interval management setting 6.8 pH calibration interval management setting With the pH calibration interval management function when the set period (number of days) elapses from the end of the last calibration, can be blinked on the measurement screen. This is an effective means in managing pH calibration. -
Page 55: Memory Overwrite On/Off Setting
Model: HM-30P 6.9 Memory overwrite on/off setting 6.9 Memory overwrite on/off setting (a) When the measured value data No. exceeds 1000, whether or not the data No. is returned to 1 and the data is overwritten can be set. (b)When set to overwrite (ON), the old data is erased. Conversely, when set to do not overwrite (OFF), when storage exceeding data No. -
Page 56: Buzzer On/Off Setting
Model: HM-30P 6.10 Buzzer on/off setting 6.10 Buzzer on/off setting The operating sound, operation end sound, and other sounds can be turned on and off. Buzzer on/off setting procedure Operation Screen example ① Display the menu screen. Press at the measurement screen in the measurement state ( INT. -
Page 57: Auto Power Off Setting
Model: HM-30P 6.11 Auto power off setting 6.11 Auto power off setting (a) The auto power off function automatically turns off the power when a key operation was not performed within the set time (10/20/30/60 minutes). (b) This function is disabled during memory execution by interval at the interval execution screen. -
Page 58: Maintenance And Inspection
Model: HM-30P 7.1 Main body maintenance 7. Maintenance and Inspection 7.1 Main body maintenance When cleaning the instrument, wipe it with a soft cloth, tissue paper, or other soft material. In addition, when the instrument is very dirty, dip gauze, etc. into a dilute neutral detergent solution and always wring out the gauze and wipe the instrument body in the state in which the electrode and battery cover are properly installed. -
Page 59: Ph Electrode Maintenance
Model: HM-30P 7.2 pH electrode maintenance 7.2 pH electrode maintenance Hazardous substances The hydrochloric acid for electrode washing is a hazardous material. Wear protective gear when handling it. In addition, always check the Material Safety Data Sheet (MSDS). Injury Part of the electrode is made of glass. Be careful not to break it. If accidentally broken, you may be injured by pieces of glass. -
Page 60: Maintenance When The Electrode Is Dirty
Model: HM-30P 7.2 pH electrode maintenance When the internal solution was consumed ③ Temporarily store the electrode. Insert the electrode into a beaker and temporarily store it as described below according to the measurement contents. (a) Normally, fill a beaker with ion exchange water, distilled water, or other pure water and immerse the electrode into the water. -
Page 61: Battery Replacement Period
Model: HM-30P 7.3 Battery replacement period 7.3 Battery replacement period (a) When the battery mark display becomes as shown in No. 4 of the table below, replace the batteries with new or recharged batteries. 4.2 “Loading the batteries” (b) Since this remaining capacity display differs somewhat for AA size alkali batteries and AA size rechargeable nickel hydride batteries, it is only a guideline. -
Page 62: Troubleshooting
Model: HM-30P 8.1 Safety precautions when an abnormality occurred Troubleshooting 8.1 Safety precautions when an abnormality occurred If an abnormality should occur, remove the batteries. Fire and electric shock Always verify that the power is off before connecting or disconnecting the electrode plug. -
Page 63: Error Display
Model: HM-30P 8.2 Error display 8.2 Error display (a) This instrument has an error display function to alert the operator that an operation mistake or trouble has occurred. ERROR When an error is generated, the mark blinks, an error number is displayed at the main display, and an “error display screen”... - Page 64 Model: HM-30P 8.2 Error display (Continued from previous page) Error Description Cause Countermeasures • The electrode is not properly • Correctly immerse the electrode into the Asymmetry potential error immersed in the standard standard solution. during pH7 standard solution. 5.4 “pH calibration”...
-
Page 65: Other Troubles And Countermeasures
Model: HM-30P 8.3 Other troubles and countermeasures 8.3 Other troubles and countermeasures (a) For the trouble contents, causes, and countermeasures of other than error number display, refer to the following table “Other troubles and countermeasures”. (b) When the instrument does not recover even when these countermeasures are taken or when requesting repair, please confirm the set/electrode name, model No., and the serial No. -
Page 66: How To Reset The System
Model: HM-30P 8.4 How to reset the system 8.4 How to reset the system (a) If the instrument fails to operate properly or an error is generated at the display, it may be possible to return to normal operation by resetting the system. -
Page 67: Transport, Storage, And Disposal
Model: HM-30P 9.1 Transport 9. Transport, Storage, and Disposal 9.1 Transport 【IMPORTANT】 • Always pack the instrument in its container box. Also, do not drop or overturn the box and do not place heavy objects atop the box. Doing so will cause instrument trouble. -
Page 68: Storage
Model: HM-30P 9.2 Storage 9.2 Storage Explosion, fire, and electric shock Do not use the product in an area where explosive gas or flammable gas exists. Do not place the product in a fire or burn it. Doing so may cause an explosion or fire inside the product. -
Page 69: Disposal
Model: HM-30P 9.3 Disposal 9.3 Disposal When disposing of the instrument or reagent, process it based on local regulations. For details, consult your local authorities. Disposal In case you dispose of this product or any part of this product, handle it as industrial waste as specified by law. -
Page 70: Parts/Options List
Model: HM-30P 10. Parts/Options List 10. Parts/Options List When purchasing parts, optional parts, etc., order them from the dealer from whom you bought the instrument. At this time, please specify the part name, type, and quantity. Parts list (standard accessories) - Page 71 Model: HM-30P 10. Parts/Options List Options list Name Type Sales units Remarks Electrode stand 6948810K 1 set When using in a laboratory Stand, stopper, and support rod Electrode holder 0IB00001 Electrode attachment (DP) 0IB00007 Anchor 0IC00001 Retainer for preventing the electrode...
- Page 72 Head Office Address: 29-10, 1-Chome, Takadanobaba, Shinjuku-Ku, Tokyo, 169-8648 Japan Telephone: +81-3-3202-0225 Facsimile: +81-3-3202-5685 URL http://www.toadkk.co.jp/...
Need help?
Do you have a question about the HM-30P and is the answer not in the manual?
Questions and answers
What's the range of slope when the calibration is OK.