Table of Contents
Advertisement
Advertisement
Table of Contents
Troubleshooting

Summary of Contents for Buehler SimpliMet 3000
- Page 1 SimpliMet™ 3000 Automatic Mounting Press MA201435_13.1 6/25/2012...
- Page 2 Continually improve our performance in all aspects of the business. About Buehler For over 70 years, Buehler has been a leading manufacturer of scientific instruments and supplies for use in materials analysis. Buehler products are used throughout the world in manufacturing facilities, quality laboratories and universities to analyze all types materials, including: ...
- Page 3 This information contained in this communication is intended only for the use of the individual or entity to which it is addressed and may contain information that is privileged, confidential and exempt from disclosure under applicable law. © 2010 – 2012 Buehler, a division of Illinois Tool Works Inc. All rights reserved. MA201435_13.1...
-
Page 4: Table Of Contents
Table of Contents SimpliMet 3000 Automatic Mounting Press ....................1 Warranty ................................ 1 Specifications ..............................1 Safety Information ............................2 Machine Use and Care ........................... 2 Safety Terms ............................3 Unpacking ..............................3 Installation ..............................5 Water Connections ..........................5 Drain Connections .......................... -
Page 5: Simplimet 3000 Automatic Mounting Press
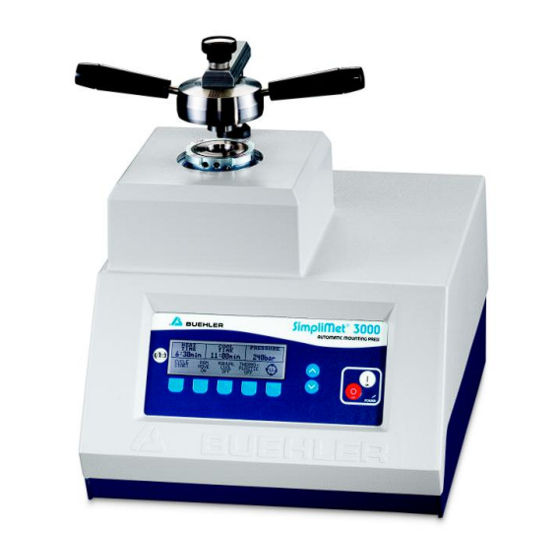
SimpliMet 3000 Automatic Mounting Press The SimpliMet 3000 is a state of the art mounting press with automatic mold sensing. It is easy to use and has full programmability, increasing productivity and sample consistency. The automatic mold sensing detects the mold size and loads the appropriate parameters, eliminating the need to look up tables. -
Page 6: Safety Information
(30-90%). Machine Use and Care All operators should be trained in the use of the SimpliMet 3000. If training is needed contact Buehler at 800.BUEHLER (800.283.4537) or your local Buehler Sales Representative. Always use safety glasses. Flying debris and liquids can cause severe eye injury. -
Page 7: Safety Terms
NOTICE indicates practices not related to personal injury. Unpacking The SimpliMet 3000 has been carefully packaged to protect it during transit from the factory to your location. Carefully unpack and check the contents. If any components are missing or damaged, save the packing list and materials and advise the carrier and Buehler of the discrepancy. - Page 8 The SimpliMet 3000 is bolted to a wood base for protection during shipping. Open areas are provided at the corners of the base for ease of lifting. Lift the SimpliMet 3000 out of the carton and position it on a table so it overhangs on the edge.
-
Page 9: Installation
Installation Select a location for your SimpliMet 3000 that provides an adequate working space, a power source, water connections, and a drain. Placement of the SimpliMet 3000 should be on a sturdy, level bench. Buehler Tech-Met™ tables are highly recommended. -
Page 10: Drain Connections
The main water supply must be shut off at night or when the machine is left unattended. If for any reason the SimpliMet 3000 has to be moved, close the vent valve before moving and open before operating MA201435_13.1... -
Page 11: Vent Valve
Installation of the SimpliMet 3000 must comply with local electrical standards or codes of practice. The SimpliMet 3000 can be plugged into an outlet rated for the voltage and frequency listed on the Specification Plate. Power Switch The main power switch is located on the back, right side of the machine. -
Page 12: Mold Assembly
Mold Assembly The SimpliMet 3000 Automatic Mounting Press is shipped fully assembled except for the Mold Assembly. Due to various available mold sets, Mold Assemblies are supplied as separate order items. CAUTION Personal Injury. Due to high temperatures when using this machine, always use caution when handling molds and working in the mold area. - Page 13 4. Using the supplied 6 mm hex wrench, turn the Mold Cylinder Clamp Screw clockwise (unlock position) until strong resistance is felt, approximately three to four rotations (see Figure 4). This will open the Mold Closure to fit the Mold Assembly. The Cylinder Lock Label (P/N 1430S119) is supplied in the Accessory Kit and is optional for customer use.
- Page 14 9. Raise the Ram Rod and install the Lower Ram (see Figure 7). Figure 7 Lower RAM Assembly 10. Lower the Ram Assembly about halfway down the Mold Cylinder to aid in centering the mold. 11. Place and hold the Upper Ram inside the Mold. This will help in centering the mold (see Figure 8).
- Page 15 Cylinder. Lower the Upper Ram into the Mold Cylinder and turn the bayonet cap handles clockwise to lock the Upper Ram into the Mold Cylinder. 17. The SimpliMet 3000 is now ready for operation. CAUTION To avoid unexpected and extended heating and cooling times and poor mounts, check that the Mold Cylinder Clamp Screw is loose.
-
Page 16: Using The Mold Cylinder
Using the Mold Cylinder Before making a mount, clamp the mold cylinder so it cannot rotate. Before installing or replacing a mold cylinder use the MANUAL COOL function. This will lower the mold cylinder to a safe handling temperature. ... -
Page 17: Operation
SimpliMet 3000 is used to mount specimens with a variety of compression mounting resins. The mold cylinders are designed for single or duplex mounting. Front Control Panel When power is activated to the SimpliMet 3000 front control panel will light up and display the default parameters. Figure 11 SimpliMet 3000 Front Control Panel Power On The Power On button will activate the SimpliMet 3000. -
Page 18: Parameters Fields
Parameters Fields There are multiple parameter fields available. Use the Parameter Scroll button to scroll through the LCD screen to display the different parameters. HEAT COOL PRESSURE TIME TIME 1:00min 3:00min 4200psi Figure 12 Parameter Fields 1 HEAT TIME Displays the amount of time the specimen will be heated. Use the Increase or Decrease buttons to select a time between 0 to 20 minutes, in 10-second increments. - Page 19 Portuguese METHOD LOADED Displays the selected method applied to a cycle. Use the Increase or Decrease buttons to select between four pre-programmed Buehler methods or 25 user-defined methods. If no method is desired, select NONE. Four Buehler Pre-Programmed Methods: ...
-
Page 20: L1 Screen
L1 Screen HEAT COOL PRESSURE TIME TIME 1:00min 3:00min 4200psi CYCLE MANUAL THERMO- START MOVE COOL PLASTIC Figure 15 L1 Screen parameters CYCLE START Press the CYCLE START button to activate a cycle when the bayonet is closed. If the CYCLE START button is pressed in the middle of a cycle, the cycle will stop. -
Page 21: L2 Screen
SAVE METHOD Opens a screen to scroll save one of 25 user-defined methods. LOAD METHOD Opens a screen to scroll through four pre-programmed Buehler Methods (per mold size) and 25 user-defined methods to operate the press. Four pre-programmed Buehler Methods: ... -
Page 22: Method Screen
Loads and saves the parameters of the selected method and exits to the L2 Screen. NEXT Scrolls to one of the four pre-programmed Buehler Methods (per mold size) or to the next displayed number of a user-defined method. PREV Returns to one of the four pre-programmed Buehler Methods or the previous displayed number of the user-defined method. -
Page 23: Making A Mold
Making a Mold Note: Remove any flash of mounting material left on the RAM before making a mold. Brush away any loose mounting material or other deposits from around the mold area before making a mold. Setting Parameters 1. Use the Parameter Scroll button to scroll to the HEAT TIME parameter field. ... -
Page 24: Loading A Method
1. Press the CYCLE START button. The screen will display PRESSURIZE. The press will operate in the automatic mode until the curing cycle is complete. a. Once the SimpliMet 3000 is pressurized, the screen will change to display PRE-HEATING. During the PRE-HEATING phase, the temperature is increasing to reach the selected temperature, 120°... -
Page 25: Additional Features
Additional Features Mold Cylinder Pre-Warming When power is activated to the SimpliMet 3000 and the front control panel is on, the mold cylinder is automatically pre-warmed and maintained to a temperature approximately 105 F (40 C) even when the mold closure is open. The Pre-Warming feature is automatically deactivated during manual cooling (when the MANUAL COOL function is ON). -
Page 26: Maintenance
Maintenance The SimpliMet 3000 will continue to perform at optimum levels with proper care, daily cleaning, and general maintenance. Electrical Shock Hazard. Disconnect the power supply before performing any maintenance. Monthly Remove the bottom RAM and cylinder and clean around the cylinder area with a vacuum cleaner. -
Page 27: Simplimet 3000 Diagnostic Screen
CYCLE TOTAL HOURS HOURS MOLD SENSE Figure 18 SimpliMet 3000 Diagnostic Screen CYCLE HOURS Displays the amount of time accumulated between Cycle Start and Cycle Stop. TOTAL CYCLES Displays the amount of cycles accumulated when the CYCLE START button is pressed. -
Page 28: Trouble Shooting Chart
2. Scroll to the MOLD SIZE parameter and select the correct mold size. LCD screen displays PRE- The thermostat has failed. Call your Buehler HEATING for a long time and Representative for service. the cycle does not complete. MA201435_13.1 [Original Instructions]... -
Page 29: Simplimet 3000 Recommended Parameters
SimpliMet 3000 Recommended Parameters Note: The listed parameters are for single molds only. Double all heat times when using a duplex mold assembly. Due to variable voltages, heating times may vary. Voltages below 120 VAC will take longer than 120 VAC and 240 VAC. -
Page 30: Trouble Shooting When Using Thermosetting Resins
Trouble Shooting when using Thermosetting Resins Thermosetting resins include Phenolic, Diallyl Phthalate, EpoMet™, and KonductoMet™. Possible Cause Correction Problem Mold appears grainy Curing temperature too low. Increase cure temperature. and unfused. Heat time too short. Increase heat time. Insufficient molding Increase molding pressure. -
Page 31: Buehler Environmental Policy
Buehler machine. For End Of Life on Buehler machines, if recycling and disposal facilities are not available in your area, please call Buehler Service at 1.800.BUEHLER (283.4537) or email at service@buehler.com. We will provide options on how to properly recycle and dispose of your Buehler machine. -
Page 32: Simplimet 3000 Accessory Mold Assemblies
SimpliMet™ 3000 Accessories SimpliMet 3000 Accessory Mold Assemblies Description Catalog Number Mold assembly, with duplex spacer. 1” Diameter ................20-2401 Mold assembly, with duplex spacer. 1 1/4" Diameter ................ 20-2402 Mold assembly, with duplex spacer. 1 1/2" Diameter ................ 20-2403 Mold assembly, with duplex spacer. - Page 33 SimpliMet™ 3000 Drawings Figure 19 SimpliMet 3000 Upper Assembly Diagram (1435900B) MA201435_13.1 [Original Instructions] 6/25/2012...
- Page 34 SimpliMet™ 3000 Drawings Figure 20 SimpliMet 3000 Lower Assembly Diagram (1435900C) MA201435_13.1 [Original Instructions] 6/25/2012...
- Page 35 SimpliMet™ 3000 Drawings Figure 21 SimpliMet 3000 Hydraulic Connections Diagram MA201435_13.1 [Original Instructions] 6/25/2012...
- Page 36 SimpliMet™ 3000 Drawings Figure 22 SimpliMet 3000 Wiring Diagram (1435900E) MA201435_13.1 [Original Instructions] 6/25/2012...
- Page 37 SimpliMet™ 3000 Drawings Figure 23 SimpliMet 3000 Packaging Diagram (1435900D) MA201435_13.1 [Original Instructions] 6/25/2012...
- Page 38 SimpliMet™ 3000 Parts List Part Number Description AK#206 KIT FOR 20-1415/1435 LAK#206 LABEL FOR AK#206 R8095 LABEL, A SIZE R6001 CARTON 8-1/16X8-1/16X3-1/8 R6182 SCOOP, PLASTIC-NATURAL 1330S49 SCRAPER TOOL ASSEMBLY 1430S119 LABEL CYLINDER LOCK 203100016 BLACK PHENOLIC POWDER 1 LB JAR L203000A LABEL FOR PHENOLIC SAMPLES L203100...
- Page 39 SimpliMet™ 3000 Parts List Part Number Description 1435S911 SIMPLIMET 3000 UNIT ASSEMBLY B700187 SCREW, M6 X 12 SOC HD CAP B700197 SCREW, M6 X 40 SOC HD CAP B700221 SCREW, M8 X 130 SOC HD CAP B704003 SCREW, M2 X 12 REC PAN HD SS...
- Page 40 SimpliMet™ 3000 Parts List Part Number Description R10496 SCREW, SET - DOG POINT R10497 DRIVER, 4MM BALL POINT HEX R11025 VALVE, 12VDC SOLENOID R12061 FERRULE,1.5MM, HO1.5/16-D R12062 FERRULE,2.5MM,HO2.5/18-D R1645TPH SCREW, 8-32 X 3/8 PHIL TR HD SS R2886 NYLON TUBE 1/4 OD 14.5 R4017A ADHESIVE SEAL-CLEAR RTV 11 OZ.
- Page 41 SimpliMet™ 3000 Parts List Part Number Description 1415S033 BRACKET, CYLINDER 1415S034 BASEPLATE, SIMPLIMET 1000/3000 1415S035 PLATE, ELECTRICAL 1415S038 TAG, VALVE OPERATION 1415S502 PCB, PWR CNTRL HI-VOLT LF 1430S097 BRUSH, CLEANING 1430S099 WRENCH, HEX 6 MM W/HANDLE 1430S122 WASHER, 5/16 O.D. X .02 1430S199 ASSY, SHAFT &...
- Page 42 BOLT, SHOULDER 1430S167 FITTING, WATER TUBE 1435S011 HYDRAULIC CYLINDER SIMP 1K/3K 1435S502 CABLE, MOLD SENSOR 1435S504 NAMEPLATE, SIMPLIMET 3000 NEW 1435S505 PCB, LOGIC & LCD CONTROL LF 3K 1435S507 PCB, MOLD SENSOR SIMP 3K LF 1790S062 PLATE, BILINGUAL CAUTION 203000 HYDRAULIC OIL-BULK 0.469...
- Page 43 SimpliMet™ 3000 Method Log METHOD HEAT COOL PRESSURE TEMPERATURE MATERIAL MOLD NUMBER TIME TIME SIZE MA201435_13.1 [Original Instructions] 6/25/2012...
- Page 44 Buehler, Asia-Pacific Web Site: http://www.buehler-asia.com 69570 Dardilly, France Fax: (852) 2307 0223 Tel: (04) 37 59 81 20 E-mail: info@buehler.com.hk Fax: (04) 37 59 81 29 Email: sav@buehler.fr For all other service inquiries contact Buehler at www.buehler.com/locations/service.htm. MA201435_13.1 [Original Instructions] 6/25/2012...
- Page 45 Notes MA201435_13.1 [Original Instructions] 6/25/2012...
Need help?
Do you have a question about the SimpliMet 3000 and is the answer not in the manual?
Questions and answers