Table of Contents
Advertisement
Advertisement
Table of Contents

Related Manuals for Victrola VH-40

Summary of Contents for Victrola VH-40
- Page 1 Model:VH-40 BT SPEAKER TABLE...
-
Page 2: Table Of Contents
CONTENTS IMPORTANT SAFETY INSTRUCTIONS..................ACCESSORIES INCLUDED ....................... INSTALLING YOUR TABLE......................INSTALLING THE TIPPING RESTRAINT PACK ................ CONNECTING TO THE POWER....................PRODUCT OVERVIEW ....................... STATUS LED ..........................REMOTE CONTROL........................CONNECTING TO THE TV......................CONNECTING ANOTHER DEVICES..................GENERAL OPERATIONS ......................BLUETOOTH OPERATION......................AUX IN OPERATION........................ -
Page 3: Important Safety Instructions
- This lightning flash with arrowhead symbol within an equilateral triangle is intended to alert the user to the presence of non-insulated “dangerous voltage” within the product’s enclosure that may be of sufficient magnitude to constitute a risk of electric shock. - Warning: To reduce the risk of electric shock,do not remove cover (or back) as there are no user-serviceable parts insides. - Page 4 - This lightning flash with arrowhead symbol within an equilateral triangle is intended to alert the user to the presence of non-insulated “dangerous voltage” within the product’s enclosure that may be of sufficient magnitude to constitute a risk of electric shock. - Warning: To reduce the risk of electric shock, do not remove cover (or back) as there are no user- serviceable parts inside.
-
Page 5: Accessories Included
ACCESSORIES INCLUDED Unpack the box and verify that the following items are included: Main Unit Wood Dowels Side Board Knob Bolts Unit Legs “L” Bracket Screws Power Cords RCA Cable Touch-up Pen Tipping Restraint Pack Remote Control Dry Batteries * One set includes 1 safety strap, 2 buckles, 2 rubber stoppers and 4 screws. -
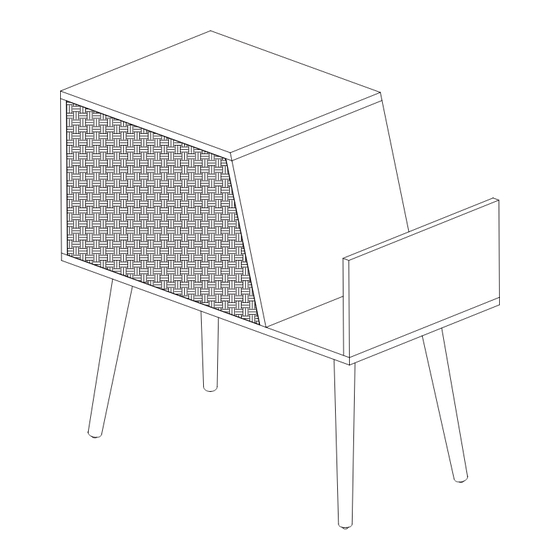
Page 6: Installing Your Table
INSTALLING YOUR TABLE IMPORTANT NOTES: Please make sure you have all parts before beginning assembly. Please wait until all steps are completed before tightening bolts. We recommend using two people for assembly. Step 1: Installing the Side Board Attach the Side Board(included) to the table by using the Knob Bolts(included) and Wood Dowels(included). See pictured insert. -
Page 7: Installing The Tipping Restraint Pack
INSTALLING THE TIPPING RESTRAINT PACK Installing the Tipping Restraint Pack helps prevent table tip over during minor earth tremors. * One set tipping restraint pack includes 1 safety strap, 2 buckles, 2 rubber stoppers and 4 screws. Safety Strap X 1 Rubber Stopper X 2 Buckles X 2 Screws X 4... -
Page 8: Connecting To The Power
CONNECTING TO THE POWER IMPORTANT NOTES: Three power cords with different plugs are included. Depending on your region, select and use an appropriate one. CAUTION: Only use the AC Power Cords supplied with this device. Do not use a power supply from another device or manufacturer. -
Page 9: Product Overview
PRODUCT OVERVIEW Control Panel STANDBY/ON-OFF • Turn ON the unit or switch the unit to Standby mode. • Hold the button for 3-5 seconds to set as the Master unit. MODE/SOURCE • Press the button repeatedly to switch to different playback mode. -
Page 10: Status Led
STATUS LED Status LED Indicators LED Indicator-1 LED Indicator-2 Status LED Table (No TWS Connection) Device Operation Mode LED Indicator-1 Action LED Indicator-2 Action Standby Mode RED (solid) – Connecting: BLUE ( blink slowly) – Bluetooth Mode Connected: BLUE (solid) –... -
Page 11: Remote Control
REMOTE CONTROL Buttons Function STANDBY/ON-OFF • Turn ON the unit or switch the unit to Standby mode. • Hold the button for 3-5 seconds to set as the Master unit. MUTE • Press Once to cut the playing volume in half. •... - Page 12 CONNECTING A TV HDMI(ARC) The ARC (Audio Return Channel) function allows you to send audio from your ARC-compliant TV to your unit through a single HDMI connection. To enjoy the ARC function, please ensure your TV is ARC compliant and set up accordingly. The setting method of ARC may differ depending on your TV model. For details regarding the ARC function, please refer to your TV owner’s manual.
-
Page 13: Connecting Another Devices
CONNECTING ANOTHER DEVICE Connecting an audio playback device Connect to COAXIAL IN, OPTICAL IN or AUX IN input to an audio playback device (CD player, portable music player, etc...) using the appropriate cables. AUDIO OUTPUT DIGITAL AUDIO COAXIAL OUTPUT DIGITAL AUDIO OPTICAL OUTPUT Audio Device Connecting a USB storage device... -
Page 14: General Operations
GENERAL OPERATIONS POWER ON THE DEVICE Select an appropriate power cord (included) and plug it into the AC INLET (AC IN) . Switch the POWER SWITCH to ON. It is strongly recommended that this product should be operated only from the type of power source marked on the rating label. -
Page 15: Bluetooth Operation
Go to Bluetooth settings on your device. Make sure your device’s Bluetooth feature is set to ON. From the Bluetooth list on your device, select < VH-40 >. Once successfully connected, a prompt voice will be came, and the LED Indicator-1 will stop blinking and solid in Blue color. -
Page 16: Coaxial Operation
COAXIAL IN OPERATION Press the MODE button on panel or remote control to enter COAXIAL Input mode. Once enter, the LED Indicator-1 will be lit up in solid Red and LED Indicator-2 in solid White color at the same time. Use an “RCA”-type cable to connect your television’s coaxial digital audio output to the unit’s COAXIAL INPUT CONNECTOR. -
Page 17: Tws Connection
TWS CONNECTION VH-40 supports two or more VH-40 paired and shared audio perfect sync with no delay. Notes: You can also connect VH-40 to your Smart Home Devices(VH-XX series products, including VH-15, VH-20, VH-25, VH-35 and VH-40) over Bluetooth. How to Set Two Or More VH-40 into TWS Mode: Power on the VH-40 speakers first. - Page 18 Blue and White LED indicators on the Master unit will be lit up and start blinking. You can now search for the Master unit (VH-40) using your Bluetooth device. For more information, refer to the user documentation that came with the device.
- Page 19 TWS CONNECTION OPTICAL OPERATION: Press the MODE button of the Master unit to enter Optical Mode. The White LED indicator on the Master unit will be lit up and start blinking. Use the digital optical cable to connect your television’s optical digital output to the OPTICAL INPUT JACK on the Master unit.
-
Page 20: Specification
SPECIFICATIONS GENERAL Power Requirements ..............AC 100-240V~ 50/60Hz Power Consumption...............80W AMPLIFIER Output Power ..................2 x 20W + 40W Frequency Response...............Suwoofer: 20 to 200 Hz ...............Mid-rang tweeter: 200 Hz to 20 KHz SPEAKER SYSTEM Type ....................2.1ch Impedance ..................4 Ohms USB Playback ................5V, 500mA USB Charging ..................5V, 2.1A BLUETOOTH Bluetooth Version ................Bluetooth V4.0... -
Page 21: Troubleshooting Guide
Please note: As a result of continual improvements, the design and specifications of this product are subject to change without notice. This product is manufactured and sold by Innovative Technology Electronics LLC. Victrola and the Victrola logo are trademarks of Technicolor or its affiliates and are used under license by Innovative Technology Electronics LLC. - Page 22 FCC Statement Warning: Changes or modifications to this unit not expressly approved by the party responsible for compliance could void the user authority to operate the equipment. NOTE: This equipment has been tested and found to comply with the limits for Class B digital device, pursuant to part 15 of the FCC Rules.
- Page 23 To obtain service, the purchaser MUST present an original sales receipt / proof of purchase. Please contact us at www.victrola.com to request an RMA (Return Material Authorization) number to return products for service or replacement. Returns without an RMA number on the package will be refused and returned to sender.
Need help?
Do you have a question about the VH-40 and is the answer not in the manual?
Questions and answers