Table of Contents
Advertisement
Quick Links
This User Manual includes the Aurora Sport, Aurora 'classic', and the Aurora PRO. Colors, features, and accessories will vary.
Getting Started
What's in the Box
Battery Charging
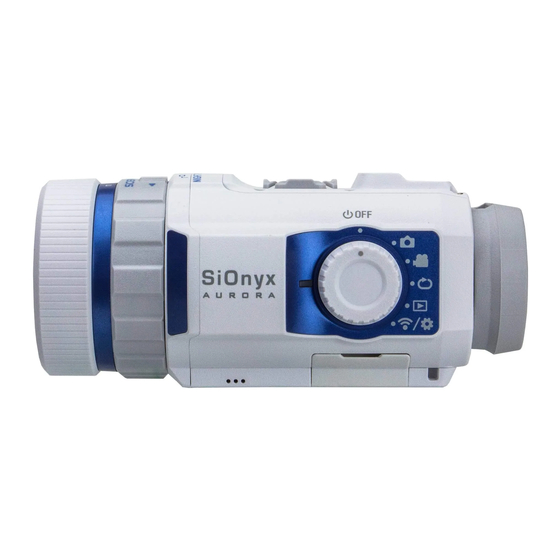
Modes, Buttons and Settings
Electronic Viewfinder (EVF)
Scene and Focusing Rings
Setting the Date and Time
Attaching The Neck Strap [Not available with Aurora Sport]
Photo and Video Modes
Focusing, Zooming, and Exposure Compensation
The Scene Ring
Playback, Deleting, and Zooming in on Photos and Videos
Photo Settings: Shutter | Burst | HDR | Self Timer | Panorama | Time Lapse
Photo and Video Advanced Settings
Brightness (Evf) | Overlay | EVF Time Out | Night Glow | Quick Review (photo) | Invert
Image Video Settings: EIS | Frame Rate | Resolution
Loop Mode
Trigger Type and Mode
About: FW Version | Serial # | MAC Address | Factory Reset
Calibrate Compass (original Aurora only)
Language
SD Card
GPS (original Aurora only)
Wifi (and the Mobile App)
Battery - usage tips, storage, handling and disposal
Camera Specifications
Sionyx Customer Care[br][br]
Warranty
Getting Started
Congratulations on the purchase of your new SiOnyx Aurora Night Vision camera! Let's get started!
What's in the Box?
Note: The Aurora Sport does not include the Quick Start Guide, the Neck Strap, or the Microfiber Bag.
1/29
Advertisement
Table of Contents


Need help?
Do you have a question about the Aurora Sport and is the answer not in the manual?
Questions and answers