
Summary of Contents for EURGEEN OL-BKY26-A4
- Page 1 Local Portable Air Conditioner Owner’s Manual Original instructions Model: OL-BKY26-A4 (With R290 refrigerant) READ AND SAVE THESE INSTRUCTIONS...
-
Page 2: Table Of Contents
CONTENTS BEFORE YOU BEGIN ..........03 FOR YOUR SAFETY ............. 05 PRODUCT OVERVIEW ..........10 INSTALLATION ............12 OPERATION ............... 17 CLEANING AND CARE ..........23 TROUBLESHOOTING ..........25 DECOMMISSIONING ............26... -
Page 3: Before You Begin
1. BEFORE YOU BEGIN 1.1 PRODUCT DESCRIPTION Our powerful portable air conditioners are great cooling solutions for single rooms, creating a comfortable atmosphere in your space. It also has ventilation and dehumidifying function for circulating air and removal of moisture. They're self-contained systems that do not require any permanent installation allowing you to move to the space in which it is most needed. - Page 4 Service personnel are required to carefully read the USER MANUAL and SERVICE MANUAL before operation.
- Page 5 THE FOLLOWING SHOULD ALWAYS BE OBSERVED FOR SAFETY This appliance is intended to be used by expert or trained users in shops, in light industry and on farms, or for commercial use by lay persons. This appliance can be used by children aged from 8 years and above and persons with reduced physical, sensory or mental capabilities or lack of experience and knowledge if they have been given supervision or instruction concerning use of the appliance in a safe way and...
- Page 6 should be used inside or in the vicinity of the units. Component parts are designed for propane and non-incentive and non-sparking. Component parts shall only be replaced with identical repair parts. FAILURE TO ABIDE BY THIS WARNING COULD RESULT IN AN EXPLOSION, DEATH, INJURY AND PROPERTY DAMAGE.
-
Page 7: For Your Safety
2. FOR YOUR SAFETY Your safety is the most important thing we concerned! Please read this manual carefully and fully understand before operating your dehumidifier. WARNING OPERATIONALPRECAUTIONS WARNING- to reduce the risk of fire, electric shock or injury to persons or property: ... - Page 8 Do not put objects on the unit. Do not climb or sit on the unit. Do not insert fingers or other objects into the air outlet. Do not touch the air inlet or the aluminum fins of the unit. ...
- Page 9 corresponds to the room area as specified for operation. Any person who is involved with working on or breaking into a refrigerant circuit should hold a current valid certificate from an industry-accredited assessment WARNING authority, which authorizes their competence to handle refrigerants safely in accordance with an industry, recognized assessment specification.
- Page 10 2.2 SAFETY PRECAUTIONS ON SERVICING Please follow these warnings when to undertake the following when servicing an appliance with R290. 2.2.1 Checks to the area Prior to beginning work on systems containing flammable refrigerants, safety checks are necessary to ensure that the risk of ignition is minimized. For repair to the refrigerating system, the following precautions shall be complied with prior to conducting work on the system.
- Page 11 to hand. Have a dry powder orCO2 fire extinguisher adjacent to the charging area. 2.2.6 No ignition sources No person carrying out work in relation to a refrigeration system which involves exposing any pipe work that contains or has contained flammable refrigerant shall use any sources of ignition in such a manner that it may lead to the risk of fire or explosion.
- Page 12 – If an indirect refrigerating circuit is being used, the secondary circuit shall be checked for the presence of refrigerant; – Marking to the equipment continues to be visible and legible. Markings and signs that are illegible shall be corrected; –...
- Page 13 The manufacture may provide other suitable example or may provide additional information about the refrigerant odour.
-
Page 14: Product Overview
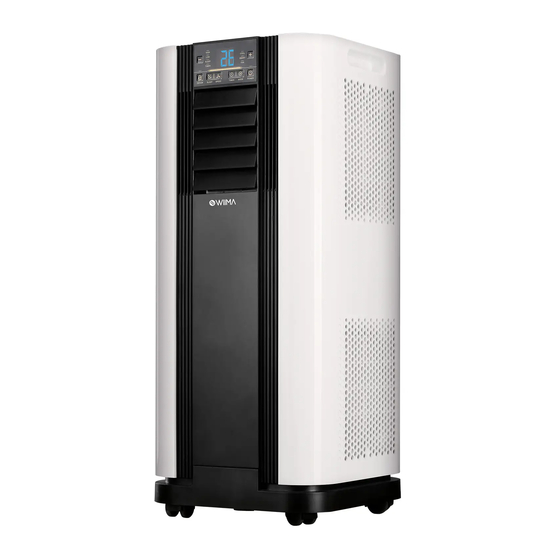
3. PRODUCT OVERVIEW 3.1 PRODUCT DIAGRAM FRONT VIEW BACK VIEW Air inlet with air Recessed Air inlet with handle air filter filter Control panel Drain opening with signal Air Exhaust with sealing plug receptor Air outlet with adjustable Power cord box louver Note: The appearance is only for reference. - Page 15 Casters for easy mobility Automatic restart in the event of power outage Auto defrosting function at low ambient temperatures Remote control 3.3 SPECIFICATIONS MODEL OL-BKY26-A4 Cooling Capacity 9000 Btu Power Supply AC220-240V/50Hz Cooling Rated Input 950W/4.3A Power/Current Sound Pressure ≤55 dB(A)
- Page 16 Net Weight 26.0 kg HighSide:3.2MPa Maximum Design Pressure LowSide:0.7MPa Minimum Room Size 10 m2 (Floor area) Dimension 320*320*740mm Fuse type and T-Type, AC 250V, rating: 3.15A...
-
Page 17: Installation
4. INSTALLATION Unpacking Unpack the carton and take the appliance and accessories out. Check the device after unpacking for any damage or scratches on it. Accessories: 1. Exhaust hose 2. Hose connector 3. Window kit adapter ... - Page 18 4.2 Choose your location Place the unit on a firm, level surface in an area with at least 50cm of free space around it allow for proper air circulation. Do not operate in close proximity to walls, curtains, or other objects that may block inlet and outlet.
- Page 19 4.3 Attach the exhaust hose The air conditioner requires being vented outside so that the exhaust air can escape the room which coming from the appliance contains waste heat and moisture. Do not replace or extend exhaust hose which will result in decreased efficiency, even worse shut down the unit due to low backpressure.
- Page 20 Step 5: Close your window to secure the kit in place. It needs to hold the windows kit It is recommended that firmly in place, secure the window kit with duct tape if required. he gap between the adapter and the sides of the window should be sealed off for maximum efficiency.
- Page 21 Step7: Adjusting the length of the flexible exhaust hose, and avoid bends in the hose. Then place AC near an electrical outlet. Step8: Adjust the louver at the air outlet, and then switch on the unit.
-
Page 22: Operation
5. Operation Control Panel and Display Fout! Fout! Fout! Fout! Fout! Fout! Fout! Fout! Fout! Fout! Fout! REMOTE CONTROL... - Page 23 Power Mode Fan speed Minus Sleep Timer Move the battery's insulating piece away before using.
- Page 24 Function keys and indicators Power Press to switch the machine on or off. button (LED) Press to switch the operation mode between cool, Mode button smart and fan. Sets a time for the unit to automatically start or stop. Timer button The range of timer adjustable is 1-24 hours.
- Page 25 Settings 5.4.1. Start-up and Shutdown Press POWER to turn the machine on. The unit runs in smart mode as default. Press MODE button to select the desired operation mode. Press POWER again to turn off the power. 5.4.2. Operation mode The unit has five operation modes: Cool, smart, fan, dehumidifying.
- Page 26 C. Dehumidifying your room Press DEHUM button or mode button on the remote control, the LED of DEHUM operation lights up. The fan speed is unable to select. User should connect the hose to the drain outlet at the bottom of the unit. Note: in this mode, the fan speed switches over to low speed and cannot be selected.
- Page 27 (1hour-24hours): 5.4.3. Timer Setting The timer has two ways of operation: Press Timer key to Press ADD/MINUS turn on the timer repeatedly to set the To turn off function. delay OFF time (When power on) Press ADD/MINUS Press Timer key to To turn on repeatedly to set the turn on the timer...
- Page 28 minutes and the power indicator blinking. 5.4.5. Overload Protection In the event of a power loss, to protect the compressor there is a 3-minute delay until the compressor restarting.
- Page 29 Drainage For continuous operation or unattended operating, please connect the attached drain hose to the unit. Condensate water can be automatically flow into a bucket or drain by gravity. Set the unit in a horizontal surface and stable position. ...
- Page 30 degree of inclination should exceed 20 degrees. • Straighten the hose to avoid a trap existing in the hose.
-
Page 31: Cleaning And Care
6. CLEANING AND CARE 6.1. Cleaning the Air Filter (every two weeks) Dust collects on the filter and restricts the airflow. The restricted airflow reduces the efficiency of the system and if it becomes blocked it can cause damage to the unit. The air filter requires regular cleaning. - Page 32 Warning!!! Do not touch the evaporator surface with bare-hand, or could cause injury of your fingers.
- Page 33 6.2. CLEANING UP OF REFRIGERANT General Measures: 1. Gas/vapor heavier than air. May accumulate in confined spaces, particularly at or below ground level. 2. Eliminate every possible source of ignition. 3. Use appropriate personal protection equipment (PPE). 4. Evacuate unnecessary personnel, isolate, and ventilate area. 5.
-
Page 34: Troubleshooting
7. TROUBLESHOOTING Symptom Inspection Solution Check the power Insert the power cord securely into the wall Outlet. connection in securely. The unit is Check if the water level Empty the water tank and indicator lights up? reinstall correctly. - Page 35 Check connection or replace Temperature sensor failure Humidity sensor dampened To clean or replace the or failure. temperature sensor. Empty the drain pan by remove Condensate water high level the rubber plug. alarm.
-
Page 36: Decommissioning
8. DECOMMISSIONING 8.1. STORAGE Long-Term Storage - If you will not be using the unit for an extended period of time (more than a few weeks) it is best to clean the unit and dry it out completely. Please store the unit per the following steps: Unplug the unit. - Page 37 Do not dispose of electrical appliances as unsorted municipal waste, use separate collection facilities. Contact your local government for information regarding the collection systems available. If electrical appliances are disposed of in landfills or dumps, hazardous substances can leak into the groundwater and get into the food c h a i n , d a m a g i n g...
- Page 38 Firm Name: Deals2day BV Web: w w w .deals2day.be Address: Hagenbroeksesteenweg 214C, 2500 Lier, België Tel: +32 3 284 35 84...
- Page 39 Version 2020.4.29...
Need help?
Do you have a question about the OL-BKY26-A4 and is the answer not in the manual?
Questions and answers