Advertisement
Table of Contents
Advertisement
Table of Contents

Related Manuals for ViaAqua Acro-Cal AC-10


Summary of Contents for ViaAqua Acro-Cal AC-10
- Page 1 WARNING Buyer/User assumes all responsability for safety and proper use not in accordance with the directions and sately labels. • Built-in water pump • Built-in bleed valve • Use in sump or hanging pump • Bubble counter included • Easy twist off top • For 10 to 75 gal aquarium AC - 10...
- Page 2 FEATURES ViaAqua® Acro-Cal Calcium Reactor offers a simple and convenient solution for maintaining calcium and alkalinity in your reef tank. After the initial setup, the calcium reactor requires minimal maintenance. A calcium reactor is almost a necessity for tanks heavily stocked with stony coral, where calcium and alkalinity demands are high and will promote coral line algae growth. Acro-Cal Calcium Reactor provides a steady supply of calcium by using CO to dissolve media in the reactor and, thus, releasing calcium into your water. The effluent released also acts as a buffer to stabilize kH. WARNING AND SAFEGUARD WARNING » This product may contain chemicals known to the State of California to cause cancer and/or birth defects or other reproductive harm. Wash you hand after handling the product.
-
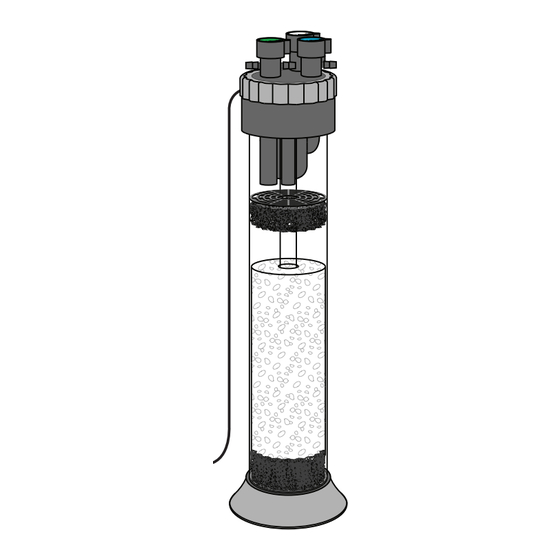
Page 3: Part List
Items Required for Installation (not included): • CO Source • CO Regulator • CO Check Valve • Silicone Tubing • Oceanpure™ Calcium Reactor Media • pH Controller (recommended) PART LIST 2. White air-vent-bleed 1. Green water valve intake valve 1. Green water intake valve 3. Blue effluent water 2. White air-vent-bleed valve valve 3. Blue effluent water valve 4. Hanger 5. Support grid 6. Sponge 4. -
Page 4: Installation
INSTALLATION: 1. Remove the top of the calcium reactor. Rinse calcium reactor media. Place a sponge over the bottom support grid. Add approximately 6” of media to the reactor. When adding media verify that media does not go down the stand pipe. Place another sponge over the top support grip above the media. Screw lid back onto the calcium reactor and verify that the output is connected to the stand pipe. 2. Choose one of the following water source (in): a) Gravity (unit installed below aquarium): Connect a piece of silicone tubing to the green water intake valve, insert the line inside the aquarium 2” below the water surface. The tube can be secured directly to the overflow box using a zip tie. b) Pressure: Choose an existing pressure line. Cut the line and plumb in a tee. The bleed line will supply water to the calcium reactor. The bleed line must have a valve and reduced to 3/16” barb. With the valve closed connects the silicone tubing from the bleed line directly to the green water intake valve. c) Supply pump: Use a separate low flow pump. Reduce the output of the pump to 3/16” barb. Connect silicone tubing directly to the green water intake valve. Depending on the size of the pump, a bleed line is needed to keep water flowing through the pump at all times. 3. Effluent water (out): Connect silicone tubing to the blue effluent water valve. Secure the line to the back of the aquarium or sump. The silicone tubing must be positioned above water level so that you can see droplets of water flowing from the tube. Check Valve CO 2 (in) 4. Fill bubble counter three quarters full with fresh water. 5. CO /Water intake (in): Attach the silicone CO 2 Regulator tubing from the CO regulator to a check valve to the bubble counter and to the CO green water intake valve. See diagram below. - Page 5 8. Once the calcium reactor is primed, close white air-vent-bleed valve. If air is accumulated in the calcium reactor, open white air-vent-bleed valve and leave the green water intake valve open. 9. Turn on the pump and wait until the water clears. Open the blue effluent water valve. Adjust the valve so there is a broken stream of water discharging from the tube. Set the valve as slow as possible without being able to count any droplets. 10. Turn on the CO control valve. Adjust the CO regulator to produce 60 bubbles per min. in the bubble counter chamber. The CO input is directly related to water flow rate: • To raise pH in effluent water increase water flow or decrease CO • To lower pH in effluent water decrease water flow or increase CO 11. A pH meter/controller is recommended to maintain a proper level of pH in the aquarium. Collect a small amount of effluent water and test it with a pH meter. Initially adjust the CO at pH 7.5. Monitor the pH in the aquarium and verify that it’s not dropping fast. If pH drops rapidly, decrease CO immediately. At all times, the pH of the aquarium should be over 8.0. The ideal pH of the effluent water should be 6.5 to 7.5. It takes approximately two weeks to stabilize the pH of the effluent water to the ideal level. Continue increasing or decreasing the CO or effluent water amount as needed to achieve optimum pH level. 12. After 24 hours, measure the carbonate hardness of the effluent water. The hardness level should be around 12-16 dKH. Calcium levels will increase but the rate it increases depend on the type of media used. Oceanpure Calcium Reactor Media is recommended. 13. Continue adding the calcium media until the Calcium Reactor starts to work. SETUP DIAGRAM 2” A) GRAVITY Green Water Intake Valve: O In Blue Effluent Water Valve:...
- Page 6 B) PRESSURE Main Pump Line Valve H 2 O (in) CO 2 (in) PVC Pipe Check Valve CO 2 Regulator Bubble Counter CO 2 Tank Drip Loop Aquarium or Sump C) SUPPLY PUMP CO 2 (in) Check Valve CO 2 Regulator Bubble Counter CO 2...
-
Page 7: Maintenance
1. Routine manteinance is required to ensure the maximum performance and the longevity of the ViaAqua Acro-Cal Calcium Reactor. ® 2. For proper operation of the Calcium Reactor, clean the impeller once a month. a) Remove the top of the calcium reactor. b) Remove the impeller cover. c) Remove the impeller and shaft. With a small brush clean the inside of the impeller and impeller cover. d) If the impeller does not spin easily on the shaft, soak the unit with 3:1 vinegar solution. Remove all calcium residue between the shaft and rotor. e) Reassemble. 3. Replace calcium media every 3 to 6 months depending on the usage. 4. Clean the ViaAqua Acro-Cal Calcium Reactor every 3 to 6 months along with the water ® pump. 5. Make sure all parts are free of debris and calcium build-up. PH CONTROLLER (RECOMMENDED) The pH Controller is used to keep the effluent water at a preset level. Items needed: • pH controller • CO regulator with solenoid • Container for the effluent water (must fit pH probe) Installation: • Secure the container to the pH probe. - Page 8 Although this limited warranty gives you specific rights, you may have other rights which vary from state to state. This warranty is void if the failure is due to misuse, tampering, negligence, abuse, accident and/or submersion, a failure to properly install, maintain, clean, prefilter, reassemble, and/or use the ViaAqua® Acro-Cal Calcium Reactor with a Ground Fault Circuit Interrupter (G.F.C.I.). CONSUMER REMEDIES Commodity Axis, Inc.’s entire liability and your sole and exclusive remedy shall be either...
-
Page 9: Registration Card
REGISTRATION CARD ONE (1) YEAR WARRANTY CARD Please fill out this warranty card and mail it with PROOF OF Purchase within 15 days of purchase to: Commodity Axis Inc., 300 South Lewis Rd. Unit J. Camarillo CA 93012, USA Name Date Product Name Mode No...
Need help?
Do you have a question about the Acro-Cal AC-10 and is the answer not in the manual?
Questions and answers