Advertisement
Table of Contents
- 1 Table of Contents
- 2 Safety & Precautions
- 3 Parts & Accessories
- 4 Parts & Accessories List
- 5 Before Sewing & Start to Sew
- 6 Start to Sew (Cont'D) & Finish Sewing
- 7 Threading the Machine
- 8 Threading the Machine (Cont'D)
- 9 Tension Adjustment
- 10 Needle Replacement & Winding the Bobbin
- 11 Creative Tips & Ideas
- 12 Creative Tips & Ideas
- 13 Troubleshooting
- Download this manual
Advertisement
Table of Contents

Summary of Contents for SewMighty Mighty Mini
- Page 1 . s e w m i g h t y . c o m Mighty Mini Sewing Machine OPERATION MANUAL (Please read manual carefully before using the SewMighty™)
-
Page 2: Table Of Contents
Sewing for all your personal needs has never been easier. Mending or creating masterpieces for yourself and as memorable gifts isn't wishful thinking anymore. You can do it all with the easy-to-use, lightweight SewMighty ® Now you can make repairs to clothing, curtains, bedding -- virtually all the fabric items in your home. -
Page 3: Safety & Precautions
SAFETY & PRECAUTIONS IMPORTANT: THE POWER ADAPTER & BATTERIES CANNOT BE USED AT THE SAME TIME. THERE CANNOT BE ANY BATTERIES IN THE SewMighty ® IF USING THE POWER ADAPTER. THIS WILL DAMAGE THE SewMighty ® ** REMOVE ALL BATTERIES WHEN USING POWER ADAPTER. ** Remove batteries when the machine is not in use for long periods. -
Page 4: Parts & Accessories
PARTS & ACCESSORIES ACCESSORIES BACK OF UNIT Large Extension Table Needle Needle Threader Tape Measure (4) Metal Power Bobbins Adapter Foot Pedal... -
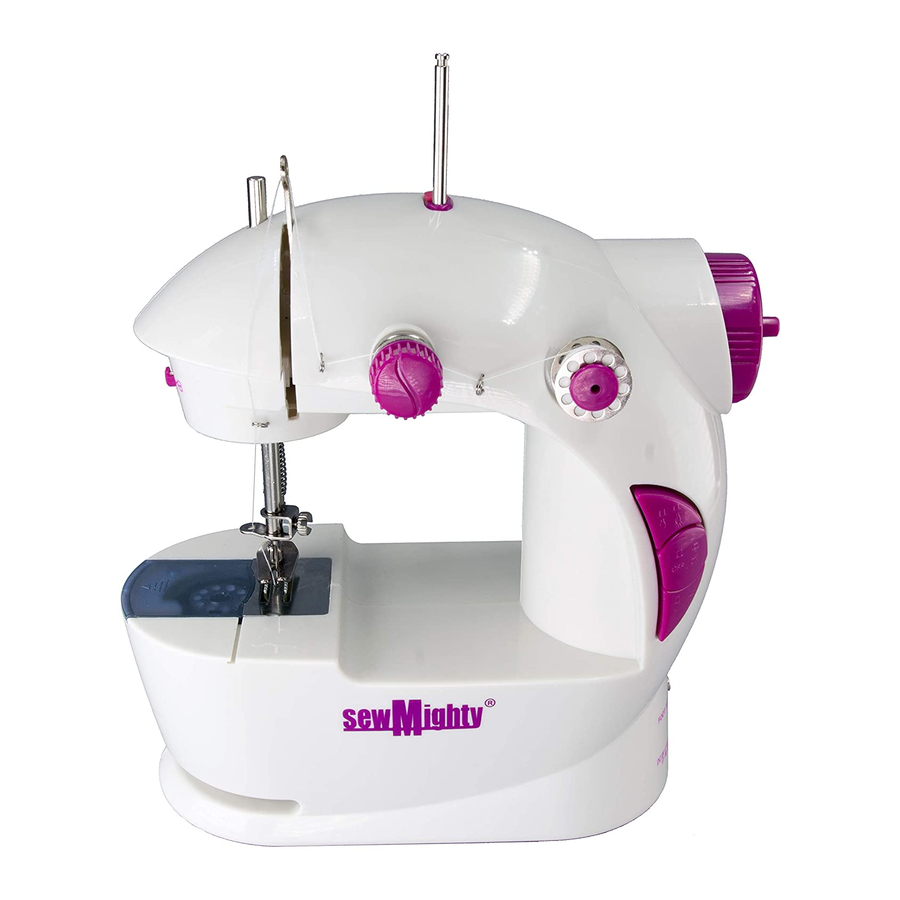
Page 5: Parts & Accessories List
PARTS LIST A- ON/OFF Switch B- Battery Compartment (bottom of unit) C- Thread Spindle D- Take-up Lever E- Thread Spool F- Presser Foot G- Presser Foot Lever H- Thread Gap I- Bobbin Compartment J- Bobbin Holder K- Hand Wheel L- Speed Control M- Foot Pedal Jack N- Tension Adjusting Screw O- Needle Clamp Screw... -
Page 6: Before Sewing & Start To Sew
BEFORE SEWING (1) Check if the needle thread and bobbin thread are available. The machine must be threaded correctly (Both needle thread and bobbin thread, refer to Pages 6-7 "Threading the Machine"). A wrong threading will cause skipped stitches (cannot sew), thread breaking and irregular stitches. -
Page 7: Start To Sew (Cont'd) & Finish Sewing
START TO SEW (1) Raise up the presser foot by pulling its lever, raise the needle up to its highest position by turning the Hand Wheel towards you. (2) Pull at least 10 cm (4 inches) needle thread from needle. Put the needle thread and bobbin thread under and behind the press- er foot. -
Page 8: Threading The Machine
THREADING THE MACHINE 1. Set the Needle Thread ( Upper Thread ) Please strictly follow the right order to thread the needle thread as illustrated. Start from Upper Bobbin (the bobbin must be placed clockwise) the thread must go through : ... -
Page 9: Threading The Machine (Cont'd)
(5) You can either grab the bobbin thread with your hand or hook it with a scissor. Seal the bottom bobbin with its cover plate. (You can also seal it after the bobbin is positioned) (6) Raise up the presser foot, put the needle thread and bobbin thread under and behind the presser foot (pic.3) **IMPORTANT** Remember to lay down presser foot again and sew some... -
Page 10: Tension Adjustment
TENSION ADJUSTMENT Thread Tension: The thread tension should be adjusted accord- ing to sewing materials, layers of fabric. To tighten, turn Tension Screw clockwise; and loosen the tension by turning counter- clockwise. (1) As Fig. A shown, it is the normal stitches, which the top thread and Bottom thread are neat and uniform. -
Page 11: Needle Replacement & Winding The Bobbin
NEEDLE REPLACEMENT Caution: Make sure to turn off the machine and plug out the adapter before replacing the needle. Raise the needle to its highest position by turning the hand-wheel and lay down the presser foot. Loosen the needle clamp screw by turning it counterclockwise, and remove the needle from the clamp. -
Page 12: Creative Tips & Ideas
CREATIVE TIPS & IDEAS Recycle clothing by tailoring it to fit growing children. It doesn't have to look like ill-fitting hand-me-downs anymore! Also, add an appliqué or decorative ribbon to give it a new look. Make your own shower curtains, window curtains and bath sink skirts out of on-sale sheets. -
Page 13: Creative Tips & Ideas
• Raise and lower dress hems to keep up with fashion • Mend torn bed sheets • Alter curtains to fit your windows Some of the Things You Can Make with your SewMighty ® to Get Decorator Looks for a Fraction of the Cost: •... -
Page 14: Troubleshooting
TROUBLESHOOTING...
Need help?
Do you have a question about the Mighty Mini and is the answer not in the manual?
Questions and answers