Table of Contents
Advertisement
Quick Links
Advertisement
Table of Contents

Summary of Contents for JOYSTEK BELL J1
-
Page 2: What's In The Box
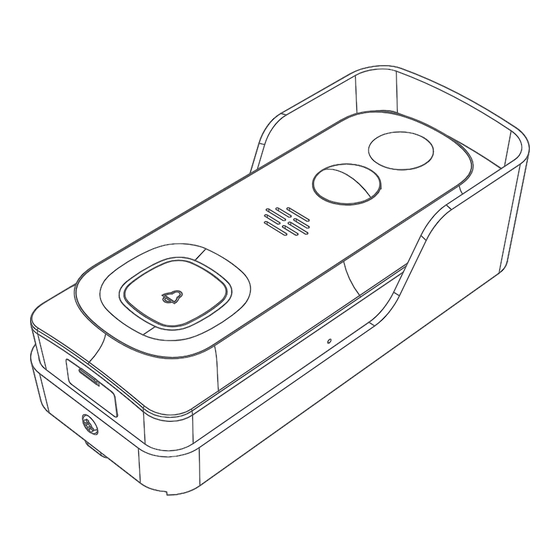
1. what’s in the box Please consult below checklist for all the components. Video Doorbell USB Cable User Guide Indoor Chime Screw & Tools Adhesive Tape 2. meet the doorbell 2MP camera LED indicator Security screw hole Micro-SD card slot Motion sensor Charging indicator Microphone... -
Page 3: Battery Installation
4. Battery installation isolating film The batteries are pre-installed in the doorbell, with an isolating film inserted in the positive poles. Please remove the film and insert the battery pack back to compartment, with positive poles upward! NOTE: Improper battery installation will cause damage to the internal components and may result in serious injury. -
Page 4: Run A Test
Guiding steps: 9:55 9:55 9:55 9:55 Install Doorbell Install Doorbell Devices Install Doorbell Camera Doorbell Battery Camera Floodlight Camera Press the [Bell] button, and tap Next Please reset the device Please follow the instruction manual to power the device Help ·... -
Page 5: Live View
9. Live view Wi-Fi signal status Quit live viewing Screenshot button Setting menu Battery status Speak to the scene Volume on/off Speak to the scene Record on the phone HD/SD switch Notification history Body detection on/off Wi-Fi signal status Notification history Stream bit rate Cloud storage service Live view interface... - Page 6 11. leave Voice messages Maximum 3 voice messages (Max. 10 seconds each) can be pre-recorded into the doorbell, which enables you to quickly respond to your visitors when you are not convenient to answer the doorbell call. Setting --> Basic function -->...
- Page 7 Share by QR code scanning The new users can show their QR codes to the administrator, and share device by QR Code scanning. CloudEdge App >> Tap on “ ” >> Tap on “ ” >> Tap on “ My QR Code”...
- Page 8 Pair with doorbell 1). Tap on “···” and enter into Settings-> Basic function, select Wireless Chime page.(refer to Picture.4) Wireless Chime Settings BasicFunction Night Vision Chime Reminder Automatic Host Leaves Message Wireless Chime Receive Notifications Power Management Device Share Picture.5 Ring Volume Device Information Middle...
-
Page 9: Installation
14. Installation 166° Select location Your doorbell has 166-degree view angle and 120-degree human detection range. 5 feet 160cm It is suggested to mount your doorbell at least 5 feet (160 cm) above the ground for the best angle of view and motion detection performance. - Page 10 Go wireless installation The Smiths (Example) 1. Dismount the bracket by pushing from 2. Bracket installation: mount the bracket on 3. (Optional) The nameplate holder can be the back of your doorbell. Please remove the wall with screws & anchors or the double mounted on the top rear/ bottom rear of the the insulation film in the battery cell.
-
Page 11: Specification
14. Specification Video doorbell Indoor Chime Video & Audio General Image Sensor 1/2.7” CMOS (2.0MP) Power source DC 5V 1A Hisilicon Lite-OS Power port USB (Type-A) 1920 × 1080 px Resolution Consumption 0.2W Stream HD/SD dual stream Ringtones 4 ringtongs optional High power IR LED with ICR Infrared LED Volume... -
Page 12: Troubleshooting
15. Trouble shooting Q1: Why I failed to set up Wi-Fi for the doorbell? A1: ①.Device works with 2.4GHz Wi-Fi only, but not support 5GHz Wi-Fi. ②.Wi-Fi network is not good, try to keep the camera near the Wi-Fi router when setting up. ③.The Wi-Fi password is wrong. Please check if there are special characters in the password, or the network is specially encrypted.
Need help?
Do you have a question about the BELL J1 and is the answer not in the manual?
Questions and answers