Table of Contents
Advertisement
Quick Links
Advertisement
Table of Contents

Related Manuals for ESP Safety IPES-IR/UV

Summary of Contents for ESP Safety IPES-IR/UV
- Page 1 IPES-IR/UV Flame Detector Operating Manual 80010-001 R07...
- Page 3 IPES-IR/UV Flame Detector Operating Manual 80010-001 R07 ESP Safety, Inc. 555 North First Street San Jose, CA 95112 408‐886‐9746 March 2013 Revision History: 80010‐001 Date Revision Description Approved 12/09/09 01 Initial Draft J. Lorelli 1/10/10 02 Technical content reformatted J. Lorelli 3/12/10 03 ...
-
Page 4: Table Of Contents
IPES-IR/UV Flame Detector 80010-001 R07 Operating Manual Table of Contents 1.0 Introduction .................................. 1 Our Mission .................................... 1 ESP Safety Inc Contact Information ............................ 1 2.0 Description .................................. 2 Application .................................... 2 Specifications .................................... 2 3.0 Safety Considerations ................................ 3 Guidelines .................................... 3 Explosion Protection Means .............................. 3 Additional Considerations ................................. 4 FM Compliance .................................. 4 IPES‐IR/UV .................................... 4 4.0 Performance Characteristics .............................. 6 Appearance .................................... 7 Response Time .................................. 7 Generation of Alarm Signals .............................. 7 Elimination of False Alarms ............................... 7 ... - Page 5 IPES-IR/UV Flame Detector 80010-001 R07 Operating Manual Maintenance Activities ................................ 19 Daily Maintenance .................................. 19 Every Six Months.................................. 20 Automatic Testing ................................... 20 9.0 Transportation and Storage ..............................20 Transportation .................................. 20 Storage .................................... 20 10.0 Warranties ..................................21 Expected Service Life of Unit .............................. 21 11.0 Repair and Return ................................22 Field Repair ..................................... 22 Return Material Authorization (RMA) Number ........................ 22 12.0 Parts Ordering Information .............................22 13.0 Certifications ..................................23 FM (U.S. & Canada) ................................. 23 Hazardous Locations ................................ 23 ABS ...................................... 23 ...
-
Page 7: Introduction
IPES-IR/UV Flame Detector 80010-001 R07 Operating Manual 1.0 Introduction Introduction The IPES‐IR/UV flame detector’s advanced detection technology incorporates optical filters configured for maximum sensitivity to radiation produced by flame or fire and ensures rapid flame recognition and alarm signaling. The IPES‐IR/UV has a field of view of not less than 90 degrees. Upon fire recognition, it signals a change in state from ... -
Page 8: Description
IPES-IR/UV Flame Detector 80010-001 R07 Operating Manual 2.0 Description Application The IPES‐IR/UV’s design and explosion‐proof ratings make it an excellent choice for indoor and outdoor applications, including: Drilling and production platforms Shipping tankers, freighters, and other vessels Fuel loading facilities Refineries, bulk terminals, and tank farms LNG/LPG processing and storage facilities Compressor stations and pipeline facilities Petrochemical, paint, and fertilizer plants Power plants and gas turbine facilities Transportation facilities (airports and subways) Oil and gas fired boilers/furnaces Aircraft hangars Specifications The IPES‐IR/UV meets industry certifications and requirements for Hazardous Locations. Detection Type: Optical Detection Method: IR and UV radiation Spectral Range: 4.2 to 4.6 micron (IR); 180 to 250 nm (UV) Power Supply: 18 to 32 VDC Power Consumption: Stand By: 2 W max; Alarm State: 3 W max ... -
Page 9: Safety Considerations
IPES-IR/UV Flame Detector 80010-001 R07 Operating Manual Conduit Entry: ¾” NPT approved Haz Loc bushing Enclosure Materials: 316 SS or 6061 Aluminum Enclosure Screws: Please refer to section 13.0 Certifications Weight: SS = 11 lbs (5.0 kg); Aluminum = 5.5 lbs (2.5 kg) 3.0 Safety Considerations Before installing and operating the IPES‐IR/UV, be sure to read this entire manual. Failure to follow these guidelines could result in impaired product performance and safety hazards. Guidelines For maximum safety: Only persons who have thoroughly read and understood this manual, are trained in safety techniques, and have electric‐safety certificates are permitted to install and operate the IPES‐IR/UV. Never operate the IPES‐IR/UV if the casing is damaged. Do not separate the IPES‐IR/UV when energized. Refer to the Appendices and diagrams in this manual to ensure that the wiring is in compliance with local ordinances and the NEC. Perform regular testing and maintenance as outlined in the Maintenance section. Ensure that fire‐alarm and fire‐extinguishing systems and controls are switched off before any testing or maintenance to avoid unwanted operation of alarms and fire‐ extinguishing equipment. Also see the individual sections in this manual for relevant specific safety guidelines. Explosion Protection The table below describes design features that protect the IPES‐IR/UV against explosions: Means Feature ... -
Page 10: Additional Considerations
IPES-IR/UV Flame Detector 80010-001 R07 Operating Manual Feature Protection Means Ignition Temperature The ignition temperature of the surrounding environment is limited by the outside surface temperature of the housing, which does not exceed 275°F (135°C). Securing of Bolts, Joints Spring washers, lock washers, and lock nuts maintain the integrity of and Grounding the bolted connections by preventing loosening of the bolts. Joined Parts Protection Anti‐seize lubricant is applied on the critical joints as described on Appendix A1. Casing Ingress Protection The design of the casing is protection class IP 66 in accordance with IEC 60529‐004. Sealing Cables at Conduit Use approved hazardous location sealed conduit fittings. For outdoor Entry installations, ensure sealing meets IP66 requirements. Additional It is important to identify false alarm sources and any conditions that could prevent the Considerations IPES‐IR/UV from responding appropriately to a fire. The following should be considered: False Alarm Arc Welding and Gas Welding Prevention Do not perform arc or gas welding within the field of view of the IPES‐IR/UV. System bypass is mandatory for gas welding and is highly recommended for all welding activity. Refer to the section on FM Compliance below for results of testing with false stimuli. Walkie‐Talkies Owing to potential EMI and RFI interference, walkie‐talkies should not be used within 1 foot of the IPES‐IR/UV. ... - Page 11 IPES-IR/UV Flame Detector 80010-001 R07 Operating Manual Standards TITLE AUTHOR‐NUMBER DATE National Fire Alarm Code ANSI/NFPA 72 2002 Radiant Energy‐Sensing Fire ANSI/FM ‐ 3260 2004 Detectors for Automatic Fire Alarm Signaling Radiant Energy‐Sensing Fire FM Approvals ‐ 3260 2000 Detectors for Automatic Fire Alarm Signaling Electrical Equipment For Use In FM Approvals – 3600 1998 Hazardous (Classified) Locations – General Requirements Explosion proof Electrical ...
-
Page 12: Performance Characteristics
IPES-IR/UV Flame Detector 80010-001 R07 Operating Manual False Stimuli When the IPES‐IR/UV is exposed to the fires specified above, and are in the presence of the Exposure following false stimuli sources – modulated at approximately 1.5 Hz, and un‐modulated – no false alarm activation or instability occurs at the minimum distances listed below. Source Distance Heater 12 inches (30.48 cm.) Arc welder 9.8 feet (3 m.) Fluorescent 6 inches (15.24 cm.) Halogen 6 inches (15.24 cm.) Incandescent 6 inches (15.24 cm.) Direct sunlight Detectors not affected by frequency range of visible light Indirect sunlight Detectors not affected by frequency range of visible light Field of View The IPES‐IR/UV’s viewing angle is varied from the center line up, down, left and right. The detector is exposed to each of the test fires described in “Flame Response Sensitivity” above at a distance described in the table below. Fuel Horizontal Horizontal Vertical Vertical Min, ... -
Page 13: Response Time
IPES-IR/UV Flame Detector 80010-001 R07 Operating Manual electromagnetic radiation from flames into electrical signals by use of electronic amplifiers and filters, digital‐analog converters, a microprocessor, and LED indicators. Response Time The IPES‐IR/UV response time to detecting radiation emitted by test sources of n‐Heptane combustion in a 12” x 12” (0.3m by 0.3m) pan, and ethyl alcohol combustion in a 12” x 12” (0.3m by 0.3m) pan, at a distance of 82 feet (25 meters) does not exceed 30 seconds. The sensitivity and response time can be varied in order to reduce the noise when the IPES‐ IR/UV identifies a fire, or the distance to the probable place of fire is short (“near/far” and “slow/fast” modes). Can be set using the ESP Commander program. Generation of Alarm The IPES‐IR/UV incorporates optical filters configured for maximum sensitivity to radiation Signals produced by flame or fire, ensuring rapid flame recognition and alarm signaling. Upon fire recognition within its 90‐degree field of view, the IPES‐IR/UV signals a change in state from normal to fire in any Original Equipment Manufacturers (OEM) or proprietary alarm and response system. In addition, via integrated infrared (IR) and ultraviolet (UV) sensors, the IPES‐IR/UV monitors in specific regions of both spectral ranges. In the infrared spectrum, the device is configured for sensitivity to wavelengths in the range of 4.2 to 4.6 microns, allowing optimal sensitivity to combustible gas fires while rejecting false signals from incandescent lamps, sunlight and hot objects. For ultraviolet radiation, the device is configured for sensitivity to wavelengths in the range of 180 to 250 nanometers, making the sensor “blind” to sunlight and radiation from heated objects but still able to “see” the UV radiation emitted by a flame. With these settings, the IPES‐IR/UV selects and alarms from those characteristic wavelength emissions from the IR‐ to‐UV spectrum that indicate actual flame or fire. The analog signals from the sensors are filtered, amplified, and then converted to digital signals which are then processed in a microcontroller via a special algorithm. This ensures the reliability of the alarm signals. The IPES–IR/UV takes the following parameters into consideration when generating an alarm signal: Magnitude of signals from different optical channels ... -
Page 14: Elimination Of False Alarms
IPES-IR/UV Flame Detector 80010-001 R07 Operating Manual Elimination of False The combination of multiple sensors and wavelength range settings makes the IPES‐IR/UV an Alarms excellent choice for elimination of false positive indicators caused by non‐flame sources of radiation such as artificial lighting, direct and indirect sunlight, lightning, arc welding and metal grinding. See additional important considerations for eliminating false alarms in section 3.0 Safety. An Alarm condition will normally override a Fault condition unless a loss of operating power impairs the detector’s ability to generate or maintain an alarm. The IPES‐IR/UV reports both Fault and Alarm conditions exclusive of each other. This means both a Fire and Fault can be reported at the same time if they occur simultaneously. Serviceability The IPES‐IR/UV remains serviceable in non‐heated rooms or under sheds at temperatures from –40°F to +185°F (–40° to +85°C). LED Normal, Fire and Fault conditions are indicated by two red LEDs located on the cover. Refer to Table 4‐1: Determining LED Conditions, below. Optical Integrity To maintain reliability of the IPES, the optical devices are automatically self‐tested for radiation transmission every 25 to 45 minutes. This routine test does not require the use of a test lamp. This test determines whether any dust or other contamination has formed on the detecting windows which would scatter the infrared radiation. UV DETECTOR UV LED INDICATOR IR DETECTOR IR LED INDICATOR Figure 4-2: IR & UV Detectors and LED Indicators ... - Page 15 Table 4‐1: Determining LED Conditions After completing all installation steps, refer to the illustration and LED indicator table below to determine LED conditions. N IPES status Fire relay dry contacts condition Fault Output Indicator LED condition signal, mA relay dry Normally closed Normally open contacts condition 1 No power supply Closed open open 0 Off voltage 2 Fault or optical Closed open open 2 Every 25 to 45 seconds two LEDs blink with the following interference (dust) frequencies: the first LED blinks 5 times with a period of 0.5 seconds, the second one blinks 3 times with a period of 1 second. Both LEDs are off during the pause between blinking. 3 Normal (no faults or Closed open closed 4 When no radiation is present: fires during operation) ...
-
Page 16: Analog Signal
IPES-IR/UV Flame Detector 80010-001 R07 Operating Manual Analog Signal Analog signal (4‐20 mA) Signal level Detector State (±0.1) mA Circuit opening (2 ± 0.1) mA Fault (4 ± 0.1) mA Normal (18 ± 0.1) mA Fire (2 ± 0.1) mA Test Digital Signal Informational digital signals are standard RS‐485 communication with Modbus: Hardware self‐test Fault Optical interference Fault Fire detected (The digital channel protocol Modbus RTU is described in Appendix B.) Relay Dry Contact Relay dry contact signal: Signal Operation of the normally open Fire relay dry contacts * FIRE relay – two‐directional single‐pole contact, which allows the state to be changed at the output to normally closed or normally open by using the ESP Commander program. The contact relay is rated for currents ranging from 10 mA to 5 A at DC voltage of 30 V. The output signal “Fire” can be cleared after eliminating the source of the alarm ... -
Page 17: Installation
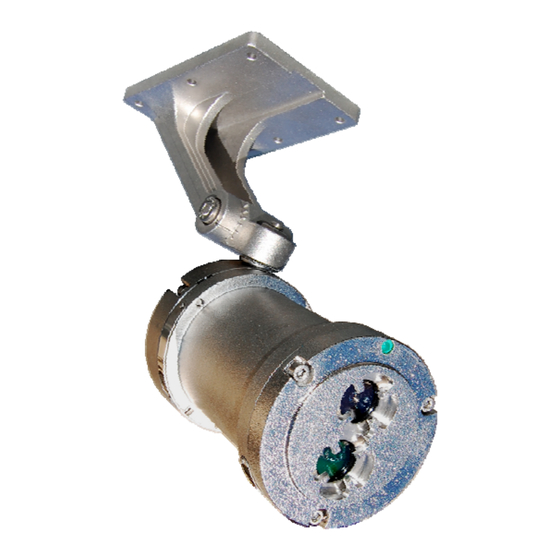
IPES-IR/UV Flame Detector 80010-001 R07 Operating Manual 5.0 Installation Component Parts The IPES‐IR/UV detector component parts and delivery set consists of the following: and Delivery Set One IPES‐IR/UV Detector with one mounting base. (10010‐001/10011‐001 Stainless Steel or 10010‐002/10011‐002 Aluminum) One Operating Manual 80010‐001 Accessory Kit (bolts, nuts, washers, etc.). Refer to Appendix A‐1, Drawing 80025‐001, for further details. Optional magnetic collar (delivered only by special request). Compare the contents of the set to the packing list to be sure all items were received. If any items are missing, contact ESP Safety Inc. Visual Examination Before installing the IPES‐IR/UV, examine the detector to be sure that: The nameplates and warning labels are in place. The external surfaces of the elements and joined surfaces of the casing are free of dents or damage. (Refer to Appendix A1, Drawing 80033‐001, and Appendix A2, Drawing 80025‐001.) The tamper‐proof screw is intact on the front cover (See Appendix A2, Drawing 80025‐ 001.) Pre‐Installation Make sure all removable parts are joined to the casing as tightly as possible. Steps Warning: Do not open, separate or disassemble casing when energized! Separating the casing can result in serious damage to ... - Page 18 Operating Manual vibrations (see Appendix A‐2, Drawing 80025‐001, Sheet 1). Note: ESP Safety Inc. recommends bolting the mounting base plate to the mounting surface. If bolting is not possible, the mounting plate can be welded to the mounting surface if it is a similar metal (either 316 Stainless Steel or 6061 aluminum). Before welding, be sure to remove the detector from the base plate before attempting any weld operation. Moisture Damage Protection It is the responsibility of the installer to take proper precautions during installation to protect the electrical connections and components from moisture. Anti‐seize lubricant is provided for easy assembly and corrosion protection of the joints between the enclosure/cover and enclosure/base. After disassembly, wipe these surfaces clean with a soft cotton or wool cloth and then re‐apply a thin layer of lubricant prior to assembly. See Appendix A2 (Drawing 80025‐001, Sheet 1). If installing wiring cable in conduit, do not use conduit for wiring to other equipment. Care should be taken to not install the detector where heavy condensate, rain, or fog can cover the lens and reduce the sensitivity of the detector. If possible, conduct fire tests to confirm detection. Caution: All cable/conduit entries must be sealed with an appropriate and certified sealing plug and cable gland. The use of industrial grade, armored field cable is recommended. Figure 5-1: View of IPES-IR/UV with Base Removed Page 12 of 29 Revised 10/21/2013...
-
Page 19: Completing The Installation
IPES-IR/UV Flame Detector 80010-001 R07 Operating Manual Table 5‐1: Arrangement of Electrical Connections Arrangement of Electrical Connections Arrange the electrical connections as described in Table 5‐1, Table 5‐2 and Figure 5‐3 below. To connect the IPES‐IR/UV to external devices, use armored control cables 4 x 1.5, which are used in all classes of explosive zones including indoor and outdoor sites, channels, tunnels, ground (trenches) with corrosive medium, and in zones containing roaming currents. Wiring Requirements The temperature rating of all field wiring conductors shall be at least 10 C greater than the maximum ambient temperature Communications: 14 AWG (2.08 mm 2) or 16 AWG (1.31 mm 2) shielded cable, twisted pair is recommended to protect against EMI and RFI interference; Power: 14 AWG (2.08 mm 2) or 16 AWG (1.31 mm 2) wires. Ground wire shall be 14 AWG (2.08 mm 2) The wiring color and type shall comply with local codes, ordinances, and the NEC. It is recommended that the local authority be consulted in case of doubt. Follow the wiring instructions in this manual to ensure correct functioning of the detector. Setting the Modbus Address and Baud Rate To ensure proper communications, a unique address must be assigned to each device, as duplicate addresses are not automatically detected. Modules with duplicate addresses will report with the same address, confusing latest updates. Record all addresses and device types after completing the installation. Refer to Appendix B for setting the Modbus address and baud rate. Completing the ... -
Page 20: Arrangement And Function Of Mounting Connection Terminals
IPES-IR/UV Flame Detector 80010-001 R07 Operating Manual Figure 5-2: Arrangement and Functions of Mounting Connection Terminals Arrangement and Function of The arrangement and function of mounting connection terminals used to connect Mounting Connection Terminals the IPES‐IR/UV to a control system are shown below. Table 5-2: Connecting Terminals Receptacle Pin Function X3 +24V 24VDC from system power source (External User Provided) GND System Ground from system power source (External User Provided) +4/20 Industry Standard +4‐20mA current loop output RS485A RS‐485 MODBUS ... - Page 21 IPES-IR/UV Flame Detector 80010-001 R06 Operating Manual Connection to Digital Circuit RS485 Figure 5-3: IPES-IR/UV Connection to Digital Circuit RS 485 Page 15 of 29 Revised 10/21/13...
-
Page 22: Startup And Operation
IPES-IR/UV Flame Detector 80010-001 R07 Operating Manual 6.0 Startup and Operation Installation Review Once the mounting, cabling, and alarm relay installation has been completed, the IPES Prior to Startup IR/UV is ready to begin the power‐on sequence. Before applying power to the system for the first time, review the steps below: Verify that the IPES IR/UV has been properly mounted. Verify that all conduit / cable gland entries have been tightened and sealed if necessary. Verify that all sensor wiring has been installed correctly. Verify that the enclosure has been connected to an earth/ground. Verify that the IPES IR/UV cover is securely installed Disconnect or power down all output devices and alarms to prevent false actuation. Once you are ready to begin startup, verify that the power supply is connected properly and verify the power supply voltage with the IPES IR/UV is disconnected at the source. The IPES IR/UV is powered by 24 VDC (18 to 32 VDC voltage range). After completing the above, the IPES IR/UV is ready to be powered on. Performance Test After installation is complete, conduct a performance test as follows, to ensure that the detector is functioning properly. ... - Page 23 IPES-IR/UV Flame Detector 80010-001 R07 Operating Manual Procedure Perform this test on all detectors in the system. Apply power to the detector. After 1 to 5 seconds, the output current will increase to 4 mA, and the indicating LEDs will start blinking. If it is necessary to isolate the detector fire relay from the alarm system, apply the magnetic collar over the enclosure with the tab on the bracelet fitting into the alignment notch as shown in Figure 6‐1. Placing the collar over the enclosure as shown allows the fire relay contacts to remain in the non‐alarm state during testing. Perform the test with the ITES Test Lamp as follows: Position the Test Lamp at a distance of 0.5 to 1 meters from the front cover of the detector. Turn the Test Lamp on and adjust the beam of light so it covers the front cover of the detector. The detector’s front red indicator LED will light, confirming detection. If the Test Lamp is turned off, the red indicator will stay lit for up to 10 seconds, depending on the detector’s internal switch configuration. The Test Lamp can be used to verify the field of view of the detector up to a distance of 2 meters away. If any detector fails this test, refer to Section 7.0, Troubleshooting. Once testing is complete, remove the magnetic collar before reconnecting the detector to the fire‐alarm or burglar‐fire alarm system. NOTES: Always make sure that the Test Lamp has fresh batteries. Keep the Test Lamp lens free from dust, dirt, and moisture. If necessary, clean the lens with a soft wool or cotton cloth. Alignment Notch Figure 6-1: IPES IR/UV with Magnetic Switch Collar...
-
Page 24: Operation
IPES-IR/UV Flame Detector 80010-001 R07 Operating Manual Operation It is important that this entire manual be thoroughly read and understood prior to operating the IPES‐IR/UV detector, to avoid compromising performance and safety. Only personnel trained in safety techniques who have electric‐safety certificates and experience in dangerous explosive zones, and are familiar with the design of the IPES‐IR/UV and have thoroughly read and understood this Operating Manual, should operate the IPES–IR/UV. Always observe all local site safety precautions while working with the IPES‐IR/UV. Ensure that the detector is equipped with internal and external grounding devices and grounding marking. See Section 5.0, Installation, Tables 5‐1 and 5‐2, and Figure 5‐3 for the recommended circuits and digital outputs to connect the detector to fire‐alarm and burglar‐fire alarm systems. Within 1 to 5 seconds after switching on the IPES‐IR/UV, it will produce an electrical current of 4 mA. The indicating LEDs will begin blinking. 7.0 Troubleshooting The sensor module (“front” half of the detector) contains no user‐ serviceable components and should never be opened. The terminal compartment is the only part of the enclosure that should be opened by the user in the field. Troubleshooting Table If testing reveals a Fault condition or failure to detect a flame, follow the troubleshooting procedures in the table below. The table describes a variety of possible failures and corrective actions. If the troubleshooting procedures do not correct the problem, contact ESP Safety Inc. Table 7-1: Troubleshooting Symptoms, Causes and Procedures Failure Symptoms ... -
Page 25: Maintenance
IPES-IR/UV Flame Detector 80010-001 R07 Operating Manual 8.0 Maintenance Fire‐alarm and burglar‐fire alarm systems must be switched off during testing to avoid operation of fire‐fighting equipment. Maintenance IPES‐IR/UV maintenance includes the following activities: Activities Visual examination Cleaning Checking the grounding and explosion‐protection systems Performance test. This section describes maintenance activities to be performed once a day or every six months. Automatic testing is also discussed. Daily Maintenance Visual Examination Perform a daily examination of the IPES‐IR/UV, checking for any visible mechanical damage such as dents to the enclosure or a cracked lens. If any damage is noted, immediately pull the detector from service and replace with a new detector. Every Six Months Every six months, or as required, perform the following: Cleaning Clean the IPES‐IR/UV every six months (if there is no visible severe contamination) or as required if the signal “Fault” arises; also clean the surface of the detector if it is covered with dust. To clean the detector: Enclosure ‐ Remove dust from the enclosure with a brush or a soft cloth slightly wetted ... -
Page 26: Automatic Testing
IPES-IR/UV Flame Detector 80010-001 R07 Operating Manual Position the Test Lamp at a distance of 0.5 to 1 meters from the front cover of the detector. Turn the Test Lamp on and adjust the beam of light so it covers the front cover of the detector. The detector’s front red indicator LED will light, confirming detection. If the test lamp is turned off, the red indicator will stay lit for up to 10 seconds, depending on the detector’s internal switch configuration. The Test Lamp can be used to verify the field of view of the detector up to a distance of 2 meters away. If any detector fails this test, refer to Section 7.0, Troubleshooting. Once testing is complete, remove the magnetic collar before reconnecting the detector to the fire‐alarm or burglar‐fire alarm system. NOTES: Always make sure that the Test Lamp has fresh batteries. Keep the Test Lamp lens free from dust, dirt, and moisture. If necessary, clean the lens with a soft wool or cotton cloth. Automatic Testing If the lens becomes dirty or coated, a change in radiation transmissibility could reduce the detector’s sensitivity. To safeguard against this, the IPES‐IR/UV continuously tests the lens for optical clarity and sends a Fault alarm when the radiation transmissibility reaches a critical threshold. In addition, the sensors are routinely tested every 25 to 45 minutes by use of internal test lamps. If the IR or UV sensor does not pass the self‐test, a Fault alarm is sent. This routine test does not require the use of an external Test Lamp. 9.0 Transportation and Storage Transportation When shipped in the factory‐supplied carton, the model IPES‐IR/UV can be shipped via any ... -
Page 27: Warranties
IPES-IR/UV Flame Detector 80010-001 R06 Operating Manual 10.0 Warranties ESP Safety, Inc. (“ESP”) warrants the IPES‐IR/UV Flame Detector to be free from defects in material and workmanship under normal use and service for a period of five (5) years, beginning on the date of shipment to the buyer. This warranty extends only to the sale of new and unused products to the original buyer. ESP’s warranty obligation is ... -
Page 28: Repair And Return
IPES-IR/UV Flame Detector 80010-001 R07 Operating Manual 11.0 Repair and Return Field Repair The IPES‐IR/UV Flame Detector is not intended to be repaired in the field. If a p r o b l e m should develop, refer to the troubleshooting section of this manual. If it ... -
Page 29: Certifications
IPES-IR/UV Flame Detector 80010-001 R07 Operating Manual 13.0 Certifications The IPES–IR/UV meets the following certifications: FM (U.S. & Canada) Class I, Zone 1, AEx d IIC, T5, Gb Hazardous Locations ISO Class 12.9, M5 X 20 socket‐head cap screws (Yield Stress 1100 MPa) shall be Zone Locations used to replace the cover fasteners. ISO Class 12.9, M5 X 25 socket‐head cap screws (Yield Stress 1100 MPa) shall be used to replace the base fasteners. Fire Protection Approval Standards: FM3260 (2000); FM3600 (1998); FM3615 (2006); ANSI/ISA 60079‐0 Equipment (2009); ANSI/ISA 60079‐1 (2009); CAN/CSA‐C22.2 No. 60079‐0 (2007); CAN/CSA‐C22.2 No. 60079‐1 (2007) Supporting Standards: ANSI/FM3260 (2004); ANSI/NFPA 72 (2002); ULC/ORD – C386 (1990); CAN/ULC – S529 (2002); CSA C22.2 No. 0.5 (reaffirmed 1999); C22.2 No. 32 (reaffirmed 2003); ANSI/IEC 60529 (2004); CSA‐C22.2 No. 60259 (2005) ABS Class I, Division 1, Groups B, C & D, T5 Ta = ‐40 C to +85 C (‐40 F to +185... -
Page 30: Iec
IPES-IR/UV Flame Detector 80010-001 R07 Operating Manual IEC/ Flameproof “d” IECEx Ex d IIC T5 Gb Ta = ‐40 F to +185 F (‐40 C to +85 C) Supporting Standards: IEC 60079‐0:2007; IEC 60079‐1:2007 IECEx Certificate Number: IECEx FMG 10.0016X Specific Conditions of Use: ISO Class A2‐70, M5 X 16 socket‐head cap screws (Yield Stress 450 MPa) shall be used to replace the cover fasteners. ISO Class A2‐70, M5 X 16 socket‐head cap screws (Yield Stress 450 MPa) shall be used to replace the base fasteners. Consult the manufacturer if dimensional information on the flameproof joints is necessary. Ingress Protection IP66 = Dust Tight, Powerful Jetting Page 24 of 29 Revised 10/21/2013... -
Page 31: Appendix A1: Ipes-Ir/Uv Explosion Protection Means
IPES-IR/UV Flame Detector 80010-001 R07 Operating Manual Appendix A1: IPES-IR/UV Explosion Protection Means Page 25 of 29 Revised 10/21/2013... -
Page 32: Appendix A-2: Ipes-Ir/Uv Installation
IPES-IR/UV Flame Detector 80010-001 R07 Operating Manual Appendix A-2: IPES-IR/UV Installation Page 26 of 29 Revised 10/21/2013... - Page 33 IPES-IR/UV Flame Detector 80010-001 R07 Operating Manual Figure A-2: Installation Page 27 of 29 Revised 10/21/2013...
-
Page 34: Appendix B: Ipes Digital Communications Protocol
IPES-IR/UV Flame Detector 80010-001 R07 Operating Manual Appendix B: IPES Digital Communications Protocol IPES Commands In addition to supporting analog signals (current loop and relays), IPES‐IR/UV flame detectors are also capable of digital communications with remote consoles. IPES‐IR/UV detectors use a standard RS‐485 interface with a Modbus RTU protocol layer defining the transactions between the IPES‐IR/UV and the console. Refer to the document “MODBUS APPLICATION PROTOCOL SPECIFICATION v1.1b” available online at www.modbus.org for complete details of the Modbus protocol. Setting Address/ The factory default Modbus address for the IPES‐IR/UV is 247. The factory default baud rate Baud Rate for each detector is 9600. Command The following 8‐byte Modbus command must be sent to the IPES‐IR/UV in order for the Modbus address and baud rate to be changed: Set address/baud rate command Byte Description 0 Current Modbus address (247 if IPES‐IR/UV set to factory default) 1 6 (Modbus function code for writing to the device) 2 0 3 0 4 New Modbus address (must be in the range 1 to 247) 5 ... -
Page 35: Poll Status Command
IPES-IR/UV Flame Detector 80010-001 R07 Operating Manual Poll Status The following 8‐byte Modbus command may be sent in order to poll the status of the IPES‐ Command IR/UV: 8‐byte Modbus command Byte Description 0 Current Modbus address (247 if IPES‐IR/UV set to factory default. 1 4 (Modbus function code for reading from the device) 2 0 3 1 4 0 5 1 6 Low byte of 16‐bit CRC 7 High byte of 16‐bit CRC The IPES‐IR/UV responds with a 7‐byte packet with the following format: 7 byte Poll Status Command Byte Description 0 Current Modbus address 1 4 (Modbus function code for reading from the device) ...
Need help?
Do you have a question about the IPES-IR/UV and is the answer not in the manual?
Questions and answers
Hi,we need soft for ESP 80010-001 IR/UV flame dedector .we wont to check some parametters .name is espcommander correct? help to us please.