
Related Manuals for Mini?Cam Proteus ACR350

Summary of Contents for Mini?Cam Proteus ACR350
- Page 1 Automatic Cable Reel ACR350 / ACR500 (including VGP350/ VGP500) Original Instruction Manual Version B...
- Page 2 PLEASE NOTE For the purpose of this Original Instruction Manual Proteus ACR (Automatic Cable Reel) will be referred ™ to using the abbreviation ACR Proteus RJP (Joystick Remote Control) will be referred ™ to using the abbreviation RJP Control Unit will be referred to as CCU Proteus ™...
- Page 3 This instruction manual is applicable to the ACR Automatic Cable Reel. A standard cable reel and available options are covered by this document. Disclaimer Hardware and software mentioned in this document are subject to continuous development and improvement. Consequently, there may be minor difference between the information in the document and the performance or design of the product.
- Page 4 Proteus ACR350/500 Version B...
-
Page 5: Table Of Contents
VGP350/500 Van Guide Pulley Product Overview Parts and Descriptions Adjusting the Pulley Arm Extending the Pulley Arm Locking the Pulley Arm Routing Cable on the Pulley Wheel Technical Specifications VGP350 - Van Guide Pulley VGP500 - Van Guide Pulley Version B Proteus ACR350/500... - Page 6 Controlling the ACR Controlling using the keyboard keys Rewind cable back onto the drum Decrease rewind speed Increase rewind speed Control using the Coloured Keys Stopping Continuous Rewind Clearing the Motor Stop Condition End of the Cable Detection Proteus ACR350/500 Version B...
- Page 7 Mode Selection Joystick Positions and Movement Modes ACR Only and ALL STOP! ACR Blocked and Motor Stop Button Pressed CCU and RJP Interactions Charging the Battery Useful Information Product Serial Numbers Service and Repair WEEE Statement Batteries Version B Proteus ACR350/500...
- Page 8 Proteus ACR350/500 Version B...
-
Page 9: Warranty
Our responsibility under this warranty is limited to repair, replacement or refund, as set forth above. Mini-Cam Limited is not responsible for direct, special, incidental or consequential damages resulting from any breach of warranty including lost profits, downtime, goodwill, damage to or replacement of equipment and/or property. Version B Proteus ACR350/500... -
Page 10: System Overview
Built using high quality materials and state of the art technology the ACR is a robust and powerful tool for use in harsh environments. NOTE! Have the system regularly serviced by a Mini-Cam Authorised Service Centre. Proteus ACR350/500 Version B... -
Page 11: Ec Declaration Of Conformity
Machinery Safety Directive The following are the stipulated operating and environmental conditions for said compliance: Residential, business, commercial, small-company and light industrial environments. This declaration is based on test report(s) of the relevant EMC testing laboratory. Version B Proteus ACR350/500... -
Page 12: Warnings And Safety Measures
• Adhere to the safety information described in this original instruction manual.. • The operator must wear safety equipment that is appropriate to the survey being performed (such as goggles, gloves, ear protection and safety shoes, etc). Proteus ACR350/500 Version B... - Page 13 Do not place objects on or near to the hot parts of the ACR. Always allow sufficient air circulation around the ACR. DANGER! Explosion Hazard! The ACR Automatic Cable Reel is not suitable for explosive environments. Version B Proteus ACR350/500...
- Page 14 DANGER! Risk of deadly injuries from electrical current! The ACR can be used in wet environments that do not exceed the Environmental Protection IP45 rating. Proteus ACR350/500 Version B...
-
Page 15: Before First Use
When preparing the system for operation pay attention to the crawler position, that it is not too close to the manhole. When testing the driving function, the crawler might fall into the manhole. Any person in the manhole may suffer serious injuries. Version B Proteus ACR350/500... - Page 16 • Only use the inspection system for work that is appropriate to the specifications. • Observe the operational requirements for this inspection system as described in this user manual. • Keep the system clean. Observe the individual cleaning instructions for this purpose. Proteus ACR350/500 Version B...
-
Page 17: Personal Safety
CAUTION! Do not use the ACR near other equipment that may be sensitive to electrical interference, such as a Pacemaker. IMPORTANT! Risk of damage to hearing! Operators with sensitive hearing may consider ear protection. Version B Proteus ACR350/500... - Page 18 The speed of the ACR winding and crawler can be set by the operator – they must set speeds only to what they are comfortable with. CAUTION! If in a two or more person team, stay in regular contact with teammates. Proteus ACR350/500 Version B...
-
Page 19: Maintenance
ACR. See information on page 77 regarding the return of equipment at the end of the useful life. IMPORTANT! Keep all electrical connections and contacts free of dirt, grease and moisture at all times Version B Proteus ACR350/500... -
Page 20: Cleaning
• Wipe clean the cable reel housing and lid using a damp (not wet) cloth, then dry using a dry cloth. Only after this should you loosen electrical connections. • Immediately fit the protective caps after removing electrical connections. Proteus ACR350/500 Version B... -
Page 21: Checking Plug And Socket Connections
• Check the contacts on the auxiliary module. Clean dirt and moisture from the pins and connectors using an electronic contact cleaner aerosol. IMPORTANT! Keep all electrical connections and contacts free of dirt, grease and moisture at all times Version B Proteus ACR350/500... - Page 22 Proteus ACR350/500 Version B...
-
Page 23: Vgp350/500 Van Guide Pulley
VGP350/500 Van Guide Pulley VGP350/500 Van Guide Pulley Version B Proteus ACR350/500... -
Page 24: Product Overview
125mm increments, to provide a maximum length of 375mm. The illustrations on the following pages in this section show the VGP500. The instructions in this section apply to both the VGP500 and the VGP350. Proteus ACR350/500 Version B... -
Page 25: Parts And Descriptions
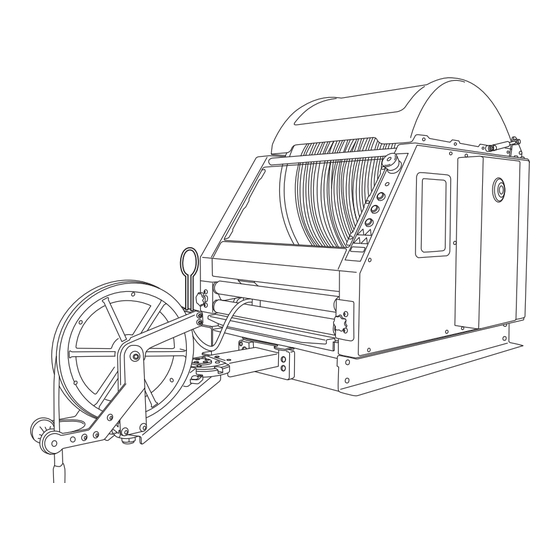
350metre and 500metre ACR ™ (Automatic Cable Reel). A Mounting frame F Pulley arm B Cable guide G Arm angle lock C Pulley wheel H Arm extension lock D Cable guide arm J Locator wheel E Cable guide roller Version B Proteus ACR350/500... -
Page 26: Adjusting The Pulley Arm
1 Lift the Arm Extension Lock (H) upwards. 2 Lift the Arm Angle Lock (G), the in-built swivel action of the lock will release it from the home position on the Locator Wheel (J). Keep hold of the Arm Angle Lock (G). Proteus ACR350/500 Version B... - Page 27 Locator Wheel (J). 4 Align the Arm Angle Lock (G) to the desired locator, then release the spring loaded Arm Angle Lock (G) to secure the Pulley Arm (F) at the desired angle. Version B Proteus ACR350/500...
-
Page 28: Extending The Pulley Arm
1 Raise the Arm Extension Lock (H), then carefully pull out the Extension Arm (K) to the required Increment Slot (L). 2 Lower the Arm Extension Lock (H) into the Increment Slot (L), to secure the Extension Arm (K). Proteus ACR350/500 Version B... - Page 29 Fully Extending the Pulley Arm 1 The van guide pulley Extension Arm (K) can be extended in three 125mm increments (L), to provide a maximum working length of 375mm. Version B Proteus ACR350/500...
-
Page 30: Locking The Pulley Arm
5 After using the van guide pulley, for safety reasons and storage convenience, the Pulley Arm (F) should be returned to the home position, and the Arm Angle Lock (G) turned anti-clockwise to secure the Pulley Arm (F) and prevent movement during transit. Proteus ACR350/500 Version B... -
Page 31: Routing Cable On The Pulley Wheel
Routing Cable on the Pulley Wheel Before use of the ACR, the cable must be correctly routed from the reel, through the van guide pulley and then connected to the crawler. Version B Proteus ACR350/500... - Page 32 Routing Cable on the Pulley Wheel Cable 1 Route the crawler connector end of the cable from the reel, through the Cable Guide (B). 2 Guide the cable into the recess around the Pulley Wheel (C). Proteus ACR350/500 Version B...
- Page 33 Routing Cable on the Pulley Wheel 3 Guide the crawler connector end of the cable through the fork of the Cable Guide Arm (D) to rest against the Cable Guide Roller (E). Version B Proteus ACR350/500...
-
Page 34: Technical Specifications
Frame Dimensions 66 x 47.5 x 7cm (L x W x H) Dimensions inc Arm (Retracted) 77 x 47.5 x 7cm (L x W x H) Dimensions inc Arm (Fully Extended) 144 x 47.5 x 7cm (L x W x H) Weight 15kg (33lbs) Construction Stainless Steel Proteus ACR350/500 Version B... -
Page 35: Acr350/500 Automatic Cable Reel
ACR350/500 Automatic Cable Reel Version B Proteus ACR350/500... -
Page 36: Product Overview
The ACR will be factory mounted in the inspection van, on to the (VGP350/500) Van Guide Pulley. Automatic Cable Reel Van Guide Pulley Base Frame Van Guide Pulley (see page 23) (see page 23) Proteus ACR350/500 Version B... - Page 37 It is advisable to regularly carry out the lubricating procedure, particularly for the first few uses of the cable, or until the cable has bedded in. Version B Proteus ACR350/500...
-
Page 38: Parts And Descriptions
C Connections (at rear) (see page 39) K Cable D Buttons Panel (see page 41) L Roller Retention Knob E Roller Retention Knob M Clear Rigid Protection Screen F Bottom Roller N Cover G Top Roller Proteus ACR350/500 Version B... -
Page 39: Connections
(D) Mains Lead 2 Remove the protective cap (A) and attach the CCU Lead (C). 3 Lift the Connector Clip (B) upwards, insert the Mains Lead (D), then push the clip downwards to securely lock the connector. Version B Proteus ACR350/500... - Page 40 Proteus ACR350/500 Version B...
-
Page 41: Acr Buttons
Stops the reel operations MOTOR STOP until button is depressed. Displays selected mode STATUS Circulates through the MODE available modes. Resets the blocked state. RESET Rewinds the cable with constant speed until the REWIND button is released. ACR500-0000 Version B Proteus ACR350/500... -
Page 42: Modes
Rewind button. button is being released. ACR is in a blocked mode. Motor Stop button, LID, Reset button when Automatic actions are not Hardware Fault, End of source of the blockage performed. Cable. is removed. Blocked Proteus ACR350/500 Version B... - Page 43 Indication Indication on on Status Indication in Cable Menu CCU Status Display Blinking Solid Yellow Solid Green Blinking Orange Solid Orange Solid Version B Proteus ACR350/500...
-
Page 44: Adjusting Payout Speed Limit
You may need to adjust the rewind speed a few times during the rewind of a long length of cable. With usage, you will gain some experience of the ideal settings for the rewind speed. Proteus ACR350/500 Version B... -
Page 45: Adjusting The Rewind Speed
You can use the keyboard keys to adjust the rewinding speed at any time. Decrease auto rewind speed Each press decreases the speed. Increase auto rewind speed Each press increases the speed. The blue coloured bar/s represent rewind speed adjustment. Version B Proteus ACR350/500... -
Page 46: Selecting The Crawler Wheel Size
1. Press a coloured key to confirm the size of the crawler wheels. With CPL150 connected With CRP300 connected 2. Press the appropriate coloured Function key to select confirm the size of wheel. Proteus ACR350/500 Version B... -
Page 47: Selecting The Wheel Size At Other Times
The CCU will display the followings short keys: With CPL150 connected With CRP300 connected 2. Press Red Function to select Wheel Size. The CCU will ask you to confirm the size of the wheels: With CPL150 connected Version B Proteus ACR350/500... -
Page 48: Status Display For The Acr
The ACR has stopped because of a blockage, hardware fault, cable end or one of the Stop buttons is activated. a The blue coloured bar/s represent rewind speed. b The orange coloured bar/s represent an estimate of how much cable is on the drum. Proteus ACR350/500 Version B... -
Page 49: Controlling The Acr
Press and hold to rewind until released Press to open ACR cable menu. Decrease rewind speed Each press decreases the rewind speed. See Auto Rewinding on page 39 Increase rewind speed Each press increases the rewind speed. Version B Proteus ACR350/500... -
Page 50: Control Using The Coloured Keys
You can also select the cable settings using the Crawler Settings: 1. Press Crawler Tools: The CCU will display the following short keys: With CRP300 connected 2. Press Blue Function to select Cable. 3. Example view of the cable menu: Proteus ACR350/500 Version B... - Page 51 RELEASE Motor Stop engaged alert. MOTOR STOP Rewind until hold. Switch to Assist Payout mode. Switch to Assist Payout mode. Switch to Assist Disabled mode Payout Speed Limit information. Use Up/Down Arrow keys to adjust it. Version B Proteus ACR350/500...
-
Page 52: Stopping Continuous Rewind
6. When Continuous rewind is started, the CCU will display the following short keys: 7. Press once to cancel rewind and to stop the motor. The ACR rewind then goes back to Assist Disabled mode. You can also use the Rewind key to cancel continuous rewind. Rewind Proteus ACR350/500 Version B... - Page 53 You can’t control the cable reel or the crawler until the stop condition has been cleared. NOTE! Regularly check the operation of the motor stop and the cover lifted stop to ensure they are fully operational. Version B Proteus ACR350/500...
- Page 54 After powering off, leave the system for 5 seconds to completely power itself down. CAUTION! Switch off power or engage Motor Stop button: - whenever system is not in use - before making mechanical changes (eg. wheels). - before clearing a cable blockage Proteus ACR350/500 Version B...
- Page 55 ACR Cover If the cover on the ACR is open, the reel will engage Motor Stop, in the same way as the Motor Stop button. ACR with cover in fully opened position Version B Proteus ACR350/500...
-
Page 56: Clearing The Motor Stop Condition
Also refer to the VCU/VKU Instruction Manual for Motor Stop Button. 2. Press Crawler Tools. You can’t control the cable reel or the crawler until the stop condition has been cleared. With CPL150 connected continued on next page Proteus ACR350/500 Version B... - Page 57 3. Press Blue Function to select Cable. 4. Press Red Function to select Reset. This will clear the stop condition and restart the ACR. 5. If the STOP condition is not cleared the menu will display the following dialogue. Version B Proteus ACR350/500...
-
Page 58: End Of The Cable Detection
To recover from this condition, the Rewind Button needs to be held at the same time as the Reset Button is pressed. The user should hold the Rewind Button until enough cable has been wound back on the drum. ACR500-0000 Proteus ACR350/500 Version B... -
Page 59: Removable Drip Tray
2 Carry out any necessary emptying and cleaning. Rinse the tray with water and wipe dry using a dry cloth. 3 Align the tray in side rails, then push the tray gently forward, until fully home. Version B Proteus ACR350/500... -
Page 60: Troubleshooting
Department if the problem persists. Status LED changes colour Tension bar needs calibration. Contact very often Mini-Cam Service Department if the problem persists. Internal cable blockage Operator can’t fix an internal cable blockage. Contact Mini-Cam Service Department. Proteus ACR350/500 Version B... -
Page 61: Technical Specifications
Temperature Range -20°C ~ +50°C Dimensions (without VGP attached) 550 x 660 x 640mm (W x D x H) Dimensions (with VGP retracted) 550 x 750 x 640mm (W x D x H) Weight 55kg (121lb) Environmental Protection IP45 Version B Proteus ACR350/500... - Page 62 Proteus ACR350/500 Version B...
-
Page 63: Rjp Joystick Remote Control
RJP Joystick Remote Control Joystick Remote Control Version B Proteus ACR350/500... -
Page 64: Product Overview
As an alternative method of control, you can use the ACR500/350 control panel buttons (see page 41) in conjunction with the dedicated keys and intuitive on-screen display on the Proteus CCU. ™ *For more information refer to table on page 42. Proteus ACR350/500 Version B... -
Page 65: Parts And Descriptions
3 Crawler with ACR Crawler and Cable Reel 4 Crawler without ACR Crawler ONLY 5 ACR Motorised Cable Reel ONLY 6 Camera Pan and Rotate 7 Function A Camera Focus / Zoom 8 Function B Unused Version B Proteus ACR350/500... -
Page 66: Pairing Rjp With Acr
If the menu is not visible then the CCU requires a software update (see above). 2 Select Motorised Cable Reel from the list. 3 The RJP Control Serial Number has to be entered in the input box presented to the user. Proteus ACR350/500 Version B... -
Page 67: Connecting Rjp
If the battery is critically low, the LEDs will flash red, the unit will switch off and operation will not be allowed. The unit should be recharged. Version B Proteus ACR350/500... -
Page 68: Rjp Operational Range And Disconnection
RJP Operational Range and Disconnection The RJP will operate up to 5 metres from the ACR. If the path between the RJP and the ACR is obstructed, or it is further than 5 metres, the RJP will disconnect. Disconnection is indicated by a short beep and all the LEDs flashing green. The RJP will immediately try to reconnect to the ACR, and if it succeeds the green LEDs will go solid for a second and then switch off. -
Page 69: Joystick Positions And Movement
Joystick Positions and Movement LEFT RIGHT... -
Page 70: Modes
CRAWLER AUX LIGHTS INCREASE RIGHT TOGGLE BETWEEN MAIN CAMERA / BACKEYE CAMERA BUTTON Crawler with Auto ACR Crawler and Cable Reel Joystick Position Function CRAWLER DIRECTION AND SPEED, WITH AUTOMATIC CONTROL OF ACR PAYOUT OR REWIND DISENGAGE CLUTCH BUTTON Proteus ACR350/500 Version B... - Page 71 DISENGAGE CLUTCH BUTTON ACR (Motorised Cable Reel) Mode Cable Reel Joystick Position Function UNUSED CABLE REWIND DOWN UNUSED LEFT UNUSED RIGHT UNUSED BUTTON Camera Mode Pan & Rotate Joystick Position Function CAMERA DIRECTION CAMERA HOME BUTTON Version B Proteus ACR350/500...
- Page 72 Modes Function A Mode Camera Focus / Zoom Joystick Position Function ZOOM IN ZOOM OUT DOWN FOCUS OUT LEFT FOCUS IN RIGHT UNUSED BUTTON Function B Mode (NOT IN USE) Proteus ACR350/500 Version B...
-
Page 73: Acr Only And All Stop
The RJP’s LEDs will also flash red rapidly. The keys and joysticks on both devices need to be released for at least 2 seconds before normal operation can continue. Charging the battery Version B Proteus ACR350/500... -
Page 74: Charging The Battery
LEDs are lit it is 0%. To start using the remote simply unplug it from the charger. Please Note the battery cannot be charged in temperatures below freezing. Joystick will operate as normal if placed in charger, in conditions below freezing. Proteus ACR350/500 Version B... -
Page 75: Useful Information
Useful Information Useful Information Version B Proteus ACR350/500... -
Page 76: Product Serial Numbers
For service and repair contact Mini-Cam Ltd Tel: +44 (0) 1942 444555 Email: service@minicam.co.uk International Customers: For service and repair contact your local Mini-Cam Approved Dealer To view Mini-Cam How-To Videos visit our website: www.minicam.co.uk/videos Or visit our YouTube Channel: MinicamTubeUK Proteus ACR350/500 Version B... -
Page 77: Weee Statement
Countries outside the EU: If you wish to dispose of your ACR, please contact your local authorities and ask for the correct method of disposal. For disposal contact Mini-Cam or the Mini-Cam Partner in your country. Version B Proteus ACR350/500... -
Page 78: Batteries
Unit 4, Yew Tree Way, Golborne, Warrington, Cheshire, WA3 3JD United Kingdom email: info@minicam.co.uk Telephone +44 (0) 1942 444555 We will agree the necessary arrangements for the return, proper treatment and recycling of the waste industrial batteries. Proteus ACR350/500 Version B... - Page 79 Version B Proteus ACR350/500...
- Page 80 Unit 4, Yew Tree Way, Stonecross Park, Golborne, Warrington, Cheshire, WA3 3JD, United Kingdom Tel: +44 (0) 1942 444555 Email: info@minicam.co.uk www.minicam.co.uk ©2019 Mini-Cam Ltd. All rights reserved. Mini-Cam and Proteus names/logos are trademarks of Mini-Cam Ltd. WinCan is a trademark of CD Lab AG. Specifications subject to change without notice. Mini-Cam Ltd is a Halma Company.
Need help?
Do you have a question about the Proteus ACR350 and is the answer not in the manual?
Questions and answers