Advertisement
Advertisement

Subscribe to Our Youtube Channel
Related Manuals for Audion Elektro D 555 NH


Summary of Contents for Audion Elektro D 555 NH
- Page 1 ® AUDION ELEKTRO ALL-IN-SEALER D 555 NH MANUAL D555 NH ENG Rev06...
- Page 2 (mis)interpretation of the contents. AUDION ELEKTRO is not responsible for damage or problems which result from the use of other than the original spareparts. If this manual has not been supplied with instructions for certain repairs, adjustments and maintenance, you should contact your dealer...
-
Page 3: Table Of Contents
CONTENTS To unpack the All-in sealer ........................4 Safety instructions ............................4 General description ............................ 5 Dimensions ..............................5 Operation panel ............................6 Installation ..............................7 Description of workplace ......................7 Connecting ALL-IN-SEALER ...................... 7 6.2.1 Adjusting height transport belt ..................7 6.2.2 Connecting to power supply .................. -
Page 4: To Unpack The All-In Sealer
Manual The D 555 NH is mounted on a wooden plate and packed in a carton box. The machine should be picked up, out of the carton box, by two persons. Place the D 555NH on a work table. Disassamble the wooden plate and mount the four rubber feet. -
Page 5: General Description
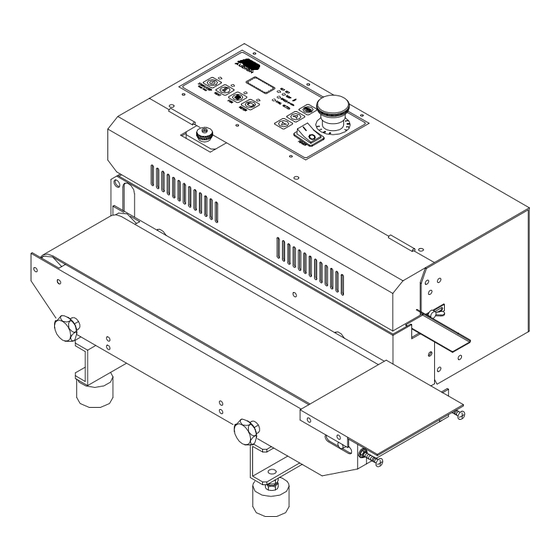
The ALL-IN-SEALER is suitable for sealing "ready to hand" bags of Polyethylene (PE), Polypropylene (PP), thin PVC's and various laminates. The All-in is standard supplied with a touch-panel and a digital display for the temperature and the speed. Dimensions Fig. 2 MACHINE Outer dimensions (mm) ALL-IN-SEALER D 555 NH... -
Page 6: Operation Panel
Operation panel Fig. 3 The operation panel contains: 1 POWER Main switch, turns the power on/off. 2 Emergency stop Stops machine immediately in case of emergency. 3 START/STOP Button to start/stop the machine. If the machine will be stopped and the actual temperature is above the 80°C. -
Page 7: Installation
Installation Description of workplace Install the ALL-IN-SEALER in a ventilated, well illuminated space. Ensure that the ALL-IN-SEALER is not exposed to direct sunlight, extreme temperatures, damp, dust or sand. The ALL-IN-SEALER is not allowed to be exposed to mechanical shocks or vibrations. Connecting ALL-IN-SEALER Before connecting the ALL-IN-SEALER, be sure that the power is off, the main switch (fig. -
Page 8: Adjusting Seal Temperature/Speed
Adjusting seal temperature/speed Use the PROG-button to change the adjustments. The leds indicates which adjustment is selected. After 30 seconds from the last button pressure, the program returns automatically to the actual seal temperature. To find the ideal sealing temperature and speed. Make a couple of trial seals with different adjustments. The settings for a good seal are a combination between sealing temperature (TEMP) and on the other side the operation speed (SPEED). -
Page 9: Preparation For Use
Preparation for use After the All-in is connected to the power and properly checked. The machine can be put into operation. Reset the emergency stop. − Set the main switch (POWER) to on (1). − Adjust the seal temperature (TEMP). −... -
Page 10: Maintenance
Before switching off the cooling ventilator and the motor the ALL-IN-SEALER must cool down or at − least 10 minutes! Only use spare parts supplied by Audion Elektro. − The maintenance schedule below is for normal use. In case of intensive use or under extreme circumstances maintenance should be executed more frequently. -
Page 11: Maintenance And Adjusting All-In-Sealer
Maintenance and adjusting ALL-IN-SEALER In order to be able to carry out maintenance or to replace spareparts easily you should: Disconnect the ALL-IN-SEALER from the power supply − Loosen the two knobs under the transport belt, and move the transport belt as far as possible from the −... -
Page 12: Heating Elements
Heating elements The heating elements are mounted in the heating plates. In order to obtain a good seal correct adjustment of the heating plates is essential. Adjustment of the heating plates depends on the material properties. 8.2.1 Adjust heating plates If very thick films need to be sealed, it may be necessary to adjust the distance between the two heating and cooling elements. -
Page 13: Replace Ptfe-Belts
8.3.2 Replace PTFE-belts Burnt or worn PTFE-belts can be replaced easily: Carry out the activities as described in § 8.2.1. − Remove the V-belts as described in § 8.4.1. − Raise the heating and cooling plates by rotating the handles above the plates clockwise (fig. 6 pos 5). −... -
Page 14: V-Belts
V-belts There are 2 V-belts in the ALL-IN-SEALER. They are located at the lefthand-side of the machine. 8.4.1 Replace v-belts Carry out the activities as described in § 8.2.1. − Loosen the nut (fig. 7 pos 1) and slide the shaft (pos 2) to the −... -
Page 15: Transport Belt
Transport belt The transport belt supports and transports the packing to be sealed. The transport belt prevents the packing from hanging on the seal. Make sure that: The distance between the transport belt and the sealunit is correct. (half of the thickness of the −... -
Page 16: Motor Set-Up
Motor Set-up The machine has an automatic motor set-up function. This motor set-up function must be carried out when a motor is replaced. During this set-up the motor will run at full speed for a few seconds. Be aware that the machine can run safely for a few seconds. -
Page 17: Print Jumpers
The jumpers of the PCB are placed on the right side in the middle. Fig. 10 The standard values are ON and 50Hz if the jumpers are removed. Technical data ALL-IN-SEALER D 555 NH Dimensions See §4 Weight 29 kg. -
Page 18: Recommended Spare Parts
Cooling does not work. The fan is turned off. Switch on the fan. Internal interruption. Contact your dealer or Audion Elektro B.V. Error codes in display E1 Wrong frequency 50/60Hz. Check the frequency and adjust the jumper. Loose wire to PT100. -
Page 19: Discard The All-In
In case we replace spare parts to fulfill our guarantee engagement, the spare parts replaced become property of AUDION ELEKTRO B.V. In case the opposite party does not come up completely, partially or does not come up in time to the obligations arisen from the closed engagement between the parties, we are not obliged to guarantee as long as the situation continues. - Page 20 Electrical circuit Appendix A1...
-
Page 21: Electrical Circuit
Electrical circuit Appendix A2... - Page 22 Exploded views Appendix B1...
-
Page 23: Exploded Views
Exploded views Appendix B2... - Page 24 Exploded views Appendix B3...
- Page 25 Exploded views Appendix B4...
- Page 26 Exploded views Appendix B5...
- Page 27 BANKS: Rabobank: account no. 34.31.00.045 Postbank: 108897 ABN-AMRO Bank n.v.:account no. 54.81.11.669 Trade reg. Hilversum no. 32057820. VAT no. NL803873104B01. Our terms and conditions are deposited at the Chamber of Commerce in Hilversum. Op alle overeenkomsten zijn van toepassing onze algemene leverings- en betalingsvoorwaarden, zoals gedeponeerd bij de Kamer van Koophandel te Hilversum...
- Page 28 AUDION ELEKTRO Represented by Hogeweyselaan 235, 1382 JL Weesp, Holland Tel : +31(0)294 491717 Fax: +31(0)294 491761 E-mail: export@audion.nl E-mail: holland@audion.nl Website: www.audion.com...
Need help?
Do you have a question about the D 555 NH and is the answer not in the manual?
Questions and answers