
Subscribe to Our Youtube Channel
Summary of Contents for Elinchrom EL Multi-Table
- Page 1 Manual/Gebrauchsanleitung/Manuel EN/DE/FR EL Multi-Table 82.5 cm 50 cm 50 cm 100 cm ENG-DE-FR Elinca S.A EL Multi-Table 01.01.2007 (73046) Printed in Switzerland...
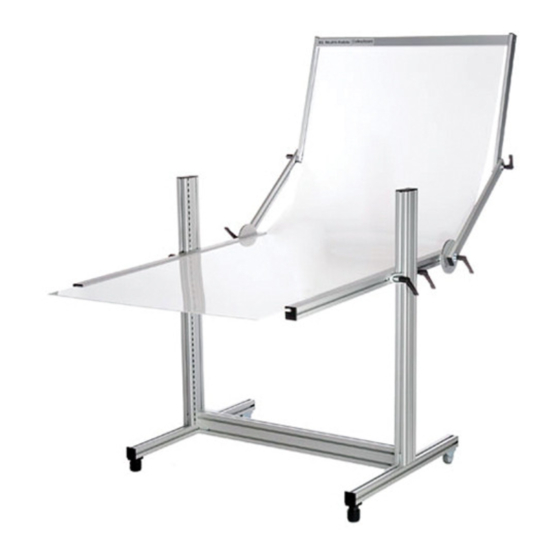
- Page 2 Introduction The EL Multi-Table is a flexible creative tool for universal Table-Top shootings. The latest design is a robust, ultra stable aluminium profile construction and is very easy to setup. The EL Multi-Table offers variable radius curves with a multi-angle, adjustable height-shooting surface.
- Page 3 Setup 1/ Remove plastic covers from the rail. 2/ Insert the connection bolt / screw into the middle rail and connect it with the foot of the table side part. 3/ Now connect the middle rail and vertical rail with the bolt and tighten the screw with the Allen key as shown in the picture.
- Page 4 5/ After fixing the middle rail, unfold the side parts and mount the background support rail. Adjust the right and left background support rails at same height and angle like you see in the image. For easier height adjustments you find a centimetre scale on both vertical rails.
- Page 5 Plexiglas plates into the support rails and fix the screws. This will stabilize the table and holds the Plexiglas plates in its support. The EL Multi-Table is now ready to use. Ensure that all screws and connections are well fixed before objects are placed on the table.
- Page 6 1x Plexiglas plate white, matt/glossy 0.3x80x200 cm /7.5 kg 1x Plexiglas plate transparent 0.5x80x100 cm / 11.5 kg EL Multi-Table 19227 without Plexiglas plates EL Multi-Table additional tray 19226 including Plexiglas plate transparent 80x100 cm for second shooting surface EL Multi-Table additional tray 19225 without Plexiglas plate...
- Page 7 Vorwort Der EL Multi-Table ist eine kompakte und extrem stabile Neukonstruktion auf Basis von Aluminium- profilen. Zusätzlich kann eine zweite Tischebene montiert werden die es ermöglicht mit Farbfolien, doppelten Hintergründen und Durchlichteffekten zu arbeiten. An dem Tischprofil können Blitzköpfe angeklemmt werden ohne die Stabilität negativ zu beeinflussen. Mit Rollen versehen, kann der EL Multi-Table leicht im Studio bewegt werden.
- Page 8 Aufbauanleitung 1/ Entfernen Sie die Plastikschutzkappen vom Profil 2/ Führen Sie das Verbindungselement der Mittelstrebe ° 3 rechtwinklig in das Fußprofil. 3/ Die Seitenteile No. 1 & 2 ebenfalls mit der Mittelstrebe verbinden. In der Seitenstrebe befindet sich ein Bolzen mit Innengewinde der mit der Befestigungsschraube der Mittelstrebe verschraubt wird.
- Page 9 5/ Nachdem die untere Mittelstrebe befestigt wurde, ist der Aufnahmetisch bereit für die Montage des Hintergrund - Abschlussprofils. 6/ Die Halteschienen für den Plexi- glashintergrund sollten rechts und links auf gleiche Höhe fixiert werden. Auf der Innenseite des vertikalen Profils ist ein Maßband zu sehen um die seitlichen Hintergrundhalteprofile in der Höhe auszurichten.
- Page 10 8/ Bevor die Plexiglasscheiben eingeführt werden können müssen die Fixierschrauben and der Unterseite des Profils gelöst werden. Führen Sie zuerst die 80 x 100 cm transparente Plexiglasscheibe ein, dann die 80 x 200 cm weisse Plexiglasscheibe. Entfernen der Plexiglas-Schutz folie an beiden Seiten! 9/ Fixieren Sie den Plexiglashintergrund mit dem rechten und linken Halteprofil und dem Abschlussprofil.
-
Page 11: Lieferbare Versionen
Plexiglasplatte transparent 26267 80 x 100 cm Option – Zubehör Der EL Multi-Table kann mit einer zusätzlichen Tischebene ausgestattet werden, die entweder oberhalb oder unterhalb des weissen Plexiglas Hintergrundes montiert wird. Die Zusätzliche Ebene ermöglicht weiter Effekte und Einspiegelungen. Tischebene... -
Page 12: Caractéristiques
La EL Multi-Table est l’outil indispensable pour la photographie d’objets. Son tout nouveau design, en profilé d’aluminium robuste, rend la EL Multi-Table ultra stable et très flexible. Grâce à sa nouvelle conception, sa surface de prise de vue offre un large éventail de possibilités d’ajustement (réglage de la hauteur, de la courbe du fond, de l’angle du plateau, et... -
Page 13: Montage
Montage 1/ A l’aide d’un tournevis, ôter les capuchons en plastique noir se trouvant à l’extrêmité des parties latérales. 2/ Dévisser de quelques tours les deux extrêmités de la traverse de la base (n°3) et la faire glisser à l’intérieur du profil latéral (partie n°1 ) 3/ Comme montré... - Page 14 5/ Après avoir fixé la traverse de la base (n°3), déplier la structure de la table (comme montré sur l’image ci-contre). Placer les deux bras latéraux à la même hauteur (régle graduée) et avec le même angle. Latéralement, les deux bras doivent également être positionnés à...
- Page 15 Visser ensuite correctement toutes les vis se trouvant sous les profils (voir image ci-contre). La EL Multi-Table est maintenant prête! Assurez-vous que toutes les vis sont bien serrées, vous gagnerez en stabilité.
- Page 16 Versions code EL Multi-Table complète 19228 Complète avec: 1x plexiglas blanc diffusant (face mate et brillante) 0.3x80x200 cm /7.5 kg 1x plexiglas transparent 0.5x80x100 cm / 11.5 kg EL Multi-Table 19227 Sans les plaques de plexiglas Plateau supplémentaire 19226 Inclus plaque de plexiglas transparent 80x100 cm...
Need help?
Do you have a question about the EL Multi-Table and is the answer not in the manual?
Questions and answers