Table of Contents
Advertisement
Advertisement
Table of Contents

Summary of Contents for Pain Relief Essentials Rhythm Touch
- Page 1 Prepared for www.painreliefessentials.com – all rights reserved. 2017a...
-
Page 2: Therapeutic Hand And Food Massage Charts
Page 2 Therapeutic Hand and Food Massage Charts Available in printed version from Pain Relief Essentials Prepared for www.painreliefessentials.com – all rights reserved. 2017a... -
Page 3: Table Of Contents
Therapeutic Hand and Food Massage Charts ___________________________ 2 What is a Low-Frequency Massager? _____________________________________________ 4 A Note on Consistent Usage______________________________________________________ 5 Product Specification – Rhythm Touch Standard Unit _______________________________ 6 Set Up the Rhythm Touch For Use _________________________________________________ 6 Set Up Procedures ____________________________________________________________________ 6... -
Page 4: What Is A Low-Frequency Massager
It will also help intensify your workout and can help diminish stress by stimulating your endorphins. Rhythm Touch can be used with gel pads, a roller, a pressure point pen, and a flexible rubber pad for a number of therapeutic methods. -
Page 5: A Note On Consistent Usage
After reading her letter we started working with people to encourage them to use the Rhythm Touch on a regular basis: once a day at a minimum and for more serious conditions, twice a day during the morning and evening. -
Page 6: Product Specification - Rhythm Touch Standard Unit
Page 6 Product Description The Rhythm Touch is a low-frequency electrical muscle stimulator and massager that offers the highest quality and performance, is easy to use, has no side effects, offers a fully automatic computerized control system. Product Specification – Rhythm Touch Standard Unit... -
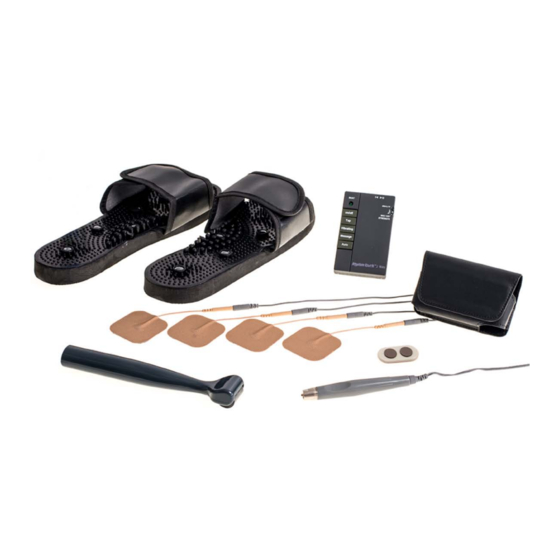
Page 7: Assembly Of Rhythm Touch
Power the unit by inserting 2 AAA batteries (included) in the battery compartment. This is located at the back bottom of the Rhythm Touch. Connect the lead wire cords to gel pads by inserting the thin metal end of the lead wire into the gel pad slots. Connect the lead wire cords to the base unit by inserting the thick plug end of the lead wire into the base unit sockets. -
Page 8: Operation Of Rhythm Touch
Page 8 Operation of Rhythm Touch Tap Key (Chopping massage) and Vibrating Key (Vibrating Massage) • Tap and Vibrating are good for neck and shoulders, muscle cramps, deep knotted areas, and to help increase your range of motion (rotator cuff). - Page 9 Page 9 1. On/Off 2. Strength dial Beat light/ Starting at the lowest power indicator strength level slowly light will light increase the strength up when power to desired level by is on. turning the level dial. Remember: Always reset the strength to lowest level before selecting different massage key, then Increase to desired...
- Page 10 Page 10 7. Strength Dial Detail o Each massage session stops When adjusting the automatically after 15 minutes of strength level dial to operation. Repeat if desired. “MAX” or "5" like o Each mode can be detected by the the figure, the output indicator light.
-
Page 11: Use Of The Adhesive Gel Pads
Rhythm Touch pads should only be applied to normal, intact, clean skin. make sure you drink lots of water when using Rhythm Touch for extended time periods. Rhythm Touch replacement pads and cords may be ordered direct from Pain Relief Essentials at www.painreliefessentials.com. -
Page 12: Basic Therapy Points
Page 12 Basic Therapy Points The Upper Body • Attach one adhesive gel pad near (not directly over) the third joint from the upside of the backbone. • Attach the other adhesive gel pad to a desired part of the body. (Arms, shoulders, etc.) The Lower Back •... -
Page 13: Acu-Roller Instructions
Page 13 Acu-Roller Instructions Connect the Acu Roller by inserting the thick metal plug of the lead wire cable into the top end of the unit (slot 1). Plug 1 lead wire (the thin metal plug) into the bottom of the handle of the roller. -
Page 14: Acu-Feet Therapy Slipper Instructions
Page 14 Acu-Feet Therapy Slipper Instructions Acu-Feet Therapy Slippers make the Rhythm Touch so much easier and convenient to use on your feet. Just drop a little water ® based jell (we like Spectra Electrode Gel or Aloe Vera gel) - Page 15 Page 15 Muscle Workout Instructions 1. Daily to twice weekly 2. Hamstring Back of Thighs 3. Inner Thighs 4. Outer Thighs 5. Buttocks 6. Calves 7. Front of Thighs 8. Abs 9. Breast Development 10. Pecs 11. Triceps (Back of Arms) 12.
-
Page 16: Facial Muscle Workout
5. Below chin on the neck where right angle is formed, on the two parallel neck muscles to tighten neck skin. 6. Below collarbone to tighten bust line. Use massage mode on Rhythm Touch unit. Start very low setting and work upward if desired five to ten minutes - 3-4 times per day. Prepared for www.painreliefessentials.com... -
Page 17: Maintenance
Page 17 Maintenance Main Box a. If dirty, remove the dirt off the surface gel pads with wet cotton and a mild cleanser. Remove the pads from the unit before cleaning. Never make the cotton so wet that the excess moisture flows into the openings of the machine b. -
Page 18: Troubleshooting
If your Rhythm Touch unit stops working even though the unit comes on, or if there seems to be a 'contact' problem with the pads plugged in but the unit will not function: Please try these things before anything else: 1. -
Page 19: Safety Instructions
• DO NOT USE if you have epilepsy, cancerous lesions, abdominal or inguinal hernias, critical ischemia of the lower limbs or blood flow deficiencies/venous thrombosis. • The Rhythm Touch should not be applied over the carotid sinuses due to the risk of acute hypotension through a vasovagal reflex. -
Page 20: Customer Service
Please read the user manual carefully before use. Warranty and Service At Pain Relief Essentials we are dedicated to helping all Rhythm Touch customers with service repair and supply needs. If you purchased your Rhythm Touch through Pain Relief Essentials, and in case of malfunction, service is guaranteed during the warranty period of five years from the date of purchase. -
Page 21: Fibromyalgia
Fibromyalgia Suggested use of the Rhythm Touch for relief of the symptoms of Fibromyalgia Drink water before, during and after using the Rhythm Touch. This will increase the effectiveness of the electrical current. 1. Label each tender point from most painful to least painful. -
Page 22: Chart Of Reflex Points
Page 22 Chart of Reflex Points The Rhythm Touch uses low-power electrical current via two AAA batteries. Without needles, it operates along the theory of ancient Chinese exercise by stimulating the body’s natural electrical signals. The illustrations identify the body’s reflex points. Using the accompanying charts, place the appropriate Rhythm Touch attachment on the desired reflex point to stimulate muscles in helping to relax, relieve and massage body area. -
Page 23: Therapy Instruction Chart
Page 23 Therapy Instruction Chart Available in printed version from Pain Relief Essentials Prepared for www.painreliefessentials.com – all rights reserved. 2017a... -
Page 24: Accessories For The Rhythm Touch
The insertion points are located on the side near LEATHER CASE Genuine Leather Case designed to clip onto your belt and hold the Rhythm Touch. Very useful in protecting the settings tabs form inadvertent adjustment Prepared for www.painreliefessentials.com...
Need help?
Do you have a question about the Rhythm Touch and is the answer not in the manual?
Questions and answers