Table of Contents
Advertisement
Available languages
Available languages
Quick Links
Advertisement
Table of Contents

Related Manuals for Cassese CS 940

Summary of Contents for Cassese CS 940
- Page 1 Version 5 05/2017 Z27456 Version 1 07/2014...
-
Page 2: Table Of Contents
USER & PARTS MANUAL CS940 INDEX I. USER MANUAL / ENGLISH .................... 4 SAFETY FEATURES .............................. 5 POSITION OF THE LABELS ON THE MACHINE.........................5 USER RULES ..................................7 WHAT SHOULDN’T BE DONE ............................7 SAFE USE OF THE MACHINE ............................7 DESCRIPTION ..............................9 DESCRIPTION OF THE CS940 PARTS ..........................9 ACCESSORIES BOX ................................10 OPTIONS ..................................10... - Page 3 USER & PARTS MANUAL CS940 EMPLACEMENT DES ETIQUETTES DE SECURITE SUR LA MACHINE................39 CONDITIONS D’UTILISATION ............................41 CE QU’IL NE FAUT PAS FAIRE ............................41 PRATIQUES DE TRAVAIL EN TOUTE SECURITE ......................41 PRESENTATION ..............................43 DESCRIPTION DES PRINCIPAUX ELEMENTS DE LA CS940 .....................43 CONTENU DE LA BOITE D’ACCESSOIRES : ........................44 ELEMENTS OPTIONNELS ...............................44 CARACTERISTIQUES TECHNIQUES ..........................45...
-
Page 4: User Manual / English
USER & PARTS MANUAL CS940 I. USER MANUAL / ENGLISH Your safety is our priority. This icon in the manual will identify a list of This icon in the manual mentions some tricks required tools to perform a procedure. that can help you saving time or improve your production. -
Page 5: Safety Features
USER & PARTS MANUAL CS940 1 SAFETY FEATURES POSITION OF THE LABELS ON THE MACHINE. 1/ Identitying plate showing 2/ Information about pressure the technical datas of your supply. machine. Figure 1-1 Figure 1-2... - Page 6 USER & PARTS MANUAL CS940 Information about 4/ This symbol on the machine reminds the locking key and the spin operator to read this manual before operating slocker of the blade. this joiner. 5/ This symbol shows that it is advised to wear a dust protecton mask.
-
Page 7: Buser Rules
USER & PARTS MANUAL CS940 USER RULES The CS940 is a cutting machine able to perform 45° cuts on wood, plastic and MDF . These materials cannot be cut on this machine : Mouldings that don’t have a 90° angle back on at least 5mm. Metal profiles. - Page 8 USER & PARTS MANUAL CS940 d) Informed about the necessity to wear suffisant individual protection such as : 1) Ear protections. 2) Mask protection against dust to avoid breathing dangerous material. 3) Protecting gloves when touching blades (it is also recommended to use a blade carrying tool to transport the blades).
-
Page 9: Description
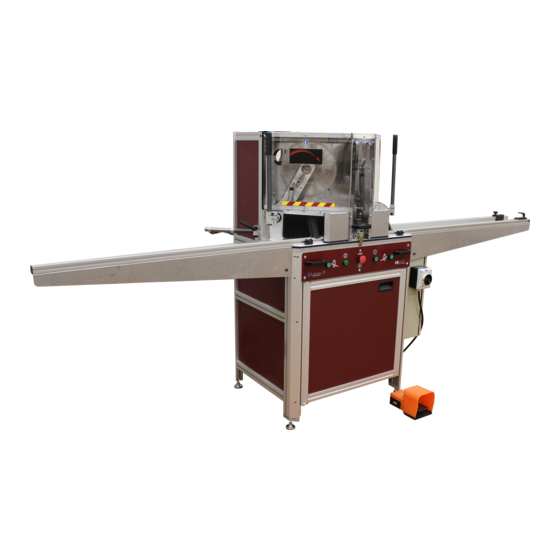
USER & PARTS MANUAL CS940 2 DESCRIPTION DESCRIPTION OF THE CS940 PARTS Control panel (10) : Left vertical clamp handle Cover Left vertical clamp Right vertical clamp handle Moulding guide Right vertical clamp Right arm Left arm Electrical cabinet door Control panel Safety switch Main circuit breaker (can be locked with a locker) -
Page 10: Baccessories Box
USER & PARTS MANUAL CS940 ACCESSORIES BOX The machine is delivered with the following items : Allen key N.10 ref : Z1369 Allen key N.4 ref: Z1884 Allen key N.5 ref: Z1885 Allen key N.6 ref: Z1889 Black cap ref: Z15329 ZZ15329Z1369 Triangular key ref : Z9522 US male connector... -
Page 11: Dtechnical Datas
USER & PARTS MANUAL CS940 TECHNICAL DATAS Name……..………………………………………………………………………………………………………………………CS940 Year of manufacturing.………………………………………………………………………………………………………….. 2015 Cutting capacity : Maximum width………………………………………………………………………………………………………..140 mm Maximum hig of moulding……………………………………………………………………………………………..75 mm Dimension of the blades…………………………………………………………………………………………………….Ø 300 mm Bore…..…………………………………………………………………………………………………………………………. Ø30 mm RPM………………. ………………………………………………………………..3500 RPM at 60Hz and 2800 RPM at 50 Hz Maximum lengh to be cut …………………………………………………………………………………………………….1400 mm Electric supply………... -
Page 12: Ecutting Capacity
USER & PARTS MANUAL CS940 CUTTING CAPACITY... -
Page 13: Fneeded Space
USER & PARTS MANUAL CS940 NEEDED SPACE... -
Page 14: Gwarranty
USER & PARTS MANUAL CS940 2.G WARRANTY This machine is covered by a one year warranty, parts and labor included. Wearing parts* and damaged parts due to bad use of the machine are not covered by the warranty. * Are considered as wearing parts : waste support, belts, blades, cardboard waste box and clamps’extremities. -
Page 15: Handling And Unpacking
USER & PARTS MANUAL CS940 3 HANDLING AND UNPACKING Flat screw driver. Crowbar Protecting gloves Forklift To handle the machine, it With the help of a flat is necessary to use a screw driver, bent back the Forklift equiped with forks ears to be able to remove of minimum 115cm lenght. -
Page 16: Installation Of The Machine
USER & PARTS MANUAL CS940 4 INSTALLATION OF THE MACHINE PUTTING THE MACHINE IN PLACE Flat span of 17 bubble level Flat span of 13 Allen key N.4 & N.5 A sufficient space should be around the machine to be able to proceed to its maintenance (see chapter I.2.F NEEDED SPACE page 13). -
Page 17: Binstallation Of The Arms
USER & PARTS MANUAL CS940 When installing the machine, make sure the floor is flat and stable, make sure your floor can support the weight of the machine. The machine must be installed in a temperate environement with no excessive humidity. Select a position where the light with be sufficient to light the working bench of the machine. - Page 18 USER & PARTS MANUAL CS940 Start to install the right Unlock arm (8), taking care of horizontal screws of 4 damaging turns (see picture extremity of the scale. opposite). If needed use the flat span of 10mm to hold the nut at the extremity of the Figure 4-12 Figure 4-11...
- Page 19 USER & PARTS MANUAL CS940 Make sure the scales Still with the help of are well aligned. second person holding levelled, lock the 3 screws under the arm. Figure 4-22 Figure 4-21 Lock the 2 screws With a bubble level on under the arm.
-
Page 20: Left Arm Installation
USER & PARTS MANUAL CS940 4.B.b Left arm installation Unlock of 3 turns the 2 Remove the 2 screws front horizontal (V4) and (V5), discard screws. the nut which was just installed avoid damaging in transport the scale with a too long screw. - Page 21 USER & PARTS MANUAL CS940 Lock the 3 screws Still holding the arm, install the nut so they (ULF) from the top of inside the profile. track of the profile. Figure 4-37 Figure 4-36 With the bubble level, Holding the arm, lock check the level of the the screws under it.
-
Page 22: Electric Connection
USER & PARTS MANUAL CS940 ELECTRIC CONNECTION The user of the machine should connect it to a cable and power source in conformity with safety regulation. It is recommended to have an electrician checking your electrical system before plugging the machine on it. The cable of the machine is contains 3 wires, it must be connected to 240 volts single phase, the earth must be connected to the yellow/green wire. -
Page 23: Edust Collector Connection
USER & PARTS MANUAL CS940 DUST COLLECTOR CONNECTION To be in conformity with the health and safety regulation it is needed to connect to the machine a dust collector (not supplied with the machine). This dust collector must show a suction of 1600m3/h at 20m/s and be connected to both plugs of Ø... -
Page 24: Using The Machine
USER & PARTS MANUAL CS940 5 USING THE MACHINE STARTING THE MACHINE Close the cover. Lock the right side clamp. Lock the front and left side clamp. Figure 5-2 Figure 5-1 Make sure there is no Turn the valve (VA) to object on the tables. -
Page 25: Bsawing
USER & PARTS MANUAL CS940 SAWING 5.B.a Setting the horizontal clamps Press on the pedal to Still with pedal release the clamps and to pressed, unlock be able to introduce the (M2) handle and adjust moulding inside position machine. Keep the pedal horizontal clamps (PH) pressed during... -
Page 26: First Cut
USER & PARTS MANUAL CS940 5.B.c First cut Switch blade also possible rotation using the button introduce the moulding as per image opposite. of the control panel. Press pedal introduce the moulding as per image opposite. Figure 5-9 Figure 5-10 Example of bad position of Release the pedal and the moulding, the right... -
Page 27: Inside Measurement
USER & PARTS MANUAL CS940 Inside measurement 5.B.d Once the first cut is done, press on the pedal to release the clamps and slide the moulding to the scale of the right arm. To make the inside measurement, align the rebate of the moulding to the desired measurement line, here 46cm. -
Page 28: Cut Of The First Piece
USER & PARTS MANUAL CS940 5.B.f Cut of the first piece Make sure the blades are Example rotating or press the button positionning moulding, the left clamp of the control panel to will push the moulding switch on your blades. against the right blade Make sure the moulding is during the cut, causing... -
Page 29: End Of A Stick
USER & PARTS MANUAL CS940 IT IS STRICTLY FORBIDDEN TO MOVE DOWN BOTH BLADES AT THE SAME TIME. 5.B.g End of a stick At the end of a moulding it is difficult to predict where the left clamp will be. In the example opposite, the left clamp will push the moulding to the right blade, this can damage the machine and the moulding. - Page 30 USER & PARTS MANUAL CS940 Operation of the machine should be done only by one person at a time. (17) In case of a trouble, press the red button . Then before any maintenance, switch off and lock the main contactor and the air switch (see page 22).
-
Page 31: Maintenance
USER & PARTS MANUAL CS940 6 MAINTENANCE When the cover is opened, a safety sensor prevents the starting of the motors. OPENING THE COVER Press the pedal to Keep pedal release the clamps as pressed and unlock vertical clamps the left and front cover can avoid the opening clamps. - Page 32 USER & PARTS MANUAL CS940 Open the front cover (see chapter 6.A OPENING THE COVER page 31) Turn the blade by hand Unlock the screw (V7), until the receptacle (R) is move up the locking key (V) until the blades’s axis is in line with the locking key (V).
-
Page 33: Creplacement Of The Waste Support
USER & PARTS MANUAL CS940 Install the blade and lock Unlock the screw (V7) and its screw. slide down the locking key (V). Pay attention to the blade mounting way! Lock back the screw (V7) and make sure the blade will be free of rotating. -
Page 34: Dempty The Waste Box
USER & PARTS MANUAL CS940 6.D EMPTY THE WASTE BOX Before performing any maintenance , switch off the main electrical contactor (12) and the air rotating switch (15) and lock it with a locker. Your machine is equiped Pull the box out of the with waste machine and clean it. -
Page 35: Fdiagnosis
USER & PARTS MANUAL CS940 DIAGNOSIS L7: One blade is not back up and 6.F.a Machine doesn’t start the confirmbutton is not pressed Your machine is equiped with a self diagnosis L3: Air pressure board which will be very helpful in case of unsufficient trouble. -
Page 36: Gmonthly Safety Controls
USER & PARTS MANUAL CS940 6.G MONTHLY SAFETY CONTROLS The control list bellow should be performed once a month for your safety. It is advised to check regularly that the machine is complete, make sure that all panels are in place and correctly attached, especially the blade covers and the back cover that avoids the access to the blades’... - Page 37 USER & PARTS MANUAL CS940...
-
Page 38: Manuel D'utilisation / Francais
USER & PARTS MANUAL CS940 II. MANUEL D’UTILISATION / FRANCAIS VERSION ORIGINALE Votre sécurité est notre priorité. Cette icône dans le manuel vous permet de Cette icône dans le manuel vous signale une connaître la liste des outils nécessaires pour astuce susceptible de vous faire gagner du temps ou d’améliorer votre production. -
Page 39: Consignes De Securite
USER & PARTS MANUAL CS940 1 CONSIGNES DE SECURITE EMPLACEMENT DES ETIQUETTES DE SECURITE SUR LA MACHINE. 1/ Plaque d’identité de votre 2/ Information sur la pression d’air coupure CS940, informations sur les l’alimentation électrique. caractéristiques techniques de la machine. Figure 1-1 Figure 1-2... - Page 40 USER & PARTS MANUAL CS940 Information marquage machine vous l’emplacement de la clé de recommande de lire le manuel avant toute desserrage des lames et le utilisation. verrou d’immobilisation de la lame. This symbol on the machine reminds the marquage machine vous operator to read this manual before to...
-
Page 41: Bconditions D'utilisation
USER & PARTS MANUAL CS940 CONDITIONS D’UTILISATION La scie CS940 est une machine pour la réalisation de coupe d'onglets à 45° de toute moulure à base de bois , massif ou reconstitué brut ou revêtu (peinture, vernis, revêtement plastique, papier, etc...). Sont exclus : Les profils de moulure ne présentant pas un talon à... - Page 42 USER & PARTS MANUAL CS940 Il est essentiel que tous les opérateurs soient : a) Suffisamment formés à l'utilisation, au réglage et au fonctionnement de la machine. b) Informés des facteurs qui influencent l'exposition au bruit, par exemple: 1) Les lames conçues pour réduire l'émission de bruit. 2) La sélection optimale de la vitesse de déplacement des lames.
-
Page 43: Presentation
USER & PARTS MANUAL CS940 2 PRESENTATION DESCRIPTION DES PRINCIPAUX ELEMENTS DE LA CS940 Détails tableau de commandes (10) : Manette presseur vertical gauche Capot Presseur vertical gauche Manette presseur vertical droit Guide moulure Presseur vertical droit Bras droit Bras gauche Porte d’armoire électrique Tableau de commandes Verrou de sécurité... -
Page 44: Bcontenu De La Boite D'accessoires
USER & PARTS MANUAL CS940 CONTENU DE LA BOITE D’ACCESSOIRES : La machine vous est livrée avec les accessoires suivants : Clé Allen N.10 ref : Z1369 Clé Allen N.4 ref: Z1884 Clé Allen N.5 ref: Z1885 Clé Allen N.6 ref: Z1889 Bouchon noir ref: Z15329 ZZ15329Z1369 Clé... -
Page 45: Dcaracteristiques Techniques
USER & PARTS MANUAL CS940 CARACTERISTIQUES TECHNIQUES Désignation………………………………………………………………………………………………………………………CS940 Année de fabrication…………………………………………………………………………………………………………….. 2015 Capacités de coupe : Largeur maxi…………………………………………………………………………………………………………..140 mm Hauteur maxi moulure………………………………………………………………………………………………..75 mm Dimension des lames……………………………………………………………………………………………………….Ø 300 mm Alèsage…………………………………………………………………………………………………………………………. Ø30 mm Vitesse de rotation ……………………………………………………………………..3500 tr/mn à 60Hz et 2800 tr/mn à 50 Hz Longueur de coupe maxi …………………………………………………………………………………………………….1400 mm Alimentation électrique …………………………………………………………………………………….230V Mono / 50Hz-60 Hz Câble d’alimentation, norme………………………………………………………………………………..4 x 1.5 HO7RNF - 4G1,5... -
Page 46: Ecapacite De Coupe
USER & PARTS MANUAL CS940 CAPACITE DE COUPE... -
Page 47: Fplan D'encombrement
USER & PARTS MANUAL CS940 PLAN D’ENCOMBREMENT... -
Page 48: Grisques Residuels
USER & PARTS MANUAL CS940 RISQUES RESIDUELS Les mains ne doivent en aucun cas être engagées à l'intérieur du capot supérieur de protection au delà des écrans en plastique zones délimitées par les bandes Jaunes/rouges, étant donné la présence des vérins de maintien et des lames de scie en rotation dans leur position de repos haute . -
Page 49: Deballage Et Manutention
USER & PARTS MANUAL CS940 3 DEBALLAGE ET MANUTENTION Tournevis plat. Pied de biche Gants de protection Chariot elevateur A l’aide d’un tournevis plat, Pour la manipulation de la scie, nécessaire replier oreilles d’utiliser chariot maintien du panneau avant élévateur équipé... -
Page 50: Installation De La Machine
USER & PARTS MANUAL CS940 4 INSTALLATION DE LA MACHINE MISE EN PLACE DE LA MACHINE Clé plate de 17 Niveau à bulle Clé plate de 13 Clés Allen N.4 & N.5 Un espace suffisant doit être réservé autour de la machine pour assurer une libre circulation et procéder à son entretien (voir chapitre II.2.F PLAN D’ENCOMBREMENT page 47). -
Page 51: Bmontage Des Bras
USER & PARTS MANUAL CS940 Lors de l’installation de la machine, assurez-vous que le sol soit plan et pourra supporter le poids de la machine. La machine doit être installée dans un endroit sec et tempéré. Choisir un endroit ou l’éclairage sera suffisant pour assurer une utilisation confortable du matériel. - Page 52 USER & PARTS MANUAL CS940 Présenter le bras droit Deserrer les 2 (8), prendre garde à horizontales ci-contre abimer de 4 tours, ci-besoin l’extrémité du reglet. maintenir l’écrou à l’aide de la clé plate de 10. Figure 4-12 Figure 4-11 Avec l’aide d’une...
- Page 53 USER & PARTS MANUAL CS940 Veiller à bien aligner Toujours les reglets. maintenant bras avec une deuxième personne, bloquer les 3 vis sous le bras droit. Figure 4-22 Figure 4-21 Bloquer les 2 vis sous A l’aide d’un niveau à le bras.
-
Page 54: Montage Du Bras Gauche
USER & PARTS MANUAL CS940 4.B.b Montage du bras gauche Deserrer de 3 tours Dévisser les 2 vis (V4) les 2 vis de façade et (V5) à l’intèrieur du des butées du bras bras (7), l’écrou sur gauche. l’une des vis ne sera plus utile. - Page 55 USER & PARTS MANUAL CS940 Bloquer Insérer écrous dans le profilé toujours (ULF) sur le dessus en soutenant le bras du profilé. gauche. Figure 4-37 Figure 4-36 Contrôler le niveau du Verrouiller les vis sous bras et le maintenir bras gauche, jusqu’au verrouillage...
-
Page 56: Cbranchement Electrique
USER & PARTS MANUAL CS940 BRANCHEMENT ELECTRIQUE L’utilisateur doit raccorder le câble d’alimentation à une source conforme à la réglementation en vigueur, faites vérifier votre système électrique par un électricien en cas de doute. Le câble de la machine comporte 3 conducteurs, la machine doit être raccordée au réseau 240V monophasé, la terre doit impérativement être raccordée sur le fils verre/jaune. -
Page 57: Easpiration
USER & PARTS MANUAL CS940 ASPIRATION Pour être en conformité avec les normes d’hygiène la machine doit impérativement être connectée avec un aspirateur (non fourni) dont les caractéristiques sont au moins égales à 1600m3/h à 20m/s et raccordé aux deux bouches de Ø 100.mm. Pour connecter vos tuyaux d’aspiration, ouvrir le panneau arrière de la machine en otant les 9 vis ci-contre. -
Page 58: Utilisation
USER & PARTS MANUAL CS940 5 UTILISATION MISE EN ROUTE Fermer le capot. Verrouiller grenouillère de droite. Verrouiller grenouillère gauche ainsi celle façade verrouillant le capot. Figure 5-2 Figure 5-1 Assurez vous qu’aucun Tourner la vanne (VA) objet n’est sur la table afin d’alimenter coupe... -
Page 59: Bsciage
USER & PARTS MANUAL CS940 SCIAGE 5.B.a Réglage des presseurs horizontaux Appuyer sur la pédale afin Toujours en maintenant de liberer les presseurs et pédale enfoncée, pouvoir ainsi introduire la Desserer manette moulure dans le carter de (M2) ajuster coupe. Garder la pédale position presseur enfoncée durant toute les... -
Page 60: Première Coupe À Gauche
USER & PARTS MANUAL CS940 5.B.c Première coupe à gauche Mettre marche Autre exemple de bon moteurs de lames avec le positionnement moulure qui reste ainsi bouton ( du tableau de parfaitement maintenue commande. durant tout le cycle de Appuyer sur la pédale, coupe. -
Page 61: Mesure Fond De Feuillure ( Cote Interieure )
USER & PARTS MANUAL CS940 Mesure fond de feuillure ( cote interieure ) 5.B.d Une fois votre première coupe gauche réalisée, appuyez sur la pédale pour libérer les presseurs et glissez votre moulure sur la table. Pour réaliser une mesure interne, aligner la feuillure sur la distance requise, ici 46cm. -
Page 62: Coupe Du Premier Morceau
USER & PARTS MANUAL CS940 5.B.f Coupe du premier morceau Exemple mauvais besoin, mettre marche les moteurs de positionnement moulure. presseur lames avec le bouton ( gauche va repousser celle- du tableau de commande. ci vers la lame de droite ce La moulure doit toujours qui peut endommager la être contre la butée de... -
Page 63: Fin De Moulure
USER & PARTS MANUAL CS940 L’ABAISSEMENT DES DEUX POIGNEES SIMULTANEMENT EST FORMELLEMENT INTERDIT. RISQUE DE CASSE DES DEUX LAMES QUI VONT SE TOUCHER LORS DE LA DESCENTE 5.B.g Fin de moulure Lors de la fin d’une baguette, il est difficile de prédire où le presseur de gauche sera, dans l’exemple ci-contre, le presseur gauche va repousser celle-ci vers la lame de droite ce qui peut endommager la moulure et les lames de la machine. - Page 64 USER & PARTS MANUAL CS940 Il est formellement interdit de couper plusieurs longueurs de moulure à la fois en les empilant ou l’une devant l’autre. En aucun cas l’opérateur ne doit engager les mains à l’intérieur du carter principal au-delà des bandes de sécurité...
-
Page 65: Maintenance & Entretien
USER & PARTS MANUAL CS940 6 MAINTENANCE & ENTRETIEN Lorsque le capot est ouvert, la mise en route des moteurs est interdite par le groupe de sécurité PROCEDURE POUR ACCÉDER A L’INTÉRIEUR DE LA MACHINE Appuyer sur la pédale Tout en maintenant la pour liberer pédale... - Page 66 USER & PARTS MANUAL CS940 Ouvrir le carter principal ( voir chapitre 6.A PROCEDURE POUR ACCÉDER A L’INTÉRIEUR DE LA MACHINE, page 65) Tourner la lame à la main Desserrer (V7), jusqu’à orienter monter clef verrouillage jusqu’à réceptacle (R) avec blocage complet de l’axe clé...
-
Page 67: Cremplacement De L' Axe Support De Chute
USER & PARTS MANUAL CS940 Monter la lame et serrer Desserrer sa vis de blocage. blocage (V7) et glisser en position basse la clef de Attention sens verrouillage (V). montage de la lame ! Bloquer de nouveau la vis (V7) et vérifier que la lame sera bien libre de tourner. -
Page 68: Dvidage Du Bac A Chutes
USER & PARTS MANUAL CS940 6.D VIDAGE DU BAC A CHUTES Pour toute opération d’entretien, de réglage ou de réparation, mettre hors service les circuits électriques & pneumatiques de la machine en verrouillant le sectionneur général (12) et la vanne d’air (15) à l’aide de cadenas. -
Page 69: Fdiagnostique
USER & PARTS MANUAL CS940 DIAGNOSTIQUE L7: Une lame n’est pas en position 6.F.a La machine ne démarre pas haute et son bouton de validation n’est pas enfoncé. L3: Pression d’air insuffisante Votre machine équipée d’une carte électronique qui fournira une aide précieuse en cas de problème. -
Page 70: Gcontrôle Mensuel Des Organes De Sécurité
USER & PARTS MANUAL CS940 6.G CONTRÔLE MENSUEL DES ORGANES DE SÉCURITÉ Il vous est demandé de proceder aux controles ci-dessous une fois par mois. Avant toute chose, il convient de vérifier que la machine est complète et qu’aucun carter n’est manquant. Le carter de protection des lames, le capot arrière interdisant l’acces aux moteurs doivent être présents et convenablement fixés. -
Page 71: Hnomenclature / Spare Part List
USER & PARTS MANUAL CS940 V. CERTIFICATE / CERTIFICAT DE CONFORMITE... - Page 72 USER & PARTS MANUAL CS940...
Need help?
Do you have a question about the CS 940 and is the answer not in the manual?
Questions and answers