Advertisement
Advertisement
Table of Contents

Related Manuals for Boss Elite BV745B


Summary of Contents for Boss Elite BV745B
- Page 3 To ensure safety while driving and to comply with laws, drivers should not watch video or operate the video device while driving. [ 1 ]...
-
Page 4: Installation & Accessories
IMPORTANT NOTICE & PRECAUTIONS Thank you for using our company multi-media player! To operate the unit correctly, please read the operation manual carefully before using. Keep this operation manual for further reference. The unit is designed only for DC 12V negative ground operation system. Make sure your vehicle is connected to DC 12V negative ground electrical system. -
Page 5: Wiring Connection
WIRING CONNECTION Socket A (Power) Socket D (Audio / Video Input & Output) A1 Yellow Constant (+12V) FL (White) Front Left Audio Output A2 Orange Illumination Input (+12V) FR (Red) Front Right Audio Output A3 Blue Antenna Output (+12V) RL (White) Rear Left Audio Output A4 Black Ground (B-) -
Page 6: Main Unit Operation
MAIN UNIT OPERATION Operations & Controls 1. Press repeatedly to select the desired mode for operation. 2. Press to shift screen between MAIN MENU and current operation mode. 3. Power On/Off When the unit is turned off, press to turn on the unit. When the unit is turned on, press &... -
Page 7: Battery Replacement
REMOTE HANDSET – GENERAL OPERATION BATTERY REPLACEMENT Refer to the back of remote handset for details on how to replace the battery. Replace the battery only with the same or equivalent type. Note: If the remote handset will not be used for a long time, please remove the battery from the battery compartment. - Page 8 SCAN At tuner mode, press to start scanning the radio frequency upward and stop for broadcasting for a few seconds when a radio station received. Tuner Mode Press repeatedly to select the desired radio band for broadcasting. When the unit is under other operation mode, press to shift current operation mode to tuner mode for operation (not available at USB / SD playback mode).
- Page 9 At tuner mode, press to select local setting for reception of strong signal stations and distance setting for reception of weak signal stations. (Note: LOC appears on screen on local setting whereas DX appears on screen on distance setting) SLOW Video Playback Mode Each time press &...
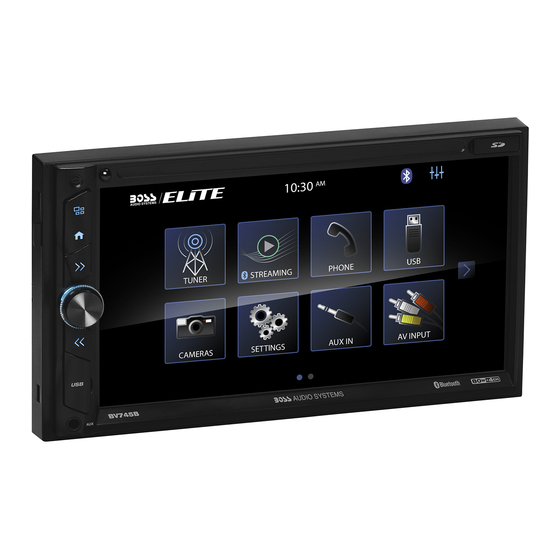
- Page 10 5. Touch to start camera input operation (when connected with front and/or rear camera). 6. Touch to start various setup of the unit. 7. Touch to start auxiliary input operation (when an external device has been connected). 8. Touch to start AV input operation (when an external AV device has been connected). 9.
-
Page 11: Settings Menu
VOLUME CONTROL MENU VOLUME CONTROL MENU During unit operation and when the above VOLUME CONTROL MENU appeared on screen: 1. Touch to turn on sound mute. 2. Touch to turn off sound mute. 3. Hold & slide to set for the desired sound output level. 4. -
Page 12: Camera Menu
11. This Bluetooth icon will light up if the unit has connected to a mobile phone. If no connection made, the icon will flash. 12. Touch to activate AUDIO MENU for various audio settings. 13. Touch to shift to MAIN MENU for operation mode selection. GENERAL SETTINGS GENERAL MENU 1. -
Page 13: Clock Settings
CAMERA MENU 1. Touch repeatedly to select the front or rear camera viewing when the car is shifted from forward mode to backward mode. When “Off” is selected, no camera viewing available at car backward mode. 2. Touch to turn on or off of rear camera input. 3. -
Page 14: Clock Menu
CLOCK MENU 1. Touch to select 12 hour or 24 hour display format of clock. 2. Touch repeatedly to adjust hour of clock. 3. Touch repeatedly to adjust minute of clock. 4. At 12 hour display format, touch to select AM / PM display. 5. - Page 15 5. Touch to shift to next AUDIO SETTINGS MENU. 6. Touch to shift to previous AUDIO SETTINGS MENU. 7. Touch to shift to GENERAL SETTINGS MENU for general settings of the unit. 8. Touch to shift to CAMERA SETTINGS MENU for camera settings of the unit. 9.
- Page 16 CONTROLS (BACKLIGHT) SETTINGS CONTROLS (BACKLIGHT) SETTINGS MENU 1. Touch repeatedly to select the backlight color for illumination. When Auto mode selected, backlight color will have cycle changed automatically. 2. Touch to shift to ILLUMINATION (VISUAL) MENU for various visual settings of the unit. 3.
- Page 17 5. Touch to show other setting modes of the unit. 6. This Bluetooth icon will light up if the unit has connected to a mobile phone. If no connection made, the icon will flash. 7. Touch to activate AUDIO MENU for various audio settings. 8.
-
Page 18: Tuner Menu
TUNER MENU 1. Touch repeatedly to select radio band (FM-1 / FM-2 / FM-3 / AM-1 / AM-2) for broadcasting. 2. Touch to turn the radio frequency upward or downward and stop for broadcasting when a station received. Press & hold shortly to activate manual tuning mode. At this mode, press repeatedly to fine tune the radio frequency upward or downward. - Page 19 PARKING BRAKE WARNING PARKING BRAKE WARNING INTERFACE will appear on screen and no INTERFACE video playback start in case the parking brake input has not been connected and engaged. VIDEO PLAYBACK MENU VIDEO PLAYBACK MENU VIDEO PLAYBACK MENU MUSIC PLAYBACK MENU PHOTO PLAYBACK MENU FOLDER / PLAYLIST MENU [ 17 ]...
- Page 20 VISUAL INTERFACE KEYBOARD INTERFACE 1. Touch to activate KEYBOARD INTERFACE to input track number directly for playback. 2. Touch to shift to next or previous track for playback. At video & music playback mode, touch & hold shortly to activate fast forward or fast rewind mode.
- Page 21 ON SCREEN – PHONE (BLUETOOTH) OPERATION At MAIN MENU, touch on screen and shift to PHONE (KEYPAD) MENU for Bluetooth Operation. LINK UP WITH MOBILE PHONE To linkup Bluetooth connection with the mobile phone, take your phone and follow the steps: - set the mobile phone to Bluetooth state - start to search new device - after searched, new device (model number of this unit) searched out, confirm the search...
- Page 22 PHONE (SETUP) MENU PHONE (SETUP) MENU PIN CODE INTERFACE PHONE (DEVICE) MENU PHONE (RECENT) MENU PHONE (PHONEBOOK) MENU PHONEBOOK SEARCH INTERFACE 1. Touch to shift to PHONE (KEYPAD) MENU for dial out. [ 20 ]...
- Page 23 2. Touch to shift to PHONE (PHONEBOOK) MENU to show the phone book of the connected mobile phone. 3. Touch to shift to PHONE (RECENT) MENU to show the record on incoming / outgoing / missing calls. 4. Touch to shift to PHONE (DEVICE) MENU to show the current status on connection. 5.
- Page 24 38. Touch to close KEYPAD INTERFACE. 39. This Bluetooth icon will light up if the unit has connected to a mobile phone. If no connection made, the icon will flash. 40. Touch to activate AUDIO MENU for various audio settings. 41.
- Page 25 CAMERA INPUT MENU 1. Touch to select rear camera viewing. 2. Touch to select front camera viewing. 3. This Bluetooth icon will light up if the unit has connected to a mobile phone. If no connection made, the icon will flash. 4.
- Page 26 Due to the law of some countries and PARKING BRAKE WARNING areas, watching video is not allowed during INTERFACE driving. To allow video playback, parking brake must be engaged (light green wire - parking brake input must be connected). PARKING BRAKE WARNING INTERFACE will appear on screen and no...
-
Page 27: Setup Menu
5. After installation, mirror linking of mobile phone will appear on screen and A-Link operation activated. 6. Depends on the mobile phone used, it may be necessary to disconnect the mobile phone from the USB slot first and then plug in again in order to start A-Link operation. SETUP MENU Important notice on mobile phone linking operation on Android mobile phone: 1. -
Page 28: Specification
SPECIFICATION GENERAL Power Requirement: DC 12 Volts, negative ground Load Impedance: 4 Ohms Maximum Power Output: 80 watts x 4 AM RADIO SECTION Frequency Range 530 – 1710 KHz (America) 522 – 1620 KHz (Europe) FM RADIO SECTION Frequency Range 87.5 –... -
Page 29: Simple Troubleshooting
SIMPLE TROUBLE SHOOTING PROBLEMS, CAUSES & SOLUTIONS No power - Check and make sure the connecting wires are connected correctly - Check whether the fuse is blown. Replace with the proper value fuse if necessary. No sound - Check and make sure the speaker wires are connected correctly. No picture - Check whether the video wire is connected to the video device.
Need help?
Do you have a question about the Elite BV745B and is the answer not in the manual?
Questions and answers