
Summary of Contents for Tume AgroCont
- Page 1 98801803 E 8.11.2017 AgroCont and AgroCont plus Manual and sparepart book Starting from machine number AD-51612→ Please read this manual before you start using the system. Translation...
- Page 3 Name and address of person authorized to compile a technical file: Name: Heimo Valli Address: Sudenkorventie 1, FI-14200 Turenki Hereby declares that Seed drill control system Agrocont and Agrocont plus Serial number _______ • are in compliance with the applicable decrees of the Machine Directive (2006/42/EC) and in addition declares, that •...
-
Page 4: Table Of Contents
Changing the current rhythm position ..........14 8.5.2 Changing the tramlining rhythm ............14 Down-pressure (only in Tume Nova models) ..........15 Low-lift function (Tume Nova, Vega and Titan, not JC) ......17 8.7.1 JC hydraulic rear harrow ..............17 Extra-lift function..................18 Left marker.................... - Page 5 Indicator for the top limit for lifting Nova /Titan......29 12.2.10 Indicator for the low limit for lifting Nova /Titan......29 12.2.11 12.2.12 Indicator for Nova/Titan’s elimination limit ........29 12.3 Seeder connecting box ................29 Storage and service of the Agrocont system ............ 30...
-
Page 6: For The User And The Person Responsible For The Use Of The Machine
It is extremely important to read these instructions in good time before the season of use begins. Keep the manual in a safe place where it is easily available. Both Tume-Agri Oy, as the manufacturer, and the authorised reseller will be happy to help you with any issues related to the machine. -
Page 7: Safety Instructions
• Ensure that the Agrocont system is only used by authorised personnel. You should be especially careful to ensure that those not permitted to use the system, such as passengers, do not touch the control unit in the cab while you are in the machine’s danger zone. -
Page 8: Deployment Of The Agrocont System
Programs, setting values and measurement results will remain in the memory of the Agrocont system even if the power is switched off. Thus, the power supply may be switched off by disconnecting the plug when the machine is not in use. However, when continuing to use the machine after the power has been disconnected you should check the settings for amounts of feeding and the value in the tramline counter. - Page 9 Figure 2. Data cable connected Figure 3. Data cable socket Figure 4. Data cable plug...
-
Page 10: Placing The Monitor In The Cab
Placing the monitor in the cab The Agrocont monitor is designed to be used only in tractors with a cab. Over the course of the season of use, it is recommended to leave the monitor in place in the cab. When a seeder or seeder fertilizer is detached from the tractor, you should not disconnect anything except the data cable from the back of the tractor. -
Page 11: Starting The System
To attach the connector, press it lightly and turn the locking part. When the system power is switched on, Agrocont’s preset values appear on the display immediately after the system has loaded. When the system is started again, the values on startup will be those stored in the memory from when you last used the system. -
Page 12: Display
7 Display Figure 8. Monitor type plate Figure 9. Basic view of the system Areas Wheel tracks Down-pressure Level mode Amount of fertilizer (plus model only) -
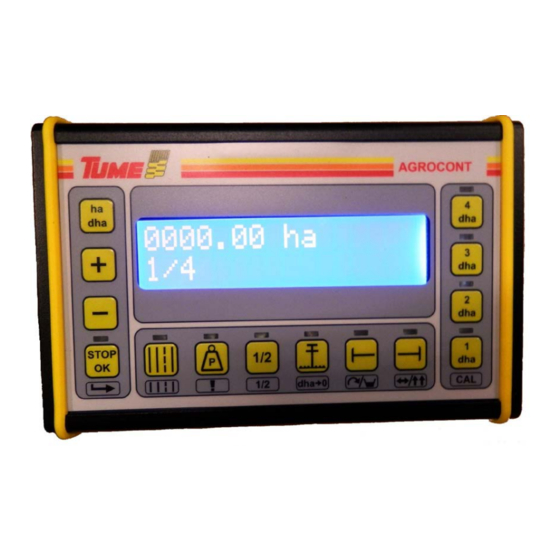
Page 13: Keys
8 Keys Figure 10. Agrocont plus model keys and display Figure 11. Agrocont model keys and display... -
Page 14: Hectare Counters Ha And Dha
Hectare counters HA and dHA When you press this key, the total seeded area and the resettable partial areas (1 dha and 2 dha) appear on the screen one at a time, with hectare as the unit of measurement. You can reset the partial area values by pressing the “stop/ok” key and the pole-lifting key (8) continuously for 3 seconds (cf. -
Page 15: Down-Pressure (Only In Tume Nova Models)
The lower the container is lowered, the higher the down-pressure. Agrocont stops the lowering at a set height. This height limit can be adjusted by changing settings. The... - Page 16 Down- pressure value (1-15) Figure 12. Down-pressure value P=11 Figure 13. Maximum down-pressure P=15 Adjusting down-pressure while seeding The down-pressure value mentioned above is the lowest limit value, which determines when the system will stop the hydraulic lowering of the machine. The down-pressure of the machine can be decreased during driving and increased again using hydraulics at areas where the pressure is lower than the maximum down- pressure set.
-
Page 17: Low-Lift Function (Tume Nova, Vega And Titan, Not Jc)
To save the desired value, press the Stop/OK key, after which the Agrocont system’s basic view will reappear on the screen. Vega: The lift height for the low-lift function is adjusted mechanically with the detent pin of the seed fertilizer’s three-way valve. -
Page 18: Extra-Lift Function
Extra-lift function The extra-lift function is controlled with the 8 key. A red light above the key indicates that the feature is switched on. When the extra-lift function is on, the system allows only the marker to be raised/lowered when you try to hydraulically raise or lower the seeder. - Page 19 • Automatic marker-change function: When the seeder is raised, first deactivate both markers, then activate the marker you wish to be lowered first, and then activate the other marker. Consequently, when seeding, the markers will be lowered in turn after field-end turns. •...
-
Page 20: Ritsi Marking (Marking The Tramlines Into The Field)
This function is needed, for example, when using certain pesticides for Turnip rape. In Tume, the marking is carried out in such a way that in the stage following the stage one of furrowing (such as stage 1 / 4, 1 / 5 etc.), both coulters come down and one coulter draws a line to the centre of the previously sown furrow stage. -
Page 21: Configuring Settings For Seeder Fertilizer
9 Configuring settings for seeder fertilizer Working width Working width and advance distance: press the Stop/OK key and the right marker key (number 10) simultaneously. The advance distance will appear on the top row of the display and the working width on the bottom row. The values are displayed in centimetres. - Page 22 Figure 19. The advance distance setting; the 120 cm setting is for 7.5-16 tyres. (with two magnets) Advance (mm) Tyre One magnet Two magnets Friction roller P1350, PTD, Multimaster 175/70 R 13 185/65 R 15 685/190x15 7.00-12 10.0/75-15.3 11.5/80-15.3 400/60-15.5 11.2-20 15.0/70-18 14.9 R 24...
-
Page 23: Monitoring And Alarms
Monitoring and alarms The Agrocont system monitors the levels of seed and fertilizer containers and the rotation of seed and fertilizer shafts. Container monitoring activates an alarm when the level of seed or fertilizer is low enough to leave the sensor in the seed or fertilizer container completely exposed. -
Page 24: Agrocont Plus
Figure 21. Agrocont Plus 10.1 Usage The Agrocont Plus model has all the functions of the basic model as well as an electric remote control for fertilizer feed. This function is implemented by substituting the standard fertilizer-shaft butt-adjustment wheel for an electric spindle engine and mechanism. -
Page 25: Conducting A Test Run
Figure 22. A test-run setting 11 Hectar counter of Agrocont There in basic-Agrocont unit are four pieces of hectar counters: dha 1 to dha 4. You can use those as trip-counters. Each of them is possibleto set to zero by activating it,... -
Page 26: Seeder Connecting Box
12 Seeder connecting box The connecting box mounted to the front-side of the seeder comprises the processor unit of the Agrocont system, to which the monitor, power supply, sensors, solenoids for the tramlining device and low-lift, electro-hydraulics for the coulters, and, in Nova models, the lift/down-pressure control are attached. -
Page 27: Advance Sensor's Indicator
12.1.1 Advance sensor’s indicator This LED light blinks when the sensor in the rear wheel sends a signal to indicate that the wheel is rotating. 12.1.2 Fertilizing-shaft rotation indicator This LED lights blinks when the fertilizing-shaft rotation control sensor sends a signal to indicate that the shaft is rotating. -
Page 28: Agrocont Nova/Titan Processor Unit
12.2 Agrocont Nova /Titan processor unit Figure 24. Agrocont Nova /Titan processor unit 12.2.1 Advance sensor’s indicator (cf. 11.1.1) 12.2.2 Fertilizing-shaft rotation indicator (cf. 11.1.2) 12.2.3 Seed-shaft rotation indicator (cf. 11.1.3) 12.2.4 Fertilizer-container level control sensor’s indicator (cf. 11.1.4) 12.2.5 Seed-container level control sensor’s indicator (cf. -
Page 29: Indicator For The Top Limit For Lifting Nova /Titan
The connecting box attached to the front side of the seeder has, in addition to the processor unit, a relay controlling the tramlining device’s solenoids, and fuses (20 A) for the tramlining device and for the rest of the system (10 A). System fuse 10 A Figure 25. Connecting box for Tume Titan... -
Page 30: Storage And Service Of The Agrocont System
Repair and software updating should only be performed by an authorised Tume service agent. Do not open the casing of the monitor or working-machine controller by yourself. Do not perform any maintenance operations on the equipment inside the monitor or working-machine controller. - Page 31 STARTING FROM MACHINE NUMBERS: R in program version (see section 8.11 Ritsi marking) Titan Nova AD 51321 AD 51612 → AD 51363 AD 51323 AD 51395 AD 51212 AD 51512 AD 51488 AD 51516 AD 51638 → AD 51523 AD 51528 AD 51662 →...
- Page 32 99262602 Agrocont Titan 99262702 Agrocont plus Titan 99262802 Agrocont JC 99262902 Agrocont plus JC 1 99263002 Käyttöpääte Agrocont Monitor Agrocont Instrument Agrocont 1 99263102 Käyttöpääte Agrocont plus Monitor Agrocont plus Instrument Agrocont plus 1.1 98722618 Kiinnitysjalka Support Ställ 1.2 01780032 Kiinnityshahlo Installation cone Anfästningsskiva...
- Page 33 STARTING FROM MACHINE NUMBERS: Agrocont and Agrocont Plus R in program version (see section 8.11 Ritsi marking) Titan Nova AD 51321 AD 51612 → AD 51363 AD 51323 AD 51395 AD 51212 AD 51512 AD 51488 AD 51516 AD 51638 →...
- Page 34 98803803 Kytkentäkuva Angle sensor, for machine lift, Nova Combi. Connection picture Kulma-anturi nostolle, Nova Combi. Inkopplingshema Pulse sensor, fertilizer shaft. Pulssianturi, lannoiteakseli. Electric cable Jännitekaapeli Magnet Monitor data Magneetti Pulse sensor, seed shaft. Näytön ohjaus Pulssianturi, siemenakseli. Magnet Magneetti Pulse sensor, speed. Pulssianturi, ajonopeus.
- Page 35 AGROCONT COUPLINGS NOVA,JC KASU12/2012 1 L10 7 L11 13 L12 17 L13 3 L4 11 12 13...
- Page 36 AGROCONT COUPLINGS TITAN KASU12/2012 1/ 2 DOWN 1 L10 L16 44 7 L11 L15 36 13 L12 17 L13 L14 28...
- Page 37 AGROCONT COUPLINGS AND WIRES NOVA 06.02.2012 AK L10 DRILL UNIT WIRE L1 MONITOR WIRE 1 pulse sensor, speed J7 / 1 1 monitor data J1 / 1 2 pulse sensor, speed J7 / 2 2 monitor data J1 / 2...
- Page 38 AGROCONT COUPLINGS AND WIRES JC 06.02.2012 AK L10 DRILL UNIT WIRE L1 MONITOR WIRE 1 pulse sensor, speed J7 / 1 1 monitor data J1 / 1 2 pulse sensor, speed J7 / 2 2 monitor data J1 / 2...
- Page 39 AGROCONT COUPLINGS AND WIRES TITAN KASU 04/2013 L10 DRILL UNIT WIRE L1 MONITOR WIRE 1 pulse sensor, speed J7 / 1 1 monitor data J1 / 1, white 2 pulse sensor, speed J7 / 2 2 monitor data J1 / 2, brown...
- Page 40 PL 77, FI-14201 Turenki Finland Tel. +358 207 433 060 Fax +358 3 688 2305 www.tumeagri.fi...
Need help?
Do you have a question about the AgroCont and is the answer not in the manual?
Questions and answers