Table of Contents
Advertisement
Quick Links
Advertisement
Table of Contents

Subscribe to Our Youtube Channel
Related Manuals for Verve GLUTE BUILDER


Summary of Contents for Verve GLUTE BUILDER
- Page 1 GLUTE BUILDER Owners Manual...
- Page 3 ▲Prior to assembling the machine and having your workout, please carefully read this manual. We assume that you have read it when you are using it. ▲Please carefully fill out the warranty card and well retain it after your purchase. Mail the stub on payment receipt to us so we can offer you more quality services conveniently.
-
Page 4: Table Of Contents
CONTENTS SAFE USE NOTICES···············································1 DESIGN ILLUSTRATION··········································4 PRODUCT DESCRIPTION·······································5 SPECIFICATIONS····················································6 ASSEMBLY TOOLS·················································6 ASSEMBLY INSTRUCTIONS·····································7 USAGE GUIDANCE···············································11 EXERCISE NOTICES··············································13 MAINTENANCE&TROUBLE SHOOTING····················14 PREVENTIVE MAINTENANCE·································15 WARRANTY··························································16... -
Page 5: Safe Use Notices
SAFE USE NOTICES Before using the machine, please carefully read this manual and get acquainted with operation process. Keep this in mind: Please have an adequate warm-up prior to any workout in case of injuries. The manufacture and dealer assume no liability for any human injury or property damage caused by any disease or improper operation during usage. - Page 6 9.It must be located stably on an even floor in case of slips during the usage. Enough clearance must be kept for safe operation. Generally, a distance of 4 feet (1.2m) should be kept between the user and the centre of the surrounding space. 10.Select appropriate weight resistance and adjust position prior to exercise.
- Page 7 In order to reduce the risk of burn, fire, electric shock and Warning injury to other people, please obey the following regulations: ●It must be ensured that the SELECTOR PIN works normally prior to using the machine. ●If you feel chest pain, nausea, dizziness or tachypnea during workout, stop immediately and consult the professional.
-
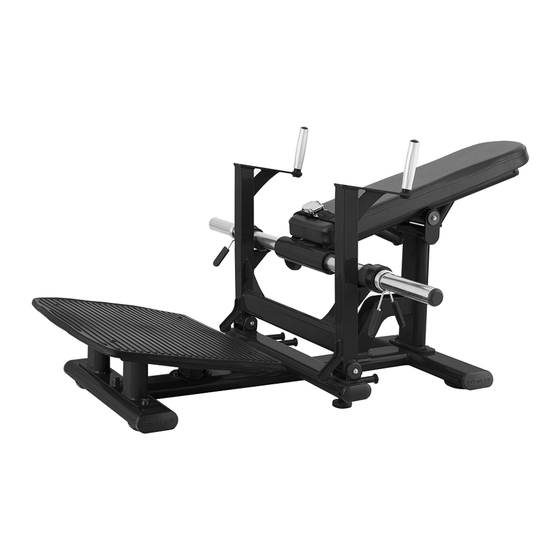
Page 8: Design Illustration
DESIGN ILLUSTRATION Cushion Handgrip Seat belt Footrest Main Frame Assembly... -
Page 9: Product Description
PRODUCT DESCRIPTION Hip Thrust: Muscle groups in hips and thighs. The unit has a scientific, reasonable structure, and simplified, elegant look. Due to the movement trajectory that complies with the principle of human engineering, the exercise is safe and comfortable. Cushion: Cushion made of PU with one-step forming technology wrapped in leather has a moderate softness and is soft, comfortable. -
Page 10: Specifications
SPECIFICATIONS 1700mm(L)*13800mm(W)*860mm(H) Unit Dimensions 2m² Recommended Live Area 10-200kg Load Capacity 93kg Unit Weight 0-40℃ Working Temperature ≤ 150kg Maximum User Weight ASSEMBLY TOOLS ITEM SPECIFICATION QUANTITY Screwdriver Philips Open-ended Spanner 17-19 Open-ended Spanner 13-16 Allen Wrench 10mm Allen Wrench Allen Wrench Allen Wrench Allen Wrench... -
Page 11: Assembly Instructions
ASSEMBLY INSTRUCTIONS 1.As the unit has a large size, please assemble it in a space which is big enough. 2.Open the packing box, take out the parts and remove packing materials. Classify all parts and tidily put them on vacant floor. 3.Ensure that it's correctly assembled and the parts are complete according to assembly steps. - Page 12 Assembled View (Frame) Assembly Step (Stop Assembly) 4-GB49 4-D35 4-GB110 4-GB459 2-D20 REF# DESCRIPTION SPEC. QTY. Stop Assembly Axle φ20*70 Stationary Cover, Axle φ49*5.0 GB49 Hexagon Socket Button Head Screw M8*20 GB110 Split Washer φ20 GB459 Bearing GB61804...
- Page 13 Assembled View (Stop Assembly) Assembly Step (Cushion) 4-GB82 4-GB92 4-GB50 2-GB118 2-D25 2-D35 2-GB49 2-M1282 2-GB163 2-GB165 4-GB99 2-H35 2-M51...
- Page 14 ITEM# DESCRIPTION SPEC. QTY. Back Cushion Assembly E1 Seat Cushion Assembly Back Cushion Supporting Assembly M12*30 Spacing Ring φ35*4.5 Stationary Cover, Axle φ49*5 Limit Sleeve φ68*40 Shock Absorber Pad φ80*37 M1282 Stop sleeve 64*38 GB49 Hexagon Socket Button Head Screw M8*20 GB99 Hexagon Socket Set Screw with Flat Point...
-
Page 15: Usage Guidance
USAGE GUIDANCE Hip Thrust Safe to operate and convenient to use. It mainly trains hip and thigh muscles. Hip Thrust ① ②... - Page 16 Target Muscles Diagram Back Muscle Gluteus Maximus Rectus Femoris Biceps Femoris Vastus Lateralis Vastus Medialis Exercise Movement Grip crossbar with both hands,sit with back firmly against back cushion, put both feet on footrest, The muscles of the waist and buttocks contract, the upper body leans back to the limit, and the hands push forward the stop bar, Straighten the arm, rest for 1 second, completely contract the waist and leg muscles (Fig.
-
Page 17: Exercise Notices
EXERCISE NOTICES 1. 5~10 minutes of warm-up must be taken prior to having exercise on this machine. Record the time while having free exercise which aims to activate the joints in case of injury to them during training. 2. Inspection must be carried out prior to using the machine. For any potential problem, please contact after-sales personnel immediately. -
Page 18: Maintenance&Trouble Shooting
MAINTENANCE AND TROUBLESHOOTING 1. Inspect bolts at all mechanical parts frequently for tightness; rotating parts should rotate smoothly without producing any abnormal sound. 2. The machine should be kept clean but not wiped with strong cleaning solvents. 3. Pins at all the adjustment parts should be tightened after adjustment in case of slack. 4.If any loading part, e.g., seat cushion, transport wheel, stop plate, is abraded or damaged, it must be replaced immediately;... -
Page 19: Preventive Maintenance
PREVENTIVE MAINTENANCE 1. Daily Inspection Clean and inspect machine frame; clean all the upholsteries. Clean upholsteries and machine frame with neutral soapy water, remove dirt, oil stain and perspiration on the surfaces and air dry them completely. Inspect the frame for rupture, rustiness and other damage. Make sure that soldering points and fastening parts are correctly fixed. -
Page 20: Warranty
WARRANTY 1.Scope of Warranty: Non-artificial damage during normal usage of product maintained properly is in the scope of warranty. The warranty card only belongs to the original purchaser and is non-transferable. 2.The warranty period is one year from the date of purchase. 3.Damages below are beyond the scope of warranty: (1)Damages which result from abuse, negligence, accident or unauthorized modification.
Need help?
Do you have a question about the GLUTE BUILDER and is the answer not in the manual?
Questions and answers