
Summary of Contents for JessEm 04550
- Page 1 MICRO ADJUSTER Owners Manual Model #04550 61 Forest Plain Road Oro-Medonte, Ontario Canada L3V 0R4 Toll Free: 1-800-436-6799 Local: 705-726-8233 Fax: 705-327-0295 Email: jessem@jessem.com Web: www.jessem.com...
- Page 2 Thank you for choosing this product from JessEm Tool Company. We appreciate your support and hope that our product serves you well. This product is designed to provide many years of reliable service provided it is used as intended and taken care of.
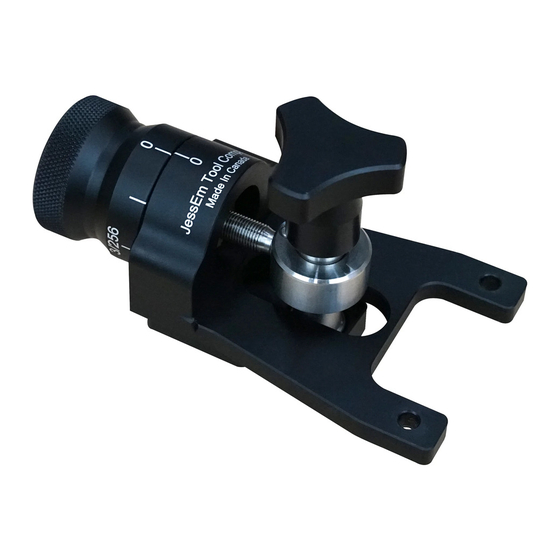
- Page 3 THE FOLLOWING INSTRUCTIONS ARE FOR MOUNTING THE #04550 MICRO ADJUSTER TO A JESSEM MAST-R-FENCE III Step 1: Attaching to the track Loosen the clamping knob (part #5). Align the clamping T-nut (part #15) with the T-slot in your Mast-R-Fence III track. See Figure 1.
- Page 4 Step 2: Attaching to the fence Align the holes in the fence mount (part #3) with the pre-drilled holes in the Mast-R-Fence III. See figure 2. Tighten the (2) #10-24 X ¾" pan head torx screws (part #2). Figure 2...
- Page 5 THE FOLLOWING INSTRUCTIONS ARE FOR MOUNTING THE #04550 MICRO ADJUSTER TO A JESSEM TA FENCE Step 3: Removing the clamping knob Remove the clamping knob (part A) from your TA Fence. HINT: Loosen then pull straight up to remove. Loosen the (2) #10-24 X ½" torx...
- Page 6 Step 4: Installing hex nuts Slide (1) of the #10-24 hex nuts (part #22) into the slot of your TA Fence. Slide the previously removed clamp- ing knob mounting block (part C) with attached hex nuts back into the slot of the TA Fence. Slide the other hex nut (part #22) into the slot of the TA Fence.
- Page 7 Step 5: Attaching to the track Reattach the TA Fence clamping knob (part A) Loosen the clamping knob (part #5). Align the clamping T-nut (part #15) with the T-slot in the track of your TA Fence. See Figure 5. Slide the clamping T-nut into the T-slot ensuring the spindle mount pivot mount (part #13) slides along Figure 5...
- Page 8 Step 6: Attaching to the fence Align the holes in the fence mount (part #3) with the hex nuts (part #22) inserted in the slot of the TA Fence. Tighten the (4) #10-24 X ½" pan head torx screws (parts #1 & B) Figure 6...
- Page 9 THE FOLLOWING INSTRUCTIONS ARE FOR OPERATING THE #04550 JESSEM MICRO ADJUSTER Step 7: Operation of the Micro Adjuster Slide your fence to the approximate location for your desired cut. Tighten clamping knob (part B) and leave clamping knob (part A) loose.
- Page 11 MICRO ADJUSTER™ PARTS LIST Item No. Part No. Part Description F0363 #10-24 X ½" Pan Head Torx Screw - FOR TA FENCE F0364 #10-24 X ¾" Pan Head Torx Screw - FOR MAST-R-FENCE III E0311-1 Fence Mount F0121 #014 O-Ring E0054-33 Clamping Knob M0302-3...
Need help?
Do you have a question about the 04550 and is the answer not in the manual?
Questions and answers