
Summary of Contents for Synthstrom Audible Deluge
- Page 1 The Official Guidebook MORE THAN JUST A MANUAL Guidebook - Reference - Notebook...
- Page 2 Deluge Official Manual...
- Page 3 Deluge Official Manual...
- Page 4 Deluge Official Manual...
-
Page 5: Table Of Contents
Contents OVERVIEW BASIC OPERATION SEQUENCING SYNTHESIZERS KITS MODULATION SONG VIEW ARRANGER VIEW AUDIO LOOPING EFFECTS MIDI SYSTEM & GENERAL INDEX Deluge Official Manual... - Page 6 Deluge Official Manual...
-
Page 7: Overview
OVERVIEW... - Page 8 Overview 1.1 How to Use This Manual This book is a formal reference to the Deluge, bringing together a comprehensive guide along with your own notes. Some pages are intentionally left blank and may contain wide margins enabling you to make your own notes on the specific topics covered.
- Page 9 An optional external DC supply, centre-negative (not centre-positive), 500mA or greater can also be used. Using an incorrect power supply may cause damage to the Deluge. Hardcopy version of the producer guide is available from the Synthstrom store and the latest PDF version as a free download from the Synthstrom site.
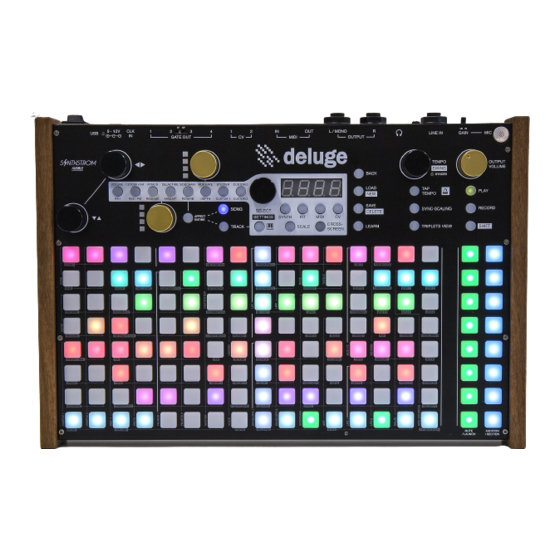
- Page 10 Pad Grid 16 x 8 grid for sequencing. Also contains Shortcuts using [SHIFT] + where columns represent Deluge function groups and row pad represents a parameter. Alpha Numeric Keyboard Pads are used for text entry for example when entering names using the QWERTY keyboard.
- Page 11 Also to launch a [SECTION]. Mute / Launch Pads are manually selectable to [MUTE] or unmute clips / rows and [LAUNCH] clips. Modulation Section Grid area where modulation sources are located and can be selected. SD Card Slot Deluge Official Manual...
- Page 12 USB-B connector and 3.5mm / 1/8” input charging source. USB MIDI Connection Front Panel Internal Speaker SD Card Slot SD card used for presets, streaming samples, firmware updates and storage. Any size, formatted to FAT32. Insert pins-up. Deluge Official Manual...
- Page 13 The Deluge may draw up to 500mA from its power source. Deluge also can be used as a USB Host. This requires Deluge to be DC powered, a USB device connected and then Deluge to be powered...
- Page 14 Deluge’s outputs to balanced / differential inputs. Output impedance: 47 ohms. Deluge will detect if only the “L / MONO” output has a cable inserted (but not the “R” output or headphone output), and will output all sound in mono.
- Page 15 Sequenced Patterns are Stored with the Song SONG CLIPS Modulation Effects Send / Return Song Effects Song is is an illustration of the general architecture and functions of the Deluge and is not intended as a detailed schematic diagram Deluge Official Manual...
- Page 16 NOTES Deluge Official Manual...
-
Page 17: Basic Operation
BASIC OPERATION... - Page 18 The Deluge is supplied with a formatted SD card loaded with the factory library. Samples are streamed directly from the SD card when in use, making it an integral part of the device. Ensure the card is inserted in Deluge when in use.
- Page 19 Joey Esposito Short Sharp Delay Detuned Retriggering Dark Chorus Saws 40 Spacer Leader FM Narrow Band 41 Zithar - Vibed Marcel Bellve Deep Fizz Jani Hakala 42 High Triangle Techno Organ Pawel Czubak 43 Square Porta Define Leader Deluge Official Manual...
- Page 20 125 Evolving Pad Guilherme Gomes 169 Double Bass Leonard Ludvigsen 126 Dark FM Pad 170 Sitar Michael Bulaw 127 Alien Larvae 128 Lunar Landing Brad Antone 129 Sci-fi Scenic Brad Antone 130 Dark Strings Guilherme Gomes 131 Warm Strings Deluge Official Manual...
- Page 21 Chaz Bundick 11 KR-55 Reuben Winter 12 HR-II Kody Nielson 13 AT Rhythm Alfred Darlington 14 CR-78 Travis Egedy Andrew Stirton (Frugal) Sjionel Timu Electronisounds Stefanie Franciotti Electronisounds Stephanie Engelbrecht Electronisounds Jonathan Snipes (FX) Fairburg Campbell Kneale Deluge Official Manual...
- Page 22 3. Turn the unit on by switching the ON/OFF switch located at the rear of the device to ON. 4. Deluge will power up in ‘clip view’ with a blank song and one blank clip with an assigned synth preset ‘0’ as shown on the display.
- Page 23 1. In any view, press [PLAY] the button illuminates green when playing. 2. To stop the sequencer press [PLAY] while its running. The button will be unlit and the sequencer resets to the beginning when play is resumed. Deluge Official Manual...
- Page 24 Presents the view where clips can be chained together in series making a longer arrangement from the perspective of an instrument, MIDI, CV or audio track. SONG VIEW Song button lit blue ARRANGER VIEW Song button flashes blue CLIP VIEW Clip button lit blue Deluge Official Manual...
- Page 25 Basic Operations 2.5 Synths and Kits NOTES Deluge has the ability to sequence patterns arranged using kits or based on the synthesizer engine. Synthesizer engine clips Kit clips • Deluge synth engine allows • Kits consist of unique sounds sound design by configuration per row.
- Page 26 The undo / redo commands can be used when editing notes. down (SCROLL▼▲) and left / For example: press [BACK / UNDO] right (SCROLL◄►) scrolling and zooming rotaries. to undo the last note placement and [SHIFT]+[REDO] to restore it. Deluge Official Manual...
- Page 27 The pads in the audition / section on the mute / launch pads column are located far right of the located at the right of the Deluge interface and provide Deluge interface. manual play out of sounds. Press [AUDITION] to trigger a sound.
- Page 28 5. Once selected, the sound displayed will be ready for use on the current Clip. Kit presets are only the kit instrument and sounds / samples - not a pattern. Deluge Official Manual...
- Page 29 6. Press [LOAD] to load the preset. 7. Once selected, the sound displayed will be ready for use on the current Clip. Kit presets are only the kit instrument and sounds / samples - not a pattern. Deluge Official Manual...
- Page 30 BACK/UNDO plus the display will flash. 2. The display will indicate the next available iteration of patch number i.e kit 0, if kit 0 exists, Deluge will show 0A, then 0b etc. This avoids accidentally overwriting existing patches. Turning (SELECT) allows the option to select an existing kit to overwrite.
- Page 31 Custom 1, 2, and 3 are mapped based on the preset chosen. These custom controls can mapped to other settings. Labels therefore on the control buttons are defaults only. Parameters can be remapped to the 8 controls, mapped for external MIDI control or existing settings edited by using the sound editor. Deluge Official Manual...
- Page 32 Configurable. Typical synth presets set to B7 Lower Custom 1 portamento and pitch for sample based sounds B8 Upper Custom 2 Configurable. Typical kit presets set to decimation B8 Lower Custom 3 Configurable. Typical kit presets set to bitcrush Deluge Official Manual...
- Page 33 9. The preset will automatically change to a new sub slot number when saving after a parameter is adjusted e.g. from 52 to 52A to enable saving without overwriting the original if required. Deluge Official Manual...
- Page 34 2.8 Alphanumeric Keyboard & Grid Layout. NOTES Deluge has an alphanumeric keyboard function within the 16x8 pad grid. This enables text entry for naming of songs, clips etc. The default setting is QWERTY mode (can be changed in settings) and the keyboard is highlighted on the grid and available automatically when text entry options are available such as when saving, file browser etc.
- Page 35 3. Press (SELECT) to drill into the sub-menu. 4. Turn (SELECT) to choose ‘SHor’ - shortcuts. 5. Press (SELECT) when ‘SHor’ is in-focus. 6. Turn (SELECT) to choose the desired shortcut style based on the firmware versions. • • Deluge Official Manual...
- Page 36 NOTES Deluge Official Manual...
-
Page 37: Sequencing
SEQUENCING... - Page 38 Clip or kit Level Repeat cycle for other clips Example, bass, lead, MIDI, drums Build structure of song in song view Build structure and assemble clips Flesh out arrangement in arrangement view Build linear structure Save song Play Deluge Official Manual...
- Page 39 Press & hold (SCROLL◄►) + press [PLAY] to start the sequencer playback from the start of 16x8 16x8 16x8 the current in focus grid scroll position instead of starting at the start of the full grid. Deluge Official Manual...
- Page 40 3. (OUTPUT LEVEL) will adjust the entire volume output and headphone output. This will also affect the metronome volume. 4. Press [SHIFT] + [TAP TEMPO] button when metronome is on to turn it off. The button will be unlit to signify that the metronome is turned off. Deluge Official Manual...
- Page 41 6. The swing interval setting is saved as part of a song. New songs revert to default while saved and reloaded songs will retain the swing interval setting. Deluge Official Manual...
- Page 42 Patterns are stored with songs not in synth presets. • The lit audition / section pad indicates the root note by the lit button or buttons if a full octave is in view. • The colours will change dependant upon the pitch by row Deluge Official Manual...
- Page 43 • The lit audition / section pad indicates the selected row and hence the selected kit sound. • Colours are assigned to the unique kit sound on each row. Deluge Official Manual...
- Page 44 The lit audition / section pad indicates the root note by the lit button or buttons if a full octave is in view for synths. Lit pad for kits indicates a selected row. • The colours will change dependant upon the pitch by row. Deluge Official Manual...
- Page 45 Scale for the keyboard can be changed. • Press [BACK / UNDO] to undo phases of the recording and [SHIFT] + [BACK / UNDO] to restore, redo the recording. • The lit [PAD] indicates the root note by the brightest button. Deluge Official Manual...
- Page 46 6. Turn (SELECT) to choose ‘oFF’ or ‘on’. This will set the count-in for recording on or off. 7. Count in will operate when set ON;- • With Deluge as master, [RECORD] enabled, press [PLAY] to perform a count-in prior to recording. • Metronome and display counts down 4-3-2-1 prior to recording.
- Page 47 This captures organic and human like recordings. Heavier touch Deluge pads are not velocity sensitive. The default velocity is 64 but this default level can be changed in the settings options under the defaults menu. ▌ SETTING A NOTE TO REPEAT 1.
- Page 48 ▌ CLEARING CLIP NOTES 1. Press (SCROLL◄►) + [BACK / UNDO]. 2. Display shows ‘CLEAr’. Notes and their associated automation will be cleared from the clip, including notes outside of the grid view. Deluge Official Manual...
- Page 49 [TRIPLETS VIEW] Switches the grid to triplets view, laying out the grid with 3 of 4 columns in the time division. The three notes have the same time period as the original 4. Deluge Official Manual...
- Page 50 • The note will be extended across the full clip. • Deluge will ensure that these type of notes play continuously through the clip and will loop. This is handled as a special case and the note does not restart.
- Page 51 If only a part of the grid is selected as the destination, the notes for the available columns are pasted and the rest discarded. • Notes will be pasted into any new zoom levels where notes will be stretched or reduced to meet the destination zoom view. Deluge Official Manual...
- Page 52 [SCALE] ON Scale is locked to a major scale. After adding notes when selecting scale mode, a guess of the scale and root note / key is made by Deluge. [SHIFT] + [SCALE] AUDITION / Switches the scale through seven western music...
- Page 53 2. Press [SCALE] to switch it ON. Button illuminates blue. Cycle it off and on if already selected to ON. 3. Deluge will evaluate the notes and establish a ‘best fit’ scale for the selected notes as well as the scale root note.
- Page 54 Changes in scale settings on one clip will affect all others in scale mode. This also includes Deluge analysis and evaluation of scale algorithm when entering scale mode, where all clip notes will be evaluated. This may lead to notes being added / changes in the clips when editing scales.
- Page 55 1. Exit scale mode by pressing [SCALE]. Button should be unlit. 2. Select the notes on the grid that will be attributed to the new scale. 3. Press [SCALE], Deluge will evaluate the notes and establish a best fit scale. Button will illuminate blue.
- Page 56 3.7 Keyboard View & Chords Deluge has a keyboard view which is reflective of the scale and is mapped to the 16 x 8 pad grid. This means that the grid has defined note and chord placements rather than traditional piano style sequencing layout.
- Page 57 Chords played on a piano are shaped uniquely across the scale (for example 12 chord shapes in a minor chord for each root note). With Deluge, chords follow a consistent shape. This is known as an isomorphic layout where each chord always follows the same shape.
- Page 58 3.8 Navigating the Grid Deluge has a 16 x 8 grid of pads which is used when sequencing notes and creating melodies and patterns. The actual programming grid is not limited to the 16 x 8 pads in focus and on view.
- Page 59 8 columns of the 16 view across to the entire 16 columns in 32 view. Example: 32 notes representing the zoomed grid. Press (SCROLL◄►) to check the current zoom setting as shown on the display. Deluge Official Manual...
- Page 60 4. Editing of notes and steps is retained irrespective of whether the notes are in focus and viewed within the pad grid. Vertical scrolling adjusts the step rows in focus based on the note pitch for synths or specific sounds for kits. Deluge Official Manual...
- Page 61 2. Select SYNTH or KIT by pressing [SYNTH] or [KIT]. The selected button illuminates red. 3. Press (SCROLL◄►). The display will flash showing the timing division resolution depending on the clip length. Examples are:- notes notes notes notes Deluge Official Manual...
- Page 62 12 steps, 3/4 length. 0.2.2 - 16 grid at 10 steps, bar 1, beats 2 (Qtr Notes), 2 x 16 notes. 1.1.0 - 16 grid extended to 20 steps, 1+1/4 length. Scroll across bars. Beat Beat Beat Beat Beat Deluge Official Manual...
- Page 63 Grid sequence pattern is duplicated to extend the entire sequence length. Press (SCROLL▼▲) + turn (SCROLL◄►) Note events can be moved left and right on the grid. Any note events which scroll off the grid will wrap to the opposite side. Deluge Official Manual...
- Page 64 4, the screen out of view. Clips individually remember whether, and at what zoom level, they have cross-screen edit mode applied. Entering the mode for one track will not automatically be active for any other track that is then edited. Deluge Official Manual...
- Page 65 1 bar 1 bar 1 bar Resolution Double In cross-screen edit mode, changes within the current screen that is in-focus i.e. 8 notes, 2 bars will be reflected across the other equivalent screens that are not in-focus. Deluge Official Manual...
- Page 66 3.11 Note Creativity: Probability & Iteration Dependance NOTES Deluge has a number of features that bring even more creativity to sequencing. Note probability and iteration dependance is a feature which uses logic to determine if the note plays on the sequence cycle or not and adds randomness.
- Page 67 1 of 2 - Play on 1 of 2 bar cycles 2 of 2 would only play on 2 cycle. 2 of 3 - Play on 2 of 3 bar cycles. 2 of 4 - Play on 2 of 4 bar cycles. Deluge Official Manual...
- Page 68 / time slot and end at the next note / step. 4. Deluge treats any region of automation as if the entire clip is automated. 5. Automation is independent of notes so will remain even if notes are deleted.
- Page 69 Automation copy / paste operates across the time region length of the ‘view’. Automation can be copied to / from different parameters, different clips and song files. Zoom levels can be adjusted prior to copying and automation will be adjusted to meet the new zoom setting. Deluge Official Manual...
- Page 70 [PAD] step and is held until the next note to ensure transitions account for note release. Copy / paste considers the entire region automation, not just the single step. (SCROLL◄►) + [BACK / UNDO] to clear all notes and automation. Deluge Official Manual...
- Page 71 7. The automation changes can be undone using [BACK / UNDO] or [SHIFT] + [REDO]. Stutter parameter cannot be automated. MIDI control can also be automated via MIDI messages. External MIDI controls can be automated on Deluge parameters. Deluge Official Manual...
- Page 72 NOTES Deluge Official Manual...
-
Page 73: Synthesizers
SYNTHESIZERS... - Page 74 Synthesizer 4.1 Synthesizer Concepts NOTES Deluge features subtractive and FM synthesis with many customisable options. Some generic synthesis concepts are explained below. Subtractive Synthesis Subtractive synthesis operates on the principle of one or more oscillators which generate a tone with harmonic content dependant on the wave shape and type.
- Page 75 By rapidly modulating the frequency of a wave, whole new repeating wave shapes are created. Amplitude modulation can be carried out by other modulation devices such as LFO’s. Amplitude modulation can be found in many types of synthesizer. Deluge Official Manual...
- Page 76 Deluge has a subtractive synthesizer as default, with ring modulation mode option. Deluge Subtractive Synthesis Deluge uses two oscillators. High-pass and low-pass filters and 2 LFO and envelope options. In addition the Deluge synth can use sample WAV files as the audio frequency source.
- Page 77 4.3 Deluge FM Synthesizer Overview Deluge has FM synth features and parameters that are configurable. Deluge FM Synthesis Deluge uses two carriers and two FM modulators. Regular modulation is also provided by 2 LFO and envelope options. 2 x Modulation...
- Page 78 Synthesizer 4.4 Synthesizer Creation Workflow NOTES An example high level workflow on setting up the Deluge synths gives a starting point for sound design and preset creation. Synth specific Generic set-up Create a blank preset [SHIFT] + [SYNTH] Determine synth mode...
- Page 79 Synthesizer 4.5 Synthesizer Clip Parameters Deluge has the some synth parameters in the affect group. However the full list of parameters is accessible from the sound editor or in part from shortcut options on the grid. Sub Category Shortcut Button Function Options &...
- Page 80 CAR 2 Carriers. FM Only FEEDback FEEDBACK Sets the amount of feedback from / to the FM modulator 1 Phase in degrees that the oscillator will be reset on note-on. Also can be RETRigger Phase RETRIG PHASE switched off. Deluge Official Manual...
- Page 81 DECAy DECAY Decay time for ADSR envelope 2. Optional patch destinations ENV 2 Envelope 2 SUStain SUSTAIN Sustain Level for ADSR envelope 2. Optional patch destinations RELEase RELEASE Release time for ADSR envelope 2. Optional patch destinations Deluge Official Manual...
- Page 82 Amount in % of the available time division which each arp note fills RATE Rate / speed of arpeggiator Enables prioritisation of sound so voices remain or are turned off at high PRIOrity PRIORITY CPU loading. Low, med, high options. Deluge Official Manual...
- Page 83 Dampening of the reverb effect REVErb WIDTH Stereo width setting Enables panning to one side or the other. SIDE - Sidechain compressor specific to the reverb output SATuration SATURATION Distortion effect DECImation DECIMATION Decimation distortion effect CRUSh BITCRUSH Distortion bitcrusher Deluge Official Manual...
- Page 84 Kit sounds only. Level this current sound triggers all of the other sidechain SEND SEND compressors in other sounds. VOLUme LEVEL (Master) Level of the clip Output Level Setting Left / right balance of the sound. 32L - 0 - 32R Output Balance Deluge Official Manual...
- Page 85 Synthesizer 4.6 Creating a New Synthesizer NOTES Upon start up, the Deluge is loaded with a synth clip and default patch, however the option exists to to create a new synthesizer clip at anytime. ▌ CREATING / LOADING A NEW SYNTHESIZER CLIP 1.
- Page 86 The commonly accessible parameters for clips are available from the eight ‘affect parameter’ controls. A more detailed parameter set are available within Deluge. Accessing and editing the synth parameters of the currently selected synth clip can be performed using the sound editor nested menu option or via the quicker grid shortcuts option.
- Page 87 12. Continue to edit through the menu and set other parameters as desired. 13. When preset parameters have all been changed to suit your requirements it is recommended to save the preset. Press [SAVE] + [SYNTH] to save the preset. Deluge Official Manual...
- Page 88 Actual parameter within the function oscillator 1 is labelled i.e. volume level shown as the shift vertically for the column. option under the button. Display indicates the parameter setting / value immediately on selection of the function / parameter pad. Deluge Official Manual...
- Page 89 If ‘CANT’ is displayed then the parameter isn't available for editing in the current mode or configuration. Deluge Official Manual...
- Page 90 Some functions, for example transpose, have decimal values which can be fine tuned, at an individual digit level. Where this is applicable the digit in focus will flash and can be changed by turning (SELECT). Use the (SCROLL◄►) control to select the digit in-focus to edit. Deluge Official Manual...
- Page 91 (SELECT] to select the synthesiser model to use: • SUbtractive • rinG Modulation (technically subtractive) • 6. Use [BACK / UNDO] to exit when the mode has been changed. The [BACK / UNDO] button flashes red to indicate that the backup option is available. Deluge Official Manual...
- Page 92 Synthesizer 4.8 Oscillators NOTES Deluge provides several oscillator types, set within the OSC1 & OSC2, TYPE Setting. Digital Waveforms Triangle Sine TIME TIME Square Sawtooth TIME TIME Analog Waveforms ASquare Sawtooth TIME TIME Audio / Inputs as Waveforms Sample An audio sample can be In left/right, in right or in used as the oscillator source.
- Page 93 The sample will audition and an illustration of the sample will be mapped across the grid. 10. Press (SELECT) to load the sample as the oscillator wave. Single-cycle waveforms make great oscillator sources. Deluge Official Manual...
- Page 94 2 Pole 12dB/Octave Allows lower frequencies to pass through the filter and cuts off higher frequencies. Deluge filters are 2-pole and 4-pole and 4- pole analog drive with saturation only on 4 Pole 24dB/Octave the LPF. Poles refer to how ‘steep’ or aggressive the cutoff curve is.
- Page 95 - although modes such as arpeggiation override how voices are assigned, and unison will sound multiple voices per note. Deluge’s maximum voice count relies on the CPU loading and processing power available, but around 64 is the limit for most basic synth sounds.
- Page 96 Note released. Deluge Unison The settings available in the voice menu of Deluge include number of voices and the detuning of these voices. You can also use the two oscillators both detuned from each other in addition to unison mode.
- Page 97 8. Use [BACK / UNDO] or tap any grid pad once to exit sub-menu and back up a level or to back out of the sound editor. Deluge Official Manual...
- Page 98 25 will be 50% of the Grid. Every 2 step with a 8 note sync note division. Examples with 8 notes. setting, 1 bar, once per bar, etc... RATE Sets the speed of the arpeggiator when SYNC is off. Deluge Official Manual...
- Page 99 4. Ensure any sequence timing and steps are taken into account when setting the arpeggiator sync and gate. 5. Use [BACK / UNDO] or tap any grid pad once to exit sub-menu and back up a level or to back out of the sound editor. Deluge Official Manual...
- Page 100 4.12 Single Cycle Waveforms NOTES Deluge provides several oscillator types but also can take an audio input or audio wave file as its ‘oscillator’. Single-cycle waveforms used in a synth are processed in Deluge to create unique and creative oscillator sound source.
- Page 101 • SINGle : forces single-cycle load. • MULTisamples : all folder samples. • BASIc : basic mode where no pitch analysis or or single cycle setting. 12. Press (SELECT) to load the sample as the oscillator wave. Deluge Official Manual...
- Page 102 NOTES Deluge Official Manual...
-
Page 103: Kits
KITS... - Page 104 Kits 5.1 Kit Creation Workflow NOTES An example high level workflow on setting up the Deluge kit gives a starting point for kit-based sound design. Kits & Presets Kit set-up from scratch Load a kit preset Create a new blank kit preset...
- Page 105 Beats and loops as opposed to single ‘hits’ can also be used. Any Audition pad to row. Typically samples loops in the factory kit is set to time stretch to the current Deluge play the sounds. but also synth-based tempo. These samples will extend beyond a single pad to match sounds, or MIDI / CV its length.
- Page 106 Many features that are available in synth view are also available in kit view. These include the parameter affect group, mute and audition pads. Generic sequencer grid functions apply both to synth and kits. Deluge Official Manual...
- Page 107 These are POLYphony, sample MODE, REVErse, SPEEd, and PISP (pitch / speed). When editing any of these, you may hold down the affect-entire button while turning the select knob in order to have your edit applied to all sounds within your kit. Deluge Official Manual...
- Page 108 5. Turn (SELECT) to navigate other samples if required. 6. Press (SELECT) to load the sample to the row selected. 7. Deluge will return to clip view and the file browser exited. 8. The sample can be auditioned and played by pressing the row [AUDITION] pad.
- Page 109 5. Turn (SELECT) to navigate other samples if required. 6. Press (SELECT) to load the sample to the row selected. 7. Deluge will return to clip view and the file browser closed. 8. At any time when entering samples press [BACK / UNDO] to back up through the menu until the file browser is exits.
- Page 110 CLAVES. 6. Press & hold (SELECT) until a menu of options appears. This should indicate ALL, if not turn (SELECT) to select ALL. 7. Press (SELECT). Deluge will load the folder into the rows automatically. Sample 6 Sample 5...
- Page 111 4. Press [SHIFT] + [NAME]. 5. The alphanumeric keyboard appears and the name flashes in the display. This enables typing in of a new name. 6. Press RETURN ‘delay amount’ [PAD] when typing of a new name is complete. Deluge Official Manual...
- Page 112 NOTES Deluge Official Manual...
-
Page 113: Modulation
MODULATION... - Page 114 Modulation 6.1 Modulation Routing Basics NOTES Parameters within Deluge can be connected / patched to modulation sources. Multiple sources may modulate one parameter, and multiple parameters may be modulated by one source. Modulation Source Shortcuts There are several modulation sources which are available through the nested menu sound editor.
- Page 115 / in-focus. tagged when it is connected to a [SHIFT] + [FREQUENCY] modulation source. Cutoff Freq Modulator. Flashes quickly when connected to a destination and the source parameter is selected / in-focus [SHIFT] + [LFO 1]. Deluge Official Manual...
- Page 116 9. A value other than ‘0’ will create a modulation connection and the display parameter, example LPF: frequency will be tagged. The modulation pad will flash quickly and the parameter destination will flash slowly. Depth can be positive and negative values. Deluge Official Manual...
- Page 117 Destination parameter name and value and source name shows tagged when it is connected to a modulation source. Destination parameter name and value and source name shows untagged when it is not connected to a modulation source. Deluge Official Manual...
- Page 118 Pulse Width LPF / HPF Frequency ✔ ✔ ✔ ✔ ✔ ✔ ✔ ✔ ✔ / Resonance ✔ ✔ ✔ ✔ ✔ ✔ ✔ ✔ ✔ ENV 1/2 ADSR ✔ ✔ ✔ ✔ ✔ ✔ ✔ ✔ ✔ Deluge Official Manual...
- Page 119 / in-focus. [SHIFT] + [FREQUENCY] Cutoff Freq Filter LFO 1 Modulator. LFO 2 Modulates LFO 1 depth which in turn LFO 2 affects Parameter frequency of LPF. Modulation sources of other modulators flash pale blue. Rate Deluge Official Manual...
- Page 120 LFP frequency and resonance Resonance ENV 1 Cutoff Freq Filter Modulator. LFO 2 modulates LFO1 depth which in turn affects parameter frequency of LPF. LFO 1 ENV1 trigger modulates, the cutoff frequency and resonance of LPF. LFO 2 Rate Deluge Official Manual...
- Page 121 25 will then modulate the parameter lower than its current setting, also determined by mod depth. Bipolar behaviour affects all stages of the envelope but is most important when considering sustain level settings, as the others are time based. Deluge Official Manual...
- Page 122 Square or Triangle. LFO1 has an additional SYNC parameter to set a sync time interval or switch off. LFO1 does not retrigger and covers all voices. LFO2 is retriggerable and exists for each voice separately. Triangle Sine TIME TIME Square Sawtooth TIME TIME Deluge Official Manual...
- Page 123 The exception being that rather than the compressor trigger being a measure against its own input signal, an external source called a sidechain is the trigger of when to ‘duck’ i.e. reduce, the gain. Deluge, for example can use a kick drum to trigger a simultaneous gain reduction (duck) of a separate function.
- Page 124 Modulation NOTES Sidechain Envelope The Deluge’s sidechain compressor effect mimics the behaviour of a sidechain compressor fed short impulses such as a kick drum. Its output, and resulting volume-ducking behaviour, is governed by AR (attack + release) envelope. ATTACK RELEASE...
- Page 125 ▌ SELECTING SIDECHAIN SPEED 1. Press [SIDECHAIN / REVERB] affect button. Button illuminates orange. 2. Press (UPPER) to toggle between ‘FASt’ - fast synced to 32 notes or slow - slow synced to 8 notes. Deluge Official Manual...
- Page 126 Note The note modulation being played is the source for this modulation option. Sometimes called key tracking, the pitch of the note is relevant to the modulation level generated. Deluge Official Manual...
- Page 127 6.6 Custom Parameter Affect Controls NOTES There are three parameter functions contained in the affect parameter group. When using presets these will be set to a specific parameter within the preset. The Deluge convention is:- Custom 1 Typically controls pitch for sample based sounds.
- Page 128 5. Unassignment is performed by reassigning the parameter control. MIDI controller controls are also assigned using the same process. MIDI Controls can also be unassigned by navigating to the parameter and by then press and hold [SHIFT] + [LEARN/INPUT]. Deluge Official Manual...
- Page 129 / strength of modulation. MOD RATE STUTTER CUSTOM 2 LEARN / INPUT DEPTH CUSTOM 1 CUSTOM 3 SIDECHAIN FREQUENCY Select parameter i.e. CUSTOM 1. Set modulation value in focus. press & hold [LEARN / INPUT] + turn (LOWER) parameter control. Deluge Official Manual...
- Page 130 NOTES Deluge Official Manual...
-
Page 131: Song View
SONG VIEW... - Page 132 Song View 7.1 Song Workflow NOTES An example high level workflow for working with SONGS on Deluge Existing song New song New song [SHIFT] + [LOAD], [LOAD] Load SONG [LOAD], turn (SELECT) SONG view Select the instrument clip per row...
- Page 133 Clips can be armed, stopped, played together as a group. Deluge will only play one instrument at one time in song view. So for example, if two clips use the same synth preset 1, the clip rows can each be launched but each one will stop playback of the other, allowing only one instance of each instrument to play at one time.
- Page 134 1. Press [SONG] to switch to song view. The button illuminates blue. 2. Press a [PAD] of any empty, unlit row from the 16 x 8 main grid. 3. Deluge creates a new clip and transfers the view from song to clip view with synth selected by default.
- Page 135 1. To increase the loops to play prior to launch / stop, turn (SELECT) to change the loop countdown. Press (SELECT) to cancel loop countdown. Mute Audition / Launch / Section Press [SHIFT] + [LAUNCH] pad to immediately play the clip row in song view. Deluge Official Manual...
- Page 136 2. While the number is displayed, turn (SELECT) to adjust the number of the loop countdown - increasing or reducing the wait timer to trigger the launch / stop command. 3. While the number is displayed, press (SELECT) to clear the countdown timer and clear arming of the clip. Deluge Official Manual...
- Page 137 4. Other clips of course will be muted and these will be dimly lit. 5. To remove the solo, press the [LAUNCH] pad. 6. To solo immediately without arming, press & hold [SHIFT] + (SCROLL◄ ►) + press [LAUNCH] pad. Deluge Official Manual...
- Page 138 3. While still holding, select the instrument type, example [SYNTH], [KIT]. 4. While still holding, select the instrument preset by turning (SELECT). 5. Holding a clip in an empty clip row will also allow changes to be made. Deluge Official Manual...
- Page 139 3. The clip will be cloned from the target to the destination and assigned a different section and won’t be launched.Cloned clips are initially linked to the original but can be edited. Deluge Official Manual...
- Page 140 3. While still holding, the affect parameter functions will be accessible. 4. The 8 parameter buttons can be changes and the associated (UPPER) and (LOWER) controls adjusted while ever the [PAD] is held in song view. Deluge Official Manual...
- Page 141 Display shows countdown of section repeats when a repeat number is defined. To increase the sections to play prior to launch / stop, turn (SELECT) to change the section countdown. Press (SELECT) to cancel section countdown. Mute Audition / Launch / Section Deluge Official Manual...
- Page 142 ‘SHAR’ - share. This enables the sharing launch status with other hat clips sharing a preset do not play sections. Note t simultaneously in song view. 3. The section will play when launched as set by ‘REPEAT MODE’ for the section. Deluge Official Manual...
- Page 143 SD card. Sub-slots are automatically generated to avoid accidentally Save Slot overwriting of existing songs Saving and loading can be performed while playing. The transition is managed without interruption to playback, switching between at the loop end. Deluge Official Manual...
- Page 144 6. The songs, while navigating the songs, will be previewed visually on the 16x8 grid. 7. Press [LOAD] again to load the song in focus or [BACK / UNDO] to back up and exit. 8. Song will load. Deluge Official Manual...
- Page 145 3. Display will blink ‘NEW’ indicating a new blank song is about to be created. 4. Press [LOAD] again and a new blank song is created, clearing previous data. This is the same as the default empty song at start up. Deluge Official Manual...
- Page 146 Tempo magnitude matching enabled: will apply a multiple of the old song tempo if needed to avoid drastic changes to a new tempo. • Synced as a slave: tempo will remain the same irrespective of tempo magnitude matching. Deluge Official Manual...
- Page 147 7.7 Collect Media Function NOTES To enable portability of songs across SD cards, backup and sharing for collaboration with other Deluge users, a tool exists to collect together all content and sample files which a song file uses. ▌ COLLECTING MEDIA 1.
- Page 148 NOTES Deluge Official Manual...
-
Page 149: Arranger View
ARRANGER VIEW... - Page 150 Build arrangement - place clip instance [PAD] Build arrangement - edit clip instance Move, length etc Add unique ‘white’ clip instances Create variations Set-up modulation Optional 2 x LFO’s and 2 envelopes Finalise output Volume level and pan Play Deluge Official Manual...
- Page 151 A clip instance with its start pad brightly lit and the length is shown by additional pads - its ‘tail’ dependent on grid resolution. Clip instance colours reflect song section colours. Deluge Official Manual...
- Page 152 Audio tracks will not play. To load a new preset to the instrument, Press clip instances. [AUDITION] + turn (SELECT). Press [AUDITION] + instrument or type to change it i.e. kit or synth. Audition / Section SONG VIEW Deluge Official Manual...
- Page 153 [CLIP] and needs to be in song view first to then enable a switch to clip view. Alternatively pressing any clip instance [PAD] other than the first, left most pad will switch the clip to its clip view. Deluge Official Manual...
- Page 154 6. Repeat to add more clip instances. Clips placed on the grid will default to the same section colour as the last clip instance placed. Deluge Official Manual...
- Page 155 ‘drop off’ the left side of the grid. Undo / redo options are available within the arranger view. This may be particularly useful if clips are deleted when removing time from the arranger grid. Deluge Official Manual...
- Page 156 2. Press & turn (SCROLL◄►) to change the grid resolution for the clip instances. 3. Options available will determine how the clip is displayed on the grid with respect to the clip length. For a 16 x 16 steps / 1 bar:- (Default) Arranger Pads Clip View Contents 16th Deluge Official Manual...
- Page 157 1. Press & hold [AUDITION] of the selected row to delete + [SAVE]. 2. Instrument track will be deleted or display will show ‘CANT’ if the instrument cannot be deleted. ▌ CLEARING ALL CLIP INSTANCE IN ARRANGER 1. Press & hold (SCROLL▼▲) + [BACK / UNDO]. Deluge Official Manual...
- Page 158 5. Press [SONG] which will return back to the arranger view. 6. The white clip will now host a unique variation from the other clips by playing the one off pattern from the recently created clip. Deluge Official Manual...
- Page 159 These can be edited to form a unique variation from the original pattern. 5. Press [SONG] which will return back to the arranger view. 6. The white clip will now host a unique variation from the other clips by playing the one off pattern from the recently edited clip. Deluge Official Manual...
- Page 160 8.5 Arranger View - Advanced NOTES Arranger view is a powerful persona and view within Deluge. Understanding the basics is important to get started. More advanced functions also exist to integrate tightly with song view and align common functions such as song and clip playback.
- Page 161 Press [SONG] which will switch to the arranger view. Turn (SCROLL◄►) to set the playback start position in the arranger view. Press & hold (SCROLL◄►) + [PLAY] to start arranger playback from the new position once the song loop completes. Deluge Official Manual...
- Page 162 2. Press & hold [AUDITION] pad for the instrument / row to change + track type [SYNTH], [KIT], [MIDI], [CV]. 2. Press & hold [AUDITION] pad for the instrument / row to change + press (SELECT) for an audio track. Deluge Official Manual...
- Page 163 Default for new songs is 0. Anything which previously existed to the right of this start-point is immediately deleted to make way for the new recording. [BACK / UNDO] & [REDO] are available functions and can restore whatever arrangement existed previously. Deluge Official Manual...
- Page 164 NOTES Deluge Official Manual...
-
Page 165: Audio
AUDIO... - Page 166 Audio clips should not be mistaken for samples. Samples are raw sounds which can be used within kits and synths. Samples can also be created in other systems and imported for use in Deluge. Audio can be recorded in song and arranger views.
- Page 167 Audio 9.2 Getting Audio Into Deluge There are three main ways to get audio into Deluge. Audio can be used in an oscillator as a source or sampled within kits. Many options exist when using audio. Re-sampling Recording & sampling...
- Page 168 6. Press (SELECT) when the sample required is in-focus. Samples will be auditioned and displayed on the grid in white when in-focus. 7. The sample selected will load show on the grid as coloured pads 8. Press [PLAY] to hear the audio sample looping. Deluge Official Manual...
- Page 169 - it'll prompt you with "DELE" first. Remember, this deletes the sample even if it’s used in songs, and the Deluge will not notify you whether it is or not being used, so be careful. ▌ DELETING A SAMPLE 1.
- Page 170 Several audio input options are available for recording. Input Input Options Options The left or mono channel of the Deluge’s line or mic input. Use LEFt this if using the Deluge’s internal mic, or recording a mono source (Default) with an unbalanced cable.
- Page 171 Audio and MIDI looping are possible within song view both to record in and also as a live performance option. Audio clips are recorded and played in-sync with other Deluge functions, typically through time- stretching. ▌ CREATING AN AUDIO CLIP IN SONG VIEW 1.
- Page 172 ‘loop’ of the original clip length. The clip will then begin to PLAY back from the start. For details on overdub recording see the details covered in the looper section. Deluge Official Manual...
- Page 173 5. Display will indicate the selected channel input for the track on which the clip sits. 6. Exit this setting before recording by pressing (SELECT), [BACK], or any [PAD] Deluge Official Manual...
- Page 174 5. Recording will be continuous and not be limited by any length. Length is set only when previously recorded or existing audio exists when recording within a clip. 6. Press [RECORD] to stop recording, play continues to end of clip. Deluge Official Manual...
- Page 175 6. Turn (SCROLL◄►) to navigate across the sample width. 7. Pressing a red column pad will remove the red loop point cursor / editor. 8. The audio will NOT be time-stretched when changing loop end point. 9. Press [PLAY] to hear the clip loop. Deluge Official Manual...
- Page 176 Elements will be Audio clip view For example sync to 16 intervals. shown by dull lit pads that are not covered. Grid pads will display the audio on coloured pads as opposed to white pads in waveform view. Deluge Official Manual...
- Page 177 ‘rEC’ to indicate that recording in progress. 5. Press [RECORD] again to end recording. Recording ends and is normalised. 6. The recording is assigned to a row of pads indicated by a green [MUTE]. 7. Press [AUDITION] to play back the sample. Deluge Official Manual...
- Page 178 OFF - ‘oFF’: switches monitoring when recording samples off. • COND - ‘cond’ (Default) : conditional monitoring. Recording from a microphone (internal or external) AND headphones connected, monitoring will occur. Recording using the LINE IN input, monitoring will always occur. Deluge Official Manual...
- Page 179 6. Press (SELECT). Number of slices is indicated at which to divide the sample. 16 is default. Turn (SELECT) to adjust, example, to 8. 7. Press (SELECT) to slice the sample across the elected number of pads. Single Sample Slices into number selected Kit rows Deluge Official Manual...
- Page 180 7. Press (SELECT) when audio sample is in-focus to load. 8. The audio file replaces the synth oscillator waveform and will be mapped based on the range set. Pressing [AUDITION] pads or keyboard will play automatically tuned to the correct notes. Deluge Official Manual...
- Page 181 Pressing [AUDITION] pads will play matched to the correct notes. 10. Range is displayed, example A.1 - ‘toP.’ Deluge Official Manual...
- Page 182 ‘rEC’ to indicate that recording has started. 5. Press [RECORD] to end recording. Recording ends and is normalised. 6. The recording is assigned to the oscillator. 7. Press [AUDITION] pads to play back the sample range. Deluge Official Manual...
- Page 183 6. [SHIFT] + turn (SELECT) clockwise to insert a new range above the currently selected one. [SHIFT] + turn (SELECT) anti-clockwise to create a new range below the currently selected one. Band in-focus will indicate flashing. 7. [SHIFT] + [SAVE] to delete the currently selected range. Deluge Official Manual...
- Page 184 “B#2” comes before “A3”, and that “Eb comes before “E”. Only the ordering of the files is important though - the Deluge does not read the actual note names - just looks at the files’ ordering and then uses its pitch detection for the rest.
- Page 185 1. Load a song, sound, pattern, audio. 2. [RECORD] + [PLAY]. Record button will flash red. 3. Deluge will start to play and at the same time recording of Deluge output will start. 4. [RECORD] + [PLAY] again to stop recording at the loop end or [RECORD] to stop recording instantly while play continues.
- Page 186 * Items exist in the sound editor menu as well as from the shortcut pads. Label shown in capitals indicates what is name used within the sound editor SAMPle Menu. Deluge Official Manual...
- Page 187 (SELECT) control. To delete a loop marker repeat the process for selection Waveform view Grid pads will display the audio on white pads as opposed to coloured pads in quick audio clip edit view. * Loop markers available for samples but not available for audio clips. Deluge Official Manual...
- Page 188 (see previous section). When working with the markers it is recommended to start with the end marker adjustment first. Zoom out to work at a wider level and zoom in as finer adjustments are needed. Deluge Official Manual...
- Page 189 4. To delete LOOP START marker, press & hold [PAD] for the green start column + press [PAD] for LOOP START column. 5. To delete LOOP END, press & hold [PAD] for the red end column + press [PAD] for LOOP END column. Deluge Official Manual...
- Page 190 Good for samples that contain pre-made beats. Some .wav and .aiff files contain tags specifying sample loop points. The Deluge will read these if they are present. See waveform view for more info. ▌ REVERSING PLAYBACK 1. With a synth type set to sample and a file loaded and in-focus use shortcuts [SHIFT] + [REVERSE] for sample 1 or sound editor - (SELECT) >...
- Page 191 As well as using the audio inputs to capture and record audio, it may be utilised as a live sound source, and all other features of the Deluge’s sound engine may be applied to it. This applies to either of Deluge’s line input, external microphone input, or internal microphone.
- Page 192 Deluge requires a more detailed understanding of time-stretching and pitch shifting. By default, when you load a sample on the Deluge, its pitch and speed are linked. If you change its pitch up or down, the sample will become shorter or longer, respectively;-...
- Page 193 [SHIFT] + [MODE] for sample 1 or sound editor - (SELECT) > OSC1 > modE. 2. Turn (SELECT) to adjust the ‘modE’ - mode setting to ‘StrE’. This automatically makes pitch and speed independent. Options are ‘LooP’ - loop, ‘StrE’ - stretch, ‘CUt’ - cut, ‘onCE’ - once. Deluge Official Manual...
- Page 194 NOTES Deluge Official Manual...
-
Page 195: Looping
LOOPING... - Page 196 Looping is the process of recording, overdubbing and playing clips in order to layer up into a continuous and more complete arrangement. The Deluge has steps automated to simplify the looping process which manages the clip recording and playback in-sync. Deluge looping includes both audio and instruments to record sessions both for live improvisation and operates within song view.
- Page 197 The workflow for looping is simple, but the techniques and your own process should be developed as part of the creative performance. This workflow is one way to use looping within Deluge. These are only the fundamental steps, shown for audio looping.
- Page 198 8. Press [LAUNCH] to stop at the recording. Tempo of recording is automatically calculated and set. 9. Clip will stop recording and the record button will turn off. Playback of the recorded clip will continue to loop and to allow future overdubs. Deluge Official Manual...
- Page 199 Continuous Overdubs New continuous overdubs can be recorded into a series of new clips below the existing original clip, triggered by [RECORD] + [SECTION]. Recording will continue on subsequent rows and be in time with the original clip. Deluge Official Manual...
- Page 200 ▌ RECORDING AUDIO CLIPS ‘PEDAL STYLE” 1. [SONG] to select song view. Button illuminates blue. 2. Ensure no other clip rows are playing and metronome is off and Deluge is a sync master. 3. Press [RECORD] + [PLAY] of the clip row to record 4.
- Page 201 1. Within clip view, press & hold [TEMPO] + Any [PAD] of the clip. Overdub loops are technically individual audio clips and as such they can be muted, deleted, and have effects applied. Undo / redo can also be applied to each overdub step. Deluge Official Manual...
- Page 202 Guitarists for example can control the loop recording while concentrating hands-on with their guitar. Global MIDI commands provide an easy interface between Deluge and a MIDI foot switch. MIDI Out to Deluge...
- Page 203 NOTES ▌ SETTING UP AN EXTERNAL FOOT CONTROLLER FOR LOOPING 1. Connect the foot switch to the MIDI in connection of Deluge while Deluge is powered off. 2. Power up the Deluge. 3. Press [SHIFT] + press (SELECT) to open the settings menu.
- Page 204 Delete an overdub if one is pending to • Delete an overdub if one is pending to begin recording a clip - all red row in begin recording a clip - all red row in song view. song view. Deluge Official Manual...
- Page 205 - meaning that the file will be treated correctly if later loaded into another Deluge project. Other software / hardware may or may not know what to do with these tags; if you're intending to use your Deluge-recorded audio clips in other devices with maximum ease, you have the option of disabling the “margins”...
- Page 206 9. In [SONG] view, press [LAUNCH] pad of clip or [RECORD] to stop recording. 10. Clip will stop recording and the record button will turn off. Playback of the recorded clip will continue to loop and to allow future overdubs. Clips with the same instrument will be muted. Deluge Official Manual...
- Page 207 More layers will be built until stopped. 4. Ensure the instrument is playing which will be recorded. 5. Press [PAD] of the grid row currently armed to record - the red row. 6. Recording will end and playback will continue. Deluge Official Manual...
- Page 208 NOTES Deluge Official Manual...
-
Page 209: Effects
EFFECTS... - Page 210 Effects 11.1 Effects Architecture Deluge: Effects Architecture SD CARD Audio samples streamed to Deluge 64MB of internal working memory Synth & Sounds within Kits Decimate Distortion Bitcrush Oscillator High Pass Low Pass Amplitude Saturation Decimation / Oscillator Volume Filter Filter...
- Page 211 • Modulation (Mod FX) and system effects: These are typically the effects used to change the overall sound or song within Deluge as insert or send effects. These include distortion, delay and reverb. This chapter concentrates on this group of effects which often are common to more than one function.
- Page 212 AMOUNT otherwise standard sub-menu options as per the general sidechain. SATuration SATURATION Distortion effect - amount DECImation DECIMATION Decimation distortion effect - amount CRUSh BITCRUSH Distortion bitcrusher - amount Stutter Parameter control effect only, no menu options available Deluge Official Manual...
- Page 213 Effects 11 11.3 Distortion Effects NOTES Deluge has a distortion effect with three variants which all introduce a gritty aggressive nature to the sound. The three effects are saturation, decimation and bitcrush. Saturation Reduces the amplitude of the highest points on a waveform, introducing harmonic content.
- Page 214 5. Turn (UPPER) to change DECIMATION amount or turn (LOWER) to change BITCRUSH amount for the entire kit selected. 6. The custom parameters are set in the factory presets by default. These can be assigned or reassigned if required. Deluge Official Manual...
- Page 215 This can affect the timbre and sound or it can be used as an audio tool for example to reduce a specifically bad frequency. Deluge has a 2- band EQ covering bass and treble frequencies at a fixed Q width.
- Page 216 5. Select either ‘bASS’ - bass, ‘trEb’ - treble to set the amount. Select ‘bAFr’ - bass , ‘trFr’ - treble for the frequency of each band. 6. Adjust the amount by turning (SELECT) to change the parameter for the selected effect. Deluge Official Manual...
- Page 217 BASS band amount for the sound selected. 5. Press [AFFECT ENTIRE] to affect the entire kit. Button lit orange. 6. Turn (UPPER) to change TREBLE band amount or turn (LOWER) to change BASS band amount for the entire kit selected. Deluge Official Manual...
- Page 218 The delay can be synchronised to a time interval with respect to the rate. Option to turn synchronisation off, having a free running delay time is available as OFF. Sync options are Off, 4 bar, 2 bar, 1 bar, 2 , 16 , 64 Deluge Official Manual...
- Page 219 AMOUNT. 4. To toggle ping-pong or standard, Press (UPPER). 5. To toggle analog or digital, Press (LOWER). 6. Press [AFFECT ENTIRE] to affect the entire kit. Button lit orange. Changes will apply to the entire kit Deluge Official Manual...
- Page 220 NOTES NOTES Deluge’s reverb applies to the entire song as a send / return effect. Only the amount for each individual part can be adjusted. Reverb emulates the characteristics of a room and its shape. In the real world, audio bounces and ricochets through the room and between walls.
- Page 221 Sets up the room size emulation. Larger rooms would provide longer delays on the reflections. Range: 0-50. Side Sidechain settings for reverb. This is a dedicated sidechain for the reverb output, but still utilises the same source as per the generic sidechain compressor. Deluge Official Manual...
- Page 222 4. Navigate in the menu to the ‘rEVE’ section and press (SELECT). 5. Select either ‘dAmP’ - dampening, ‘widt’ - width, ‘PAn’ - pan, ‘SidE’ - sidechain. Press (SELECT) for the parameter to select. 6. Adjust the value of the selected parameter by turning (SELECT). Deluge Official Manual...
- Page 223 SELECTING A REVERB ROOM SIZE PRESET 1. Ensure in clip view for a kit, synth. 2. Press [SIDECHAIN / REVERB] affect button. Button illuminates orange. 3. Press (LOWER) to toggle reverb preset between: ‘LArG’ - large, ‘SmAL’ - small, ‘mEdi’ - medium. Deluge Official Manual...
- Page 224 0-50 Takes parameters from as per the normal sidechain setting. The reverb sidechain allows sidechain compression to be applied to the reverb trails. Deluge achieves this even with a common reverb, by using the sidechain compression parameters of the sound with the most reverb and applying them to the reverb itself.
- Page 225 Rate Rate of modulation: 0-50. Feedback Flanger and phaser only. Amount of output fed back to the input: 0-50 Depth Chorus and phaser only. Amount of pitch modulation. Offset Chorus only. Time offset between signal and delay. Deluge Official Manual...
- Page 226 (SELECT). 5. Select either ‘tYPE’ - type, ‘rATE’ - rate, ‘dEPt’ - depth, ‘oFFS’ - offset, 'FEEd' - feedback. Press (SELECT) for the parameter to select. 6. Adjust the value of the selected parameter by turning (SELECT) Deluge Official Manual...
- Page 227 FEEDBACK and DEPTH for phaser. • FEEDBACK only for flanger. 6. Turn (UPPER) to adjust the rate. Will adjust LFO1 without ‘AFFECT ENTIRE’ selected. 7. Turn (LOWER) to adjust the selected parameter. Will adjust vibrato without ‘AFFECT ENTIRE’ selected. Deluge Official Manual...
- Page 228 3. Press [STUTTER / CUSTOM 1]. Button lit orange. 4. Press (UPPER) to trigger the stutter effect. 5. Release (UPPER) to stop the stutter effect. 6. Press & turn (UPPER) to adjust a short stutter length and speed while triggering. Deluge Official Manual...
- Page 229 UPPER / LOWER controls can be adjusted. 5. Parameters available by default in song view are: • Mod FX • • Delay • Reverb • Stutter • Bitcrush / decimation (custom 2 & 3) Deluge Official Manual...
- Page 230 NOTES Deluge Official Manual...
-
Page 231: Midi
MIDI... - Page 232 USB Host When Deluge is powered up (external supply, not internal battery) it can be connected via the USB connection to other devices as a USB host. The USB MIDI device must be connected on starting / booting Deluge up. The connection can be disconnected / reconnected once it’s booted in this set-...
- Page 233 MIDI 12 12.2 MIDI Hardware Configuration NOTES MIDI configuration requires the match up of both Deluge along with the external device. It is important to check out the manufacturers instructions when connecting other devices. Typical MIDI Set Up MIDI IN...
- Page 234 MAGN - tempo magnitude matching ON or OFF. THRU MIDI thru, ON or OFF. PLAY RESTart - restart playback if already playing. MIDI RECord MIDI Settings TAP tempo CMD Global MIDI Command UNDO REDO LOOP LAYEr - same as loop but with overdubs. Deluge Official Manual...
- Page 235 System exclusive MIDI time code quarter frame System common Song position pointer Song select Tune request Clock Yes* Start Yes* Continue Yes* System real time Stop Yes* Active sensing Reset *Only if MIDI Clock output is enabled Deluge Official Manual...
- Page 236 2. Turn (SELECT) and scroll to ‘midi’ - MIDI. Press (SELECT). 3. Turn (SELECT) and scroll to ‘CLOCk’ - clock. This enables setting the clock sync to external gear where Deluge acts as master or slave. Press (SELECT) to step into clock menu.
- Page 237 2. Each Tempo control ‘click’ will adjust by one MIDI clock message / one note. • Deluge as slave: nudge Deluge’s MIDI clock . • Deluge as master: nudge MIDI beat clock output to align external device. 3. The display will indicate ‘nUdG’ - nudge, when making the adjustments. Deluge Official Manual...
- Page 238 6. The MIDI channel plus the external keyboard notes will now be mapped to the Deluge. Pitch bend and mod wheel on the external midi controller keyboard will also function. 7. To unmap the keyboard press & hold [LEARN / INPUT] + [AUDITION] any pad.
- Page 239 MIDI 12 NOTES ▌ SETTING UP AN EXTERNAL CONTROLLER 1. Connect the controller MIDI-out to the MIDI-in connection of Deluge. Power both devices on. 2. Press [SYNTH], [KIT], [CV] or [MIDI] to select the instrument clip. Button selected illuminates red.
- Page 240 9. Assigning a new MIDI parameter to a parameter knob does not move the knob’s automation over to the new MIDI parameter. Automation can be manually copied and pasted using the normal manual process. Deluge Official Manual...
- Page 241 MIDI 12 12.4 Global MIDI Commands NOTES The Deluge can be controlled at a system level for example play and stop, using external MIDI commands. Any external controller can be used including a keyboard, pads or a foot controller switch.
- Page 242 NOTES ▌ SETTING UP AN EXTERNAL MIDI FOOT SWITCH CONTROLLER 1. Connect the foot switch to the MIDI-in connection of Deluge. 2. Global commands are ideal for controlling with an external foot controller. 3. Press [SHIFT] + press (SELECT) to open the settings menu.
- Page 243 Deluge will accordingly multiply or divide the tempo of the incoming clock so that the tempo at which the song on the Deluge plays is as close as possible to the tempo that it was set to. This is useful in a couple of scenarios: •...
- Page 244 Adjustments to the relative speed can be applied. 1. Press & hold [LEARN / INPUT] + turn (TEMPO). 2. When Deluge is the master, the display will show the tempo double / half while making manual changes.
- Page 245 12.6 Sync-scaling NOTES For users syncing the Deluge as a slave and wanting to make use of unusual time signatures, sync-scaling is a fun and creative feature. A clip of an unusual time signature may be created by setting its length to an unusual number of beats, example;...
- Page 246 5. Press [SYNC-SCALING] to switch it off. Button will be unlit. Unlit / Off Sync-scaling off, not applied to any clip Blue Flashing Sync-scaling on for the selected clip Blue Lit Sync-scaling on, but not for the selected clip Deluge Official Manual...
- Page 247 Some synths and devices may use the bank or sub bank to change the bank, They also may be set for NRPN instead of CC messages. It is always advised to check the documentation of any device to which Deluge will be connected and ensure matched compatibility in the MIDI communications protocol settings.
- Page 248 2. Press [CLIP] to select clip view. 3. Press [MIDI] on Deluge. Button illuminates red. 4. The display will indicate the existing MIDI channel set for MIDI output. 5. Turn (SELECT) to change the channel to match the external device.
- Page 249 7. CC messages range from CC0 - CC119, bend and aftertouch. CC1 is typically mod wheel. 8. Turning (UPPER) will control the external parameter. Example filter frequency, with a range of 0-127 on Deluge as min and max values. 9. Repeat step 4 - 8 for the (LOWER) control. Deluge Official Manual...
- Page 250 ▌ RECORDING AUTOMATION FOR EXTERNAL PARAMETERS 1. Select [CLIP] view. 2. Press [MIDI] on Deluge. Button illuminates red. 3. Ensure the destination device is set correctly to receive MIDI (channels, CC mapping etc). 4. Map the UPPER & LOWER gold controls to the desired MIDI parameters on the external device.
- Page 251 1. Select [SONG] view. 2. Press & hold [PAD] for the MIDI clip row to change + turn (SELECT) to change channel 1-16. 3. MIDI button will flash while holding and display will show the current channel. Deluge Official Manual...
- Page 252 NOTES Deluge Official Manual...
- Page 254 In particular, if you intend to use one of the gate outputs as a trigger clock, see the warning about output voltage in the trigger clock section. Deluge provides a variety of setting options to give as much flexibility as possible. However its the user who decides what and how to apply these configurations and what to connect and how.
- Page 255 (CV) according to different standards, and their gate / trigger inputs may be either polarity. The Deluge has been designed to support the widest range of CV / gate standards possible. A number of settings are available in the settings menu.
- Page 256 Deluge play as a slave to an external clock source (which could also be a MIDI beat clock). If you wish to use the Deluge as a syncing master to send a trigger clock signal to other devices, gate output 4 can be set to output a trigger clock signal, and / or gate 3 can be set to output a “run”...
- Page 257 13.2 CV Hardware Configuration NOTES CV configuration requires the careful match up of both Deluge along with the external device for CV and gate. It is important to check the manufacturers instructions when connecting other devices. The only sound editor function available for CV is the arpeggiator.
- Page 258 4. CV will output voltage representing note pitch on this channel and also Gate will output voltage for note on/off on the same channel number. Deluge includes 2 CV outputs, 4 gate outputs (which may also be set individually to output a trigger clock and / or “run” signal), and also has a dedicated trigger clock input.
- Page 259 The CV and gate outputs and trigger input set up is accessible in the general settings menu. When Deluge is a syncing master and sending a trigger clock signal to other devices, the gate output 4 can be set to output a trigger clock signal, and / or gate 3 can be set to output a “run”...
- Page 260 1. Select [SONG] view. 2. Press & hold [PAD] for the CV clip row to change + turn (SELECT) to change channel 1-2. 3. CV button will flash while holding and display will show the current channel. Deluge Official Manual...
- Page 261 NOTES Deluge Official Manual...
- Page 262 NOTES Deluge Official Manual...
-
Page 263: System & General
SYSTEM & GENERAL... - Page 264 New songs use this default - 16 notes 1.0 or 3.0 shortcut options to match the software SHORTcuts version and Deluge overlay. Style of alphanumeric keyboard, QWERTY, KEYBoard AZERTY, QWERTZ. Set mute / launch pad colours for rows as:- PAdS Active;...
- Page 265 4. Press [BACK / UNDO] to back up out of the menu at any time. ▌ PERFORMING A FACTORY RESET 1. Ensure Deluge is switched OFF / powered down. 2. Press & hold (SELECT) and switch power ON to Deluge. 3. The display will blink ‘RESE’ to confirm reset is complete. Deluge Official Manual...
- Page 266 System & General 14.2 Updating Deluge Firmware NOTES Synthstrom are continuously developing the functionality and performance of Deluge. Firmware releases will become available at points in time that allow Deluge to be updated. ▌ CHECKING THE CURRENT DELUGE FIRMWARE VERSION 1.
- Page 267 The SD card should be backed up by copying the entire content of the SD card to the PC/Mac while it is inserted. Deluge should be powered off. Once complete the SD card with the .bin file should be inserted into the Deluge.
- Page 268 SD card. This is typically performed with a PC or Mac. 3. Power Deluge OFF. Insert the SD card pins up into Deluge. 4. Ensure Deluge has enough power or is connected to a power supply. Do not switch off during the update.
- Page 269 However there may be a requirement to film deluge with various devices such as smart-phones, tablets, cameras, etc. The refresh rate may be set to match your device and allow a higher quality recording of Deluge. ▌ SETTING DELUGE USER INTERFACE REFRESH RATE 1.
- Page 270 Effect song or kit: depth, offset, [MOD RATE / DEPTH] & affect entire = on, press (LOWER) feedback Stutter [STUTTER / CUSTOM 1] = on, press (UPPER) Stutter - ramp speed [STUTTER / CUSTOM 1] = on, press & turn (UPPER) Deluge Official Manual...
- Page 271 Looping Select MIDI switch LOOP target Enter audio clip or hold clip row in song view + press switch Auto extending instrument clip Looping In record mode, unmute armed empty clip during playback record Deluge Official Manual...
- Page 272 [SHIFT] + press (SCROLL◄►) clip content Clip Horizontal clip shift / nudge L-R Press & hold (SCROLL▼▲) + turn (SCROLL◄►) Clip Playback from current screen Press & hold (SCROLL◄►) + [PLAY] Clip Clear clip Push (SCROLL◄►) + [BACK / UNDO] Deluge Official Manual...
- Page 273 MIDI knob assignment device Controls Unassign MIDI control knob [SHIFT] + [LEARN / INPUT] Preset Save preset [SAVE] Press & hold [AFFECT ENTIRE] while changing parameter Parameter Apply a change to entire kit i.e. Polyphony, mode, reverse, speed, pitch/speed) Deluge Official Manual...
- Page 274 [AUDITION] + press [MIDI] MIDI Set kit row MIDI channel [AUDITION] + turn (LOWER) - must be set as a MIDI row MIDI Set kit row MIDI note [AUDITION] + turn (UPPER) - must be set as a MIDI row Deluge Official Manual...
- Page 275 Under conditions of high CPU loading, Deluge will switch off a synth or sample voice to lower its load. Deluge will attempt to do this in the most subtle way possible, preferring to switch off voices which are “releasing”, and those which have been sounding for the longest...
- Page 276 You may eject the SD card at any time, the only adverse effect being that if the Deluge is playing any sample, it may stop, and samples may not play correctly until the card is reinserted.
- Page 277 (centre-negative) - the feature is not available when running the Deluge on its battery. The Deluge is able to deliver a little bit of power to connected devices, but this is very limited. More basic controllers without too many LEDs should work in many cases, but bigger controllers with advanced features may not.
- Page 278 System & General 14.5 Deluge Legacy Shortcuts 1.0 Deluge Official Manual...
- Page 279 System & General 14 14.6 Acknowledgments Thank you to those in our amazing community and to all users who have supported the Deluge. Thank you to our beta testers who have provided valuable feedback Thank you to those who have generously donated synth presets for our official collection, •...
- Page 280 • Danny Taurus, https://meatbeats.com The Deluge official guidebook and producer guide The Deluge guidebook is a collaboration between Synthdawg and Synthstrom Audible where Ian Jorgensen and Rohan Hill have provided essential information and guidance. In addition a special mention to Michael J Bulaw who has also been a valuable contributor throughout the development of the guide and has provided feedback and input as an integral member of the collaboration team.
- Page 281 NOTES Deluge Official Manual...
- Page 282 NOTES Deluge Official Manual...
-
Page 283: Index
INDEX... - Page 284 Foot Controller 196 Chords 50 Clip Length 56 Clip View 18, 20 Gate 6, 250 Cloned Clips 134 Global MIDI Commands 196, 235, 236 Collect Media Function 141 Grid 4 Continuous Overdubs 193 Grid Shortcuts 82 Count In 40 Deluge Official Manual...
- Page 285 Parameter Automation 62 Low Frequency Oscillators 115 Pitch 178 Pitch Shifting 186 Polyphony 89 MIDI 18, 196, 225, 229 Power 4, 7, 16 MIDI Thru 231 Probability 60 Mod FX 219 PSU 3, 6 Mode 180 Modulation 5, 107 Deluge Official Manual...
- Page 286 USB Host 271 Sequencing 32, 52 Sidechain Compressor 117 Single Cycle Waveforms 94 Velocity 41 Slicer 173 Voices 89 Song view 18, 127 Sound Editor 80 Waveform Editor 181 Stutter Effect 222 Waveform View 180 Subtractive Synthesis 68 Deluge Official Manual...
- Page 287 Index Deluge Official Manual...
- Page 288 2014/30/EU (Electromagnetic Compatibility) and 2014/35/EU (Low Voltage), as amended. Environmental Protection Waste electrical products should not be disposed of with household waste. Please recycle where facilities exist. Check with your local authority or retailer for recycling advice. Deluge Official Manual...
- Page 289 This book and its contents are the property of Synthstrom Audible. Produced in partnership with Synthdawg.
- Page 290 Deluge Official Manual...
- Page 291 Deluge Official Manual...
- Page 292 Deluge Official Manual...
Need help?
Do you have a question about the Deluge and is the answer not in the manual?
Questions and answers