
Related Manuals for Studio Designs Master’s Touch Art & Craft Station

Summary of Contents for Studio Designs Master’s Touch Art & Craft Station
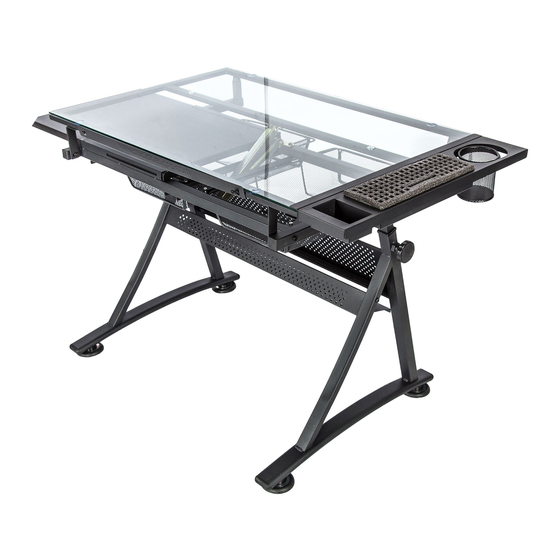
- Page 1 Thank you for purchasing our Studio Designs, Inc. Distributed By: Master’s Touch ® Art & Craft Station #10108 Charcoal/Clear Glass Office: 562.942.0492 Product Support Line: 866.942.0492 www.studiodesigns.com Rev. 9.18.2018...
- Page 2 ASSEMBLY INSTRUCTIONS - IMPORTANT: Carefully unpack and identify each component before attempting to assemble. Refer to parts list. Please take care when assembling the unit and always set the parts on a clean, soft surface. Do not use power tools to assemble.
-
Page 3: Parts List
PARTS LIST DESCRIPTION PICTURE 1. Left Leg 2. Right Leg 3. Left Arm 4. Right Arm 5. Top Frame 6. Glass Top 7. Side Shelf 8. Rear Bar 9. Front Bar 10. Support Bar 11. Rear Panel 12. Bottom Shelf 13. - Page 4 PARTS LIST DESCRIPTION PICTURE 14. Basket 15. Pencil Ledge 16. Ratchet Arm 17. L Bracket 18. Knob 19. Floor Leveler 20. Nut 21. Pin 22. Allen Bolt - 1/4" x 1-5/8" 23. Allen Bolt - 1/4" x 5/8" Master’s Touch Art &...
- Page 5 PARTS LIST DESCRIPTION PICTURE 24. Allen Bolt - 1/4" x 1/2" 25. Allen Bolt - 1/4" x 5/16" 26. Phillips Bolt - 5/32" x 1/2" 27. Glass Spacer 28. Cushion 29. Phillips Screw - 1/2" 30. Allen Screw 31. Metal Tray 32.
- Page 6 Do not fully tighten any bolt until step 4. Master’s Touch Art & Craft Station ®...
- Page 7 Screw Knobs (18) into first hole in Left and Right Arms (3 and 4). Master’s Touch Art & Craft Station ®...
- Page 8 Master’s Touch Art & Craft Station ®...
- Page 9 Repeat step to assemble two more Rails (13) on left side (see arrows). Fully tighten all bolts from Step 1-4. Master’s Touch Art & Craft Station ®...
- Page 10 Insert Baskets (14) and Insert one Pin (21) into front holes in Rails to prevent Basket from falling out. Slide Shelf (7) to edge of Rail (13), then attach Screws (29). Master’s Touch Art & Craft Station p.10 ®...
- Page 11 CAUTION!: Use two people. Attach Brackets (17), flip Frame (5) over and attach to Arms (3 and 4) using Allen Bolts (23), then attach Ratchet Arm (16). Master’s Touch Art & Craft Station p.11 ®...
- Page 12 Master’s Touch Art & Craft Station p.12 ®...
- Page 13 CAUTION!: Use two people. Lift Frame. Leave Phillips Screws (29) slightly loose so Pencil Ledge (15) can slide. Master’s Touch Art & Craft Station p.13 ®...
- Page 14 Slide Metal Tray (31) over edge of table (frame and glass), and secure using Allen Screws (30) (do not overtighten). Insert Cup (32) and Foam Organizer Tray (33) into slots. Foam Tray can also be placed on shelf as a mobile organizer. Master’s Touch Art &...
-
Page 15: Limited Warranty
LIMITED WARRANTY Studio Designs (the “Company”) warrants to the original purchaser that this product will be free from defects in its workmanship and materials, under normal residential use and service conditions, as described herein. The Company will repair or replace, at its option, without charge to the original purchaser only, the defective product or parts for a period of ten (10) years (or Thirty (30) days on closeouts and discounted products) from the date of purchase and while owned by the original purchaser.
Need help?
Do you have a question about the Master’s Touch Art & Craft Station and is the answer not in the manual?
Questions and answers