Table of Contents
Advertisement
Available languages
Available languages
Quick Links
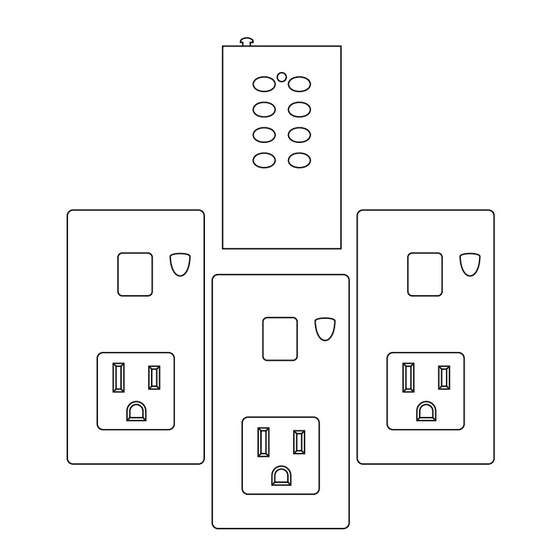
3pk Single Outlet Indoor Remote
with Single Transmitter
3 single grounded outlet receivers
Command1 expandable
Rated:120VAC/60Hz/10A/1200W Resistive
5A/600W Tungsten
500VA Electronic Ballast
Battery: CR2032 lithium battery (included)
Frequency: 433.92 MHz
INSTRUCTIONS:
1. Plug the receiver into a 120VAC electrical outlet.
2. Plug your electrical device(s) into the receiver. Make
sure that your electrical device is powered ON.
3. Use the buttons on the Remote Control to turn your
device(s) ON and OFF.
Manual Override: You can power the unit ON and OFF
manually by pressing the POWER override button located
on the front of the receiver. Do not hold the button down
for manual ON/OFF operation as this will cause the unit to
enter pairing mode.
COMMAND1 TRANSMITTER PAIRING:
Note: Your Command1 Transmitter and Receiver
contained in this package are pre-programmed and
ready to use. Command1 Pairing is only required for
using additional transmitters.
This unit is equipped with patented Command1 technology.
All Command1 indoor and outdoor transmitters have the
ability to be paired with all other Command1 indoor and
outdoor receivers. Please follow the directions below to
pair a transmitter to your receiver.
1. Locate the power [ON/OFF] button on the receiver.
2. Press and hold the power button for 3 seconds. The
LED power indicator will begin to flash slowly.
3. On your transmitter, (LED indicator still flashing slowly)
press the [ON] button, wait 2 seconds, and then press
the [OFF] button. The LED indicator will now stop
flashing.
4. You have successfully paired the transmitter to your
receiver.
RESETTING THE UNIT
You can reset and remove all paired transmitters on your
receiver by doing the following:
1. Press and hold the receiver's ON/OFF button for 3
seconds. The LED indicator will begin to flash slowly.
Continue to hold for an additional 3 seconds. The LED
indicator will now begin to flash rapidly. Release the
ON/OFF button for 1 second and press once again to
confirm reset. The LED indicator should now be OFF.
2. Your unit has now been reset and does not have
any paired transmitters. (Note: After reset, pairing
is required to use the transmitter shipped in this
package.)
BATTERY INFORMATION
AND REPLACEMENT:
The Remote Control uses a 3-volt CR2032 lithium battery.
To replace, pull battery tray tab located at the bottom of the
transmitter. Insert a new CR2032 lithium battery, making
sure to match up the + and - polarity markings. Slide the
cover back in. To test, press the ON or OFF buttons to make
sure the LED lights up. Do not dispose of batteries in fire.
Batteries may explode or leak.
SAvE THESE INSTRUCTIONS!
Customer Service Assistance: Toll Free 1-855-350-6868
Hours of Operation: 10AM to 6PM, EST, Monday - Friday
and WESTINGHOUSE are trademarks of Westinghouse Electric Corporation. Used under license. All rights reserved.
Manufactured and distributed by: The NCC, Brooklyn, NY 11220 • www.thencc.com • © 2014 The NCC
RECEIvER 1
RECEIvER 2
WARNING:
Changes or modifications to this unit not expressly
approved by the party responsible for compliance could
void the user authority to operate the equipment.
This device complies with Part 15 of the FCC Rules.
Operation is subject to the following two conditions:
(1) this device may not cause harmful interference, and
(2) this device must accept any interference received,
including interference that may cause undesired operation.
NOTE: This equipment has been tested and found to
comply with the limits for a Class B digital device, pursuant
to Part 15 of the FCC Rules. These limits are designed to
provide reasonable protection against harmful interference
in a residential installation. This equipment generates, uses
and can radiate radio frequency energy and, if not installed
and used in accordance with the instructions, may cause
harmful interference to radio communications.
However, there is no guarantee that interference will not
occur in a particular installation. If this equipment does
cause harmful interference to radio or television reception,
which can be determined by turning the equipment off and
on, the user is encouraged to try to correct the interference
by one or more of the following measures:
• Reorient or relocate the receiving antenna.
• Increase the separation between the equipment and
receiver.
• Connect the equipment into an outlet on a circuit
different from that to which the receiver is needed.
• Consult the dealer or an experienced radio/TV
technician for help.
Problem
The receiver doesn't turn on
The transmitter doesn't work
CAUTION:
DO NOT splice, repair, or modify. Unplug when not in
use. Fully insert plug. DO NOT use damaged remote sets.
TRANSMITTER
Inspect periodically. Use within the electrical rating marked
on the remote set. DO NOT plug in more than a total of
1200 watts in this remote set. If watts are not marked on
appliance, multiply ampere rating (on nameplate) by 120 to
determine equivalent watts. Add determined watts for each
plugged-in appliance or lamp (sum of watts on bulbs) to
find total watts being used. Operating temperature range
0°C (32°F) to 45°C (113°F).
• Only use the batteries specified and be sure to match
the + and - polarity markings.
• Remove exhausted or dead batteries from the product.
• Remove batteries if product is not to be used for a long
time.
• Do not dispose of batteries in fire. Batteries may
explode or leak. As with all small items, these batteries
should be kept away from children. If swallowed, seek
RECEIvER 3
medical attention immediately.
This item is a Radio Frequency device (RF), and as such the
range of the remote control is dependent on many factors.
Actual operational distance will vary based on walls and
line of sight obstructions, and other nearby electronic
devices.
THREE YEAR LIMITED WARRANTY:
If within the first year from date of purchase, this unit fails
due to a defect, exchange where purchased, or ship it prepaid
with proof of purchase to The NCC, 140 58th Street, P.O.
Box 67, Brooklyn, New York 11220. Units that fail to operate
during the second or third year from date of purchase must
be shipped prepaid with proof of purchase to The NCC.
We will replace unit. This guarantee excludes normal wear
and tear and damage resulting from accident, alteration, or
misuse. This warranty gives you specific legal rights, and you
may also have other rights which vary from state to state.
NOTE: If you are experiencing interference between
2 devices, please follow the instructions below:
CHANNEL SELECTOR:
The back of your transmitter is equipped with a channel
selector switch to prevent interference between
devices around your home. To prevent interruption
between 2 devices, set your transmitter to an alternate
channel. Transmitter channel codes are as follows:
A, B, C, D.
Location: Peel off the sticker located above the word
"channel" on the back of the transmitter to expose the
channel selector switch.
Be aware that every time a channel is changed
Command1 Transmitter Pairing is required.
See Transmitter Pairing instructions.
Solution
Make sure the AC power cord is securely plugged into an AC power outlet.
Unplug the unit for a moment, and then plug it back in again.
Check the outlet by plugging in another device.
Make sure the battery is fresh.
Stand closer to the receiver. The range should be up to 80ft.
Doors or walls will reduce the effective range.
ITEM #T28064
Made in China
Advertisement
Table of Contents

Related Manuals for Westinghouse T28064

Summary of Contents for Westinghouse T28064
- Page 1 Hours of Operation: 10AM to 6PM, EST, Monday - Friday and WESTINGHOUSE are trademarks of Westinghouse Electric Corporation. Used under license. All rights reserved. Manufactured and distributed by: The NCC, Brooklyn, NY 11220 • www.thencc.com • © 2014 The NCC...
- Page 2 Heures d’Opération: 10AM a 6PM EST, Lundi - Vendredi and WESTINGHOUSE sont des marques de Westinghouse Electric Corporation. Utilisée sous licence a The NCC. Tous droits réservés. Manufacturé et distribué par: The NCC, Brooklyn, NY • www.thencc.com • ©2014 The NCC...
Need help?
Do you have a question about the T28064 and is the answer not in the manual?
Questions and answers