Advertisement
Table of Contents
- 1 Warnings
- 2 Contents of Backpack
- 3 Unpacking Your Puma
- 4 Assembling the Frame in Narrow Mode
- 5 Assembling the Paddle
- 6 Cargo Nets and Back-Pack
- 7 Assembling in Wide Mode
- 8 Safety Leash
- 9 Packing Away
- 10 Unpacking Your Cougar
- 11 Assembling Cougar Frame
- 12 Convert from Sail to Paddle on the Water
- Download this manual
Advertisement
Table of Contents

Subscribe to Our Youtube Channel
Summary of Contents for KAYACAT PUMA
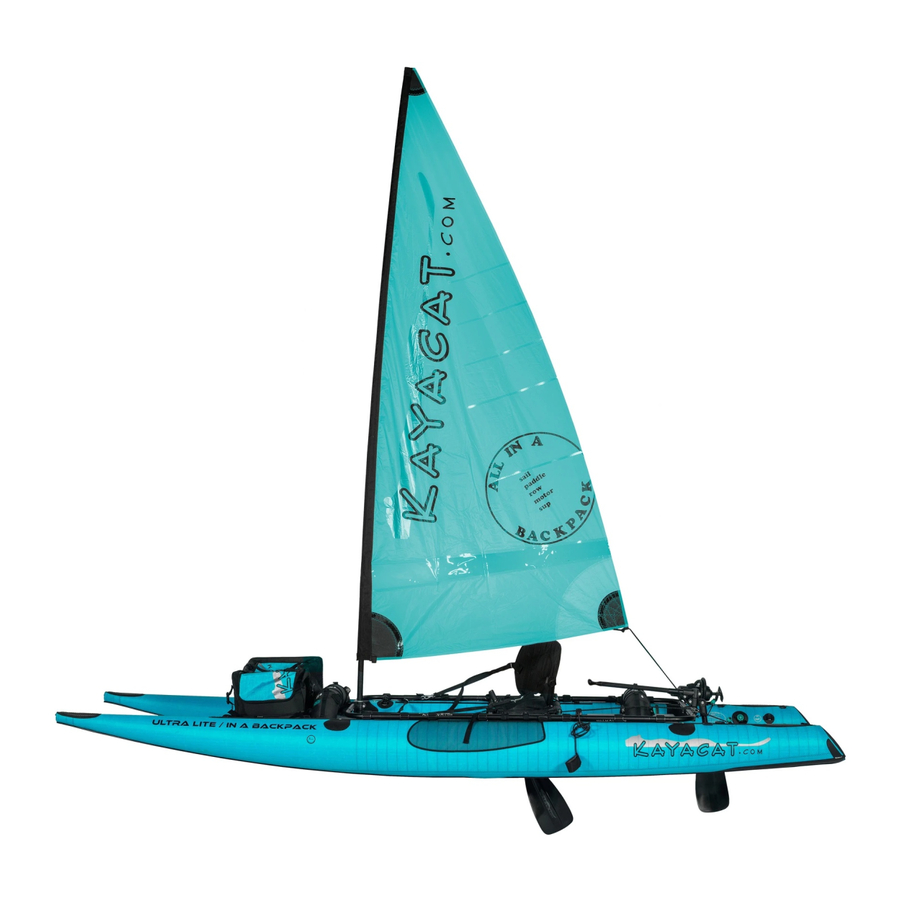
- Page 1 PUMA | COUGAR ASSEMBLY INSTRUCTIONS...
- Page 2 WARNINGS Always read and follow all warnings and product instructions before use. • Kayacat is not a Toy and Children must be closely supervised by a competent adult at all times. • All Kayacat users do so entirely at their own risk and remain responsible at all times for any events including any involving 3rd parties.
- Page 3 ASSEMBLY INSTRUCTIONS Contents of Backpack • 2 x Plain seat extension tubes (for wide mode) • 2 x Long Seat frame poles (with Kayacat logo) • 2 x Medium Seat frame poles (with Kayacat logo) • 2 x Paddle Blades •...
- Page 4 Unpacking Your Puma Unpacking - note how Kayacat is packed so you can repeat in reverse when re-packing (take photos or video for most reliable record) Unroll and unfold Kayacat fully on snag-free/no sharp objects surface. Push in transparent deflation valve plugs as far as they will go, 1 per float and 1 per cross strut = 4 in total.
- Page 5 Check all frame securing buckles and Velcro straps are fully open with buckles facing outward position and Velcro facing inwards. Locate extra-long Velcro strap, fitted to rear of Main Float and use to secure pump to Kayacat Remove and layout all other components from Kayacat Bag...
- Page 6 Assembling the frame in Narrow Mode Join the 2 halves of seat frame directly with button clips engaged. Add 2 x medium seat frame poles to rear of seat frame then 2 x long seat frame poles to front of seat frame.
- Page 7 Warning! For safety reasons Do Not use any Strap or Harness to tie you to the Kayacat, other than safety leash provided, as risk of drowning is increased in the event of capsizing! Use Velcro straps either side of Mesh Seat for securing paddle/spare tubes/SUP handle.
- Page 8 Assembling the Paddle Remove matte rubberised finish paddle shafts from sleeves. Assemble shaft sections with short section as middle piece. Fit paddle blades with optional paddle twist as required. For Stand Up Paddling, replace one paddle blade with the SUP handle and adjust length to suit by removing/adding paddle shafts.
- Page 9 Cargo Nets and Back-Pack Separate cargo nets to provide 2 smaller nets in narrow mode. Pass cargo net straps through buckles and tighten on to main float in positions either behind seat, at rear of float, or in front of forward cross strut. Slot back pack shoulder straps around rear seat frame extension poles and tighten fast.
- Page 10 Assembling in Wide Mode Fit unmarked/plain seat extension tubes to seat frame with button clips Add 2 x medium seat frame poles to rear of seat frame then 2 x long seat frame poles to front of seat frame. Lay Mesh Seat on ground with colour coordinated stripe facing down.
- Page 11 Once fully inflated screw on 4 x black dust caps to all inflation valves. Note: Do not over tighten dust caps. Locate extra-long Velcro strap, fitted to rear of Main Float and use to secure pump to Kayacat.
- Page 12 Warning! For safety reasons Do Not use any Strap or Harness to tie you to the Kayacat, other than safety leash provided, as risk of drowning is increased in the event of capsizing! Use Velcro straps either side of Mesh Seat for securing paddle/spare tubes/SUP handle.
- Page 13 Velcro strip and fitted buckles. Fit wide mode cargo net to buckles at front or rear of Kayacat. Use four long corner straps on back pack to secure backpack to main float through buckles behind seat.
- Page 14 Packing Away • Always rinse Kayacat with fresh water and allow to dry before storing. • Remove and dissemble all items attached to floats (frame, seat etc) • Open 4 x transparent deflation valves • Re-pack in reverse order using your previous photos/video clips and be sure to roll main Kayacat floats tightly.
- Page 15 1 x Backrest, 1 x Mesh Seat, 1 x Seat Splash Guard • 1 x Safety Leash • 2 x Wide mode cargo net • Main Kayacat Float • 1 Kayacat Pump • Spare button clips • 1 x Allen key •...
- Page 16 Unpacking - note how Kayacat is packed so you can repeat in reverse when re-packing (take photos or video for most reliable record) Unroll and unfold Kayacat fully. Push in transparent deflation valve plugs as far as they will go and secure with Velcro, 1 per float and 1 per cross strut = 4 in total.
- Page 17 Note - do not over tighten dust caps. Check all frame securing buckles are fully open facing outward position. Take extra-long Velcro strap fitted to float at rear of Kayacat and fasten pump. Remove and layout all other components from Kayacat Bag.
- Page 18 Assembling Cougar Frame Lay out seat halves and 2 x plain unmarked seat extension tubes (one tube with dagger board joint attached fitted to front of seat) and connect as per photo diagram. Connect Front set of tubes together (connected by bungee), then attach to front of seat frame.
- Page 19 Insert Rudder Stock assembly and tighten bolts as required to achieve minimum resistance. Take rubberised SUP handle/Tiller arm and connect to Rudder Stock. Fit Seat Splash Guard loosely to underside of mesh seat and allow for stretch when tightening mesh seat to frame. Lay mesh seat on seat frame with colour coordinated stripe facing up/splash guard underneath.
- Page 20 Fasten torque bar to underside of seat using clip and strap and adjust strap to generate required mast angle. Flip frame back over and place on Kayacat float as per diagram photo then secure frame to main float in position using Velcro straps and buckles, ensuring rudder joint fits free and beyond rear cross strut.
- Page 21 Attach back rest adjuster straps with clips to "O" rings on running strap. Adjust back rest as required for comfort/support. Attach 1 x paddle blade to short rubberised paddle tube to create hinged dagger board (drift) then connect to dagger board joint on front of seat frame.
- Page 22 Remove mast base end end-cap then open Sail and insert mast in sail mast sleeve. Thread short bungee with black bobble through "O" ring at base of Sail and pull tight until bobble stops. Slide base of mast onto mast foot then extend bungee and fix to underside of mast foot.
- Page 23 Image showing Sail Sheet (rope) passing through metal swivel and sheet secured in cam cleat. Fit large cargo net to front of Kayacat using long Velcro straps through buckles. Fasten unused components to seat, or store in back-pack and attach back pack to front of Kayacat on top of cargo net using back pack spare straps to secure.
- Page 24 Safety Leash It is vital to your safety that you always reliably attach safety leash to Kayacat and then your ankle or wrist before using Kayacat in any mode. Clip safety leash to either left or right clips behind...
- Page 25 Convert from Sail to Paddle on the Water Unclip sheet from cleat, unfasten short bungee from mast foot then remove mast & Sail from mast foot and roll Sail tightly around mast. Velcro strap mast and Sail to seat. Assemble rubber coated paddle sections, remove dagger board and attach to paddle shaft.
- Page 26 Packing Away • Always rinse Kayacat with fresh water and allow to dry before storing. • Open 4 x transparent deflation valves • Unclip sheet from cleat then undo knot in sheet or knot at sail clew, unfasten short bungee from mast foot then remove Mast & Sail from mast foot. Remove Mast from Sail.
Need help?
Do you have a question about the PUMA and is the answer not in the manual?
Questions and answers