
Summary of Contents for Qdis QPI-BM12 V1.4
- Page 1 Your best partner for better driving Release Date 2013.06.25 Model QPI-BM12-Main-V1.4 IF Product Code QPI-BM12-1306-009...
- Page 2 Warning / Caution When installing the main unit, do not remove or alter existing vehicle fasteners, including nuts, bolts, screw, clips, and fittings. Never detach, move or alter existing vehicle wiring, including electrical grounds and straps. Alteration of existing vehicle Warning components may make vehicle unsafe to operate.
-
Page 3: Table Of Contents
Table of Contents 1. Specifications 1.1 Main Specifications 1.2 Features 1.3 System Diagram 1.4 Components 1.5 Exterior 2. Installation 2.1 Installation Diagram 2.2 Installation 3. Settings 3.1 DIP Switch 3.2 Remote Control 3.3 Car Model and Navi Model 3.4 Factory Mode 3.5 DVD, DTV I-DRIVE input 3.6 Original Button Usage 3.7 Rear Camera... -
Page 4: Specifications
1. Specifications 1.1 Main Specifications 1. Car Compatibility BMW New 1,3,5,7 series 6.5’’ & 8.8’’ & 10.2” 2. Components Interface* 1EA 3. MULTIMEDIA INTERFACE input specification 3 * A/V input (video external input) 1 * CVBS(Rear Camera) input 1 * Analog RGB input (Navigation system output) 1 * LCD input (Car system input) 4. -
Page 5: Features
1. Specifications 1.2 Features Easy installation through connection with commander Able to control NAVI, DVD, DTV function by using I-Drive Controller Able to adjust DVD, NAVI display on screen Improved Screen Display (user-oriented interface) Mode change through original button (I-DRIVE MENU BUTTON) ... -
Page 6: System Diagram
1. Specification 1.3 System Diagram Switch for source toggle Remote control OEM Button (Can Signal) NAVIGATION Input (Analog RGB) DISPLAY Car Installation A/V 1 OEM LCD VIDEO MUX A/V 2 VIDEO CIRCUIT A/V 3 CVBS (Rear camera) Car Screen Input (CAR MAIN BOARD) POWER A/V OUT... -
Page 7: Components
1. Specification 1.4 Components Extension Sub-board * 1ea (QCPASS0414)(Optional) LCD Cable * 1ea (HLCDCA0019) LVDS Extension Cable * 1ea Remote control * 1ea (HLCDCA0022)(Optional) (REMOTE0001) A/V cable * 1EA (HAVCAB0002) Mode cable * 1EA TOUCH IN cable * 1ea (HARETC0001) (HTOUCH0010) RGB cable * 1ea TOUCH OUT cable * 1ea... -
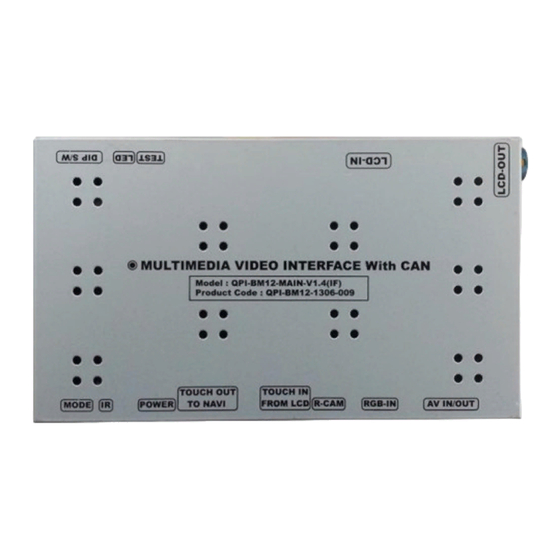
Page 8: Exterior
1. Specifications 1.5 Exterior Dimension Width 150.4mm ⑬ ⑫ ⑪ ⑩ ⑨ Length 99.4mm Height 2.3.2mm ① MODE ② IR ③ POWER ④ TOUCH OUT TO NAVI ⑤ TOUCH IN FROM LCD ⑥ R-CAM ⑦ RGB-IN ⑧ AV IN/OUT ⑨ LCD-OUT ①... -
Page 9: Installation Diagram
2. Installation 2.1 Installation Diagram Control Box Monitor Original LCD Cable Provided LCD cable Original CAN Control box REAR-C SAFE F-CAM-DET CAN-L CAN-H ACC (12V ~24V) ※Connect Interface CAN High (green + brown) with car’s yellow + red cable. ※Connect Interface CAN Low (green) with car’s yellow + brown cable. -
Page 10: Installation
2. Installation 2.2 Installation / Monitor and Interface connection ① See left picture. Remove original LCD cable from monitro and connect with provided LCD cable. ② Connect the original LCD cable with LCD-IN on the interface. ※ Precaution : Do not connect power cable with accessory power, connect with backside of command or cigar jack. - Page 11 2. Installation 2.2 Installation / connect CAN cable original CAN-Low original CAN-High Provided CAN-High Power Cable Control box Provided CAN-Low See picture above. Connect provided CAN-H cable (green + brown) with original CAN-H cable (yellow + red). Connect CAN-L cable (green) with original CAN-L cable (green + brown).
-
Page 12: Settings
3. Settings 3.1 DIP Switch ※ Example DIP S/W usage - Use input mode : A/V2, A/V3 - Use original navigation - External rear camera ▷DIP S/W : 1,2 ON (hide INPUT MODE) ▷DIP S/W : 3 OFF (A/V2 display) ▷DIP S/W : 4 ... -
Page 13: Remote Control
3. Settings 3.2 Remote Control What is Hot Key function ? You can use this function via pressing number “1” button next to the radio button. You can change audio source to the external AUX with this function. (original function of BMW) Our device let it change to an external video source for driver to use this function via this button. -
Page 14: Car Model And Navi Model
3. Settings 3.3 Car Model and Navi Model FACTORY mode – Press ◀ button 2 seconds long on the remote control. Setup for car model Setup for navigation UTIL1 – NAVI MODEL UTIL1 - CAR MODEL Definition of the navigation Selecting model of the car resolution F20 : 1, 3, 5, 7 series 6.5”... -
Page 15: Factory Mode
3. Settings 3.4 FACTORY Mode FACTORY mode – Press ◀ button 2 seconds long on the remote control. UTIL1 – AVOUT SELECT UTIL1 - FACTORY RESET Selecting background sound After FACTORY MODE RESET returning navigation or original mode DEFAULT : Selecting AV sound just before changing navigation or original mode... - Page 16 3. Settings 3.4 FACTORY Mode FACTORY mode – Press ◀ button 2 seconds long on the remote control. UTIL2 - I_DRV CONTROL UTIL2 - I_DRV REMOTE Selecting whether to use I_DRV Choose DTV and navi model function or not to be control I_DRV function ON / OFF LI-1DISC...
- Page 17 3. Settings 3.4 FACTORY Mode FACTORY mode – Press ◀ button 2 seconds long on the remote control. UTIL2 – IR MEMORY UTIL2 – HANDLE KEY To register DVD, DTV remote control, Whether to use voice button the remote control value must be on handle for mode change registered and can be control with I-Drive...
-
Page 18: Dvd, Dtv I-Drive Input
3. Settings 3.5 DVD, DTV I-DRIVE input ① First of all, press ◀ button on ② Picture above shows DVD remote controller 2 seconds remote control button value long or press input, select menu you want UP→DOWN→UP→MENU to save. (To register DVD button in order to access remote control button value, Factory mode. - Page 19 3. Settings 3.5 DVD, DTV I-DRIVE input ③ After register, select “INPUT” example) continued.. in OSD menu and press “OK”. c. The values that you Then you can see registered will appear as confirmation window as green text in the marked shown above.
-
Page 20: Original Button Usage
3. Settings 3.6 Original Button Usage/ 6.5” I-Drive Button (6.5”) Mode Operation Function Press longer Change mode Press shorter Go back to Original image MENU Press shorter Making Selection Whole mode Press shorter Change mode Audio Press shorter Change mode + Change Car Aux Button #8 Reverse Press shorter... - Page 21 3. Settings 3.6 Original Button Usage / 8.8” I-Drive Button (8.8”) Mode Operation Function Press longer Change mode Press shorter Go back to Original image Whole MENU Press shorter Select mode Press shorter Change mode Audio Press shorter Change mode+ Change Car Aux Button #8 Press this button in the ▽...
-
Page 22: Rear Camera
3. Settings 3.7 Rear Camera FACTORY mode – Press ◀ button 2 seconds long on the remote control. ※After installing rear camera : DIP S/W #7 must be put down (ON). Refer to page 9. PARK PAS ENABLE : Selecting whether to display the parking guide line or not on rear gear (default : ON) PAS SETUP : Adjusting the position of the parking guide line (available in PARK SETUP->... - Page 23 3. Settings 3.7 Rear Camera / 6.5” Rear display setting 1 series : Press shortly on steering wheel, to select rear camera screen and PIP screen QDIS < Rear camera full screen > QDIS < PIP screen > -20-...
- Page 24 Rear display setting 1 series : Press button about 2 seconds long on I-Drive and select one among options. QDIS < Rear camera full screen > QDIS < PIP screen > ※ For PDC solid, set DIP S/W 6 ON <...
-
Page 25: Rear Parking Guidelines
3. Settings 3.8 Rear Parking Guidelines Go to Factory Menu, choose PAS SETUP, by using OK button change H-POS → V- H-POS In H-POSITION, use ◁, ▷ on remote control, to adjust parking guideline left and right. V-POS In V-POSITION use △, ▽on remote control, to adjust parking guideline up and down. -
Page 26: Osd
3. Settings 3.9 OSD (On Screen Display) / Analog RGB Mode OSD IMAGE *LANGUAGE : Set OSD language * BRIGHTNESS (only support English and Chinese) * CONTRAST * TRANS : Adjust OSD transparency * SHARPNESS *H-POSITION : Move OSD horizontally * V-POSITION : Move OSD vertically ... - Page 27 3. Settings 3.9 OSD (On Screen Display) / Video Mode OSD IMAGE * LANGUAGE : Set OSD language * BRIGHTNESS (only support English and Chinese) * CONTRAST * TRANS : Adjust OSD transparency * SATURATION * H_POSITION : Move OSD horizontally * HUE * V_POSITION : Move OSD vertically * SHARPNESS...
-
Page 28: Trouble Shooting
4. Trouble Shooting Q. I cannot change mode A. Check connection of Ground cable and IR Cable. Check LED lamp is on, if not check connection of POWER cable. Q. All I got on the screen is black. A. .Check second LED lamp of the interface is on, if not, check A/V sources connected are working well. - Page 29 RM #404 4TH FLOOR, B-DONG, WOORIMLIONSVALLY, 371-28, GASAN-DONG, GEUMCHEON-GU, SEOUL, KOREA. TEL : 82-2-868-3627~9 | FAX : 82-2-2026-5987...
Need help?
Do you have a question about the QPI-BM12 V1.4 and is the answer not in the manual?
Questions and answers