Advertisement
Quick Links
Advertisement

Summary of Contents for Freespirit Recreation ReadyLight
- Page 1 I N S T R U C T I O N S F O R A S S E M B LY A N D O P E R A T I O N...
- Page 2 THANKS FOR PURCHASING READYLIGHT! … and congratulations. You’re now part of the ReadyLight family, and own one of the best mobile lighting solutions available on the market today. ReadyLight’s intuitive, all-in-one design, adventure-tested materials and intelligent engineering guarantee many years of fun memories and reliable performance.
-
Page 4: Package Contents
PACKAGE CONTENTS READYLIGHT HEAD TRIPOD SWIVEL CLAMP FASTENERS, LOCK WASHERS, HEX-KEY WRENCH 2 FASTENERS REQUIRED; 2 EX TRAS ARE PROVIDED... - Page 5 TRIPOD LEGS TRIPOD ROD TRIPOD ROD LOCK NUT...
- Page 6 PACKAGE CONTENTS AC POWER ADAPTER DC POWER ADAPTER / CAR CHARGER GROUND STAKES...
- Page 7 CARRYING CASE CARRYING CASE...
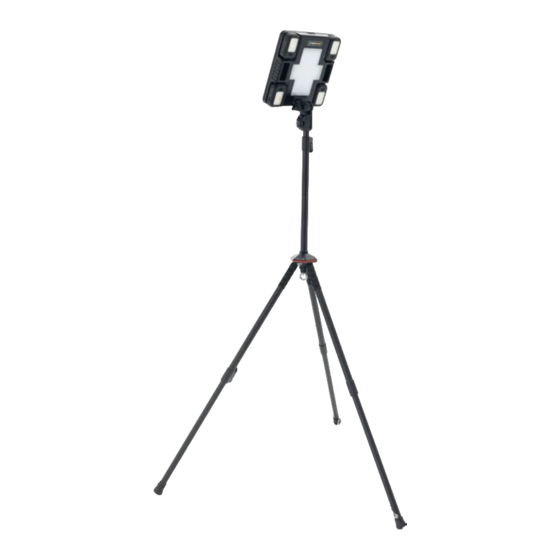
- Page 8 ASSEMBLE TRIPOD Loosen tripod rod lock nut by turning nut counterclockwise. Pull up and away from end of rod. Insert the three tripod legs into the slots in the tripod rod.
- Page 9 Slide tripod rod lock nut down onto tripod legs, begin threading, and turn clockwise to tighten the assembly. Your assembled tripod Use the supplied stakes should look like this: to firmly anchor your ReadyLight to the ground.
- Page 10 ASSEMBLE HEAD Using two of the supplied fasteners, two lock washers, and the hex key wrench, secure tripod swivel clamp to ReadyLight head as shown.
- Page 11 Release locking lever on swivel clamp … Insert end of tripod Angle of ReadyLight rod into tripod swivel head can be adjusted clamp. Once rod is in, by loosening and move locking lever tightening triangular back to the locked knob.
-
Page 12: Main Panel
MAIN PANEL Master Charge Power Full size ON / OFF indicator supply USB power output switch light input Place in ON Glows RED Allows light 1 AMP power supply for cell position to use when light to be charged or charge light. is charging;... - Page 13 CHARGING Place master Charging source: Give your ReadyLight ON / OFF switch Connect to the A/C time to charge: in ON position. or D/C adapter, This allows your OR position your AC/DC .... 6 hours ReadyLight to ReadyLight in direct Solar ....
- Page 14 MAIN LIGHT OPERATION Turn on light: Press and hold ON / OFF … lights will first activate button for 1–2 seconds … at their brightest (5 WATT) setting.
- Page 15 Momentarily depress ON / OFF button a second time: Lights will dim to their low (2.5 WATT) setting. Momentarily depress ON / OFF button a third time: Main lights will deactivate and red warning lights will turn on and blink slowly. To repeat the cycle of light functions, continue to depress the ON / OFF button.
- Page 16 Press and hold 1–2 seconds to turn on light. LED spot light Fold-out hook Lets you hang your light just about anywhere. Powerful base magnet Firmly secures light to main ReadyLight. Also allows light to adhere to any ferrous metal surface.
-
Page 17: Portable Operation
PORTABLE OPERATION To activate light: Press and hold ON / OFF button for 1–2 seconds. Main light activates at its brightest setting. Momentarily tap button once: Main light dims. Tap button a second time: Main light deactivates. Spot light activates. Tap button a third time: Spot strobe light activates. -
Page 18: Specifications
SPECIFICATIONS MAIN LIGHT BATTERY TYPE ..................Lithium-Ion BATTERY CAPACITY ..............7.4V 7800mAH DC POWER ..................12V CLA charger AC/DC CHARGE TIME ................. 6 hours SOLAR CHARGE TIME ..............up to 24 hours RUN TIME ................15 hours / 30 hours MA XIMUM POWER .....................15W BRIGHTNESS SETTINGS ................ - Page 20 20495 Murray Rd, Suite 120 Bend OR 97701 (844) READY-LT • www.readylight.com...
Need help?
Do you have a question about the ReadyLight and is the answer not in the manual?
Questions and answers