Table of Contents
Advertisement
Available languages
Available languages
Quick Links
Advertisement
Table of Contents

Related Manuals for EPIQ 9001010617

Summary of Contents for EPIQ 9001010617
- Page 1 INSTRUCTION MANUAL AIR FRYER 9001010617...
- Page 2 INTRODUKTION Mange tak fordi du har valgt et produkt fra Epiq. Dermed har du erhvervet et kvalitetspro- dukt som opfylder alle gældende krav til præstation og sikkerhedsstandarder i EU. For at sikre en korrekt behandling og en lang levetid anbefaler vi, at du overholder nedenstående anvisninger.
-
Page 3: Bortskaffelse Af Produktet
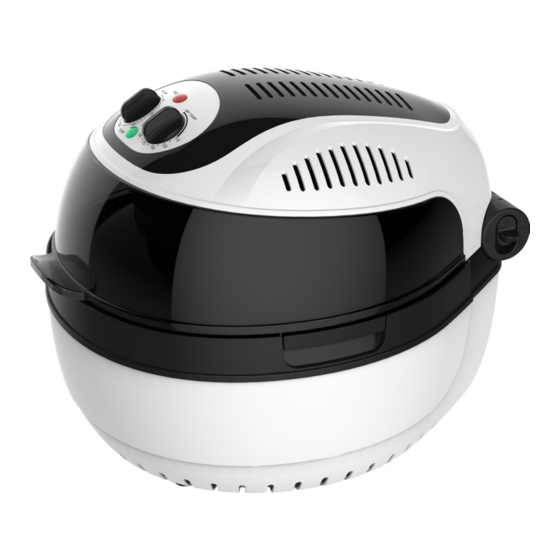
LEDNING OG STIK • Lad ikke ledningen hænge ud over bordkanten. • Hold ledningen og produktet væk fra varmekilder, varme genstande og åben ild. • Tag stikket ud af stikkontakten før rengøring, og hvis apparatet ikke er i brug. Undlad at trække i ledningen, når du tager stikket ud af stikkontakten, men tag fat om selve stikket. - Page 4 KONSTRUKTION OG FUNKTIONER 1.Kontrolpanel 2.Håndtag til låg 3.Hul til varmeudledning / Lufthætte 4.Gennemsigtigt låg 5.Varmeblæser 6.Fastgjort kontakt 7.Spindelhul 8.Base 9.Køleplade spray teflon 10.Dobbeltrist 11.Tang 12.Bage bur 13. Kyllingegaffel KONTROLPANEL Varenummer Funktion Rødt Lys Tidslampe Grønt Lys Temperaturlampe TIDS Kontakt (Venstre) Sæt din ønskede madlavningstid TEMP Kontakt (Højre) Sæt din ønskede temperatur...
- Page 5 Bemærk: For mere information se senere instruktioner Advarsel: Nedenfor er den korrekte metode til åbning eller lukning af låget på varmluft frituren Advarsel: Før brug skal du tage papirholderen, inde i enheden, ud.
- Page 6 Advarsel: Før låget åbnes, skal kogeprocessen stoppes. Tryk venligst på den fastgjorte kontakt (som vist ovenfor) for at låse låget op. Dampen bliver varm og kan forårsage forbrændinger, så fortsæt med forsigtighed, når du åbner enheden. Tilbehør Tang Dobbeltrist Bage bur Kyllingegaffel Vare Beskrivelse...
- Page 7 gen skal sidde midt på spyddet. Det åbne ben skal fastgøres med jerntråd for at forhindre, at det skraber på gryden. 2. Tang and Bage bur KORT LEDNING INSTRUKTIONER Brug ikke en forlængerledning; Der er en kort strømforsyningsledning til rådighed for at reducere de risici, der sker ved at være viklet ind eller snuble over en lang ledning.
- Page 8 maden indeni det, inden du placerer den i frituren. Luk låget og sørg for, at fødevaren ikke berører låget. Sæt stikket i stikkontakten i væggen. Drej ”TID / TEMP” -knappen og indstil derefter ønsket tilberedningstid og temperatur. Sørg for at apparatet ikke er tændt uden mad i. DRIFT 1.
- Page 9 afhængig af den aktuelle situation. INDSTIL TILBEREDNINGSTID OG TEMPERATUR Når du drejer Temp-knappen eller Tids-knappen til den ønsket temperatur / tid, starter apparatet. Drej Temp-knappen til den ønskede temperatur, ”Temp” grønt lys vil fortsætte, og drej derefter tids-knappen til den ønskede tid, ”time” rødt lys fortsætter;...
-
Page 10: Rengøring Og Vedligeholdelse
Lad enheden afkøle helt inden opbevaring. Opbevar apparatet på et tørt sted. Placer ikke tunge genstande oven på apparatet under opbevaring, da dette kan medføre mulig skade på apparatet. TEKNISKE DATA Model: 9001010617 Spænding: 220~240V Strøm: 1300W Frekvens: 50~60Hz Temperaturområde: 110~230℃... -
Page 11: Safety Precautions General
INTRODUCTION Thank you for choosing a product from Epiq. You have acquired a quality product which meets all applicable performance and safety standards in the EU. In order to ensure proper treatment and a long product life, we recommend that you comply with the instructions below. -
Page 12: Product Disposal
CORD AND PLUG • Do not let the cord hang over the edge. • Keep the cord and the product away from heat sources, hot objects and open flames. • Unplug the power cord before cleaning and if the appliance is not in use. Do not pull the cord when removing the plug from the socket, rather grasp the plug itself. -
Page 13: Construction And Features
CONSTRUCTION AND FEATURES 1.Control Panel 2.Lid Handle 3.Heat emission hole / Louver 4.Transparent Cover 5.Heating Fan 6.Fixed Switch 7.Spindle Hole 8.The Base 9.Cold plate spray teflon 10.Dual Rack 11.Tong 12.Baking Cage 13. Chicken Fork CONTROL PANEL Item Number Function Red Light Time light Green Light Temperature light... - Page 14 Note: For more information see later part of instructions Warning: Below is the correct method of opening or closing the cooking lid of the appliance air fryer. Warning: Before using please take out the paper holder inside the unit.
-
Page 15: How To Use The Accessories
Warning: Before opening the lid the cooking process must be stopped. Please press down the Fixed Switch (as illustrated above) to unlock the lid. The steam will be hot and may cause burns so proceed with care when opening the unit. Accessories Tong Dual Rack... -
Page 16: Short Cord Instructions
the chicken, and screw it into the screw hole with a wave plate screw. The chicken must be kept tight at both ends. Keep the chicken at the center of the shaft. The open leg should be fixed with iron wire to prevent it should be scraped to the inside of the pot. -
Page 17: Operation
Close the lid and make sure the food dose not touch the top of lid. Insert the power cord firmly into the wall AC main outlet. Turn “TIME/TEMP” knob and then set your desired cooking time and temperature. Make sure the unit is not turned ON without any food inside. OPERATION 1. -
Page 18: Pause Function
SET THE COOKING TIME AND TEMPERATURE When you turn the Temp knob or Time knob to your desired the temperature/time, the unit will start working. Turn the Temp knob to your desired temperature, “Temp” green light will go on, then turn the Time Switch to your desired time,“Time”... -
Page 19: Cleaning And Maintenance
Allow the unit to cool completely before storing. Store the appliance in a dry location. Do not place any heavy items on top of appliance during storage as this may result in possible damage of appliance. TECHNICAL DATA Model: 9001010617 Voltage: 220~240V Power: 1300W Frequency: 50~60Hz Temperature Range: 110~230℃...
Need help?
Do you have a question about the 9001010617 and is the answer not in the manual?
Questions and answers