Advertisement
Quick Links
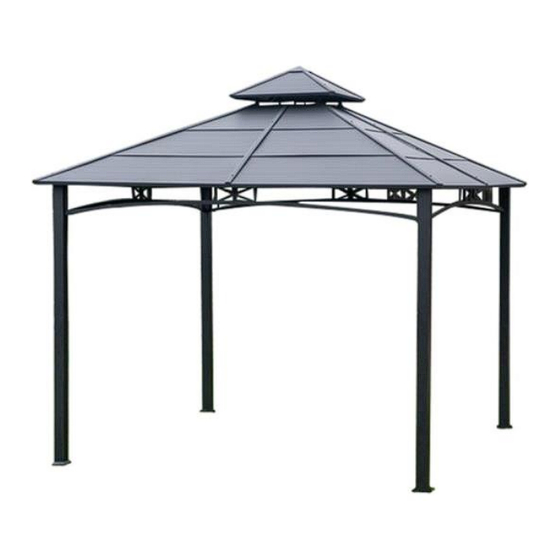
10 ft x10 ft Hardtop Gazebo
Please check to make sure you have the following:
No.
Description
A
B
C
Base cover
D1
Slanting bar connector
E1
Beam connector
F1
Left top screen
F2
Right top screen
G
Support bar
H1
Big top bar
J1
Big top connector
K1
Small top support beam
L
Small top roof cover
M1
Small top connector
N1
Top slanting bar
P1
Top beam
Q4
Big roof top beam (Short Side)
Q5
Big roof top beam (Middle Part)
Q6
Big roof top beam (Long Side)
R
Small top cover
Need help? Please contact our service department at 1-866-578-6569, Monday through Friday, between 8:30
a.m. and 8:30 pm, Eastern Standard Time or email us at ace@sunjoygroup.com
Qty
Post
4
Base
4
4
4
4
4
4
4
4
4
4
4
1
4
4
8
8
8
1
No.
Description
S
Hook
T1
Small top roof panel
U1
Big roof panel cover 1
V3
Big roof panel cover 2
V4
Big roof panel cover 3
W3
Big roof panel cover 4
W4
Big roof panel cover 5
X
Big roof panel cover (Corner)
Y
Big roof panel cover (Middle)
Z
Mosquito netting pipe
AA
Bolt M6 * 15
BB
Flat washer M6
CC
Bolt M6*20
DD
Nut M6
EE
Bolt M6*40
FF
Bolt M6*60
Stake Φ8*180
HH
WW
Spring washer
Z1
Wrench M6
8014537
Qty
1
4
4
4
4
4
4
4
4
8
72
277
152
16
24
13
8
32
2
Advertisement

Related Manuals for Living Accents 8014537


Summary of Contents for Living Accents 8014537
- Page 1 8014537 10 ft x10 ft Hardtop Gazebo Please check to make sure you have the following: Description Description Post Hook Base Small top roof panel Base cover Big roof panel cover 1 Slanting bar connector Big roof panel cover 2...
- Page 2 IMPORTANT: Keep all children and pets away from assembly area. Children and pets should be supervised when they are in the area of pavilion construction. The area for assembly should not be less than 6 feet from any obstruction such as fence, garage, house, overhanging branches, laundry line or electrical wires.
- Page 3 Fig.1: Insert the posts (A) into the base covers (C), and then install the bases (B) to the bottoms of posts (a) with bolts (AA) & flat washers (BB). Fig.2: Fix Slanting beam connector (D1) to post (A) with bolt (CC) & washer (BB). Fig.3: Connect left top screen (F1) and right top screen (F2) with bolt (CC), washer (BB), spring washer (WW) and nut (DD).
- Page 4 Fig.8: Fix big top bar (H1) to big top connector (J1) with bolt (CC) and flat washers (BB). Fig.9-1: Fix the top slanting bar (N1) to big top connector (J1) with bolts (CC), flat washers (BB). Fig.9-2: Fix the top slanting bar (N1) to slanting bar connector (D1) with bolts (AA), flat washers (BB). Fig.10-1: Fix top beam (P1) to big top bar (H1) with bolts (CC), flat washers (BB).
- Page 5 Fig.14: Fix small top roof panel (T1) to small top support beam (K1) with bolts (AA), flat washers (BB). Fig.15: Fix small top roof cover (L) to small top support beam (K1) with bolts (EE), flat washers (BB). Fig.16: Fix small top cover (R) to small top connector (M1) with bolts (FF), flat washers (BB). Fig.17: Button up the big roof panel cover 1 (U1) on the big roof panel cover 2/3 (V3/V4).
- Page 6 Care and Maintenance Before using, clean gazebo frame completely with a dry towel. Keep all flame and heat sources away from the gazebo fabric. To maintain the frame finish, apply a fine automotive wax after each cleaning. Never use a solvent type cleaning solution. Put away your gazebo during heavy snow or strong gale to avoid damage.
Need help?
Do you have a question about the 8014537 and is the answer not in the manual?
Questions and answers