
Subscribe to Our Youtube Channel
Related Manuals for Steren RAD-630


Summary of Contents for Steren RAD-630
- Page 1 RAD-630 Radio profesional de largo alcance, 7 W con teclado Manual de instrucciones V0.1 0615v...
- Page 2 Radio profesional de largo alcance, 7 W con teclado. Por favor, revíselo completamente para estar seguro de cómo utilizar apropiadamente el producto. Para apoyo, compras y todo lo nuevo que tiene Steren, visite nuestro sitio web: www.steren.com La información que se muestra en este manual sirve únicamente como referencia sobre el producto.
- Page 3 IMPORTANTE -No intente abrir el equipo, podría dañarlo y perder la garantía. -No use el equipo si ha sufrido golpes fuertes, caídas o cualquier otro daño. -No utilice ni almacene el equipo en lugares donde existan goteras, humedad o salpicaduras de agua, podría causar un mal funcionamiento o choque eléctrico. -Revise periódicamente la batería, si no utiliza el equipo por largos tiempos retírela.
- Page 4 Características Con este radio profesional tendrás comunicación de largo alcance, rápida y confiable con tu personal de seguridad, staff o familia; es ideal para conservar el flujo de información y que el trabajo no se detenga por ningún motivo, perfecto para aplicaciones de vigilancia, construcción o logística. Incorpora un teclado en la parte frontal que en conjunto con su pantalla LCD te da acceso a todas las configuraciones;...
- Page 5 Contenido *Incluye manual de usuario Batería Li-ion Radio Cargador de batería Clip Antena y Cargador para cinturón correa de mano...
- Page 6 Controles 1. Interruptor de encendido y apagado/perilla de volumen 2. Linterna 3. Antena 4. Altavoz 5. Micrófono 6. LED indicador •Rojo cuando transmite señal. •Verde cuando recibe señal. •Parpadea en color rojo cuando la carga de la batería está baja. 7.
- Page 7 8. Teclas desplazamiento. 9. Función /OK (tecla para iniciar una configuración y de confirmación). 10. Salir 11. Teclado. Se utiliza para elegir el canal de comunicación y para seleccionar diversas funciones. 12. Entrada para audífonos y puerto de programación por software (manos libres): Inserte el manos libres teniendo cuidado de que entren los dos plugs al mismo tiempo.
- Page 8 Íconos de pantalla Indicador de señal Añadir búsqueda de frecuencia Potencia baja Potencia alta Manos libres Bnada estrecha Banda estrecha CTCSS (señalización tonos analógicos) ( señalización tonos digitales) Indicador de Indicador de estado frecuencia áctiva de corriente...
- Page 9 Ajuste de canal Búsqueda de Busqueda de frecuencia frecuencia Ajuste de Radio Información de Radio Nivel de batería Teclado bloqueado Tono de teclado apagado DTMF Marcación Multifrecuencial...
- Page 10 CH 01 Modo canal DTMF Modo frecuencia RX:400.12500 TX:400.12500 DTMF CH 01 RX:400.12500 Modo frecuencia + canal TX:400.12500 DTMF...
-
Page 11: Instalación
Instalación Antena Inserte la antena, gire hacia la derecha y apriete firmemente. Batería Para instalar la batería, simplemente inserte los conectores inferiores y presione hasta escuchar un clic. -
Page 12: Correa De Mano
Clip para cinturón Coloque el clip para cinturón inserte los tornillos de fijación utilizando un desarmador de cruz. Correa de mano Inserte la punta de la correa, dé vuelta y jale para fijar la correa. -
Page 13: Carga De Batería
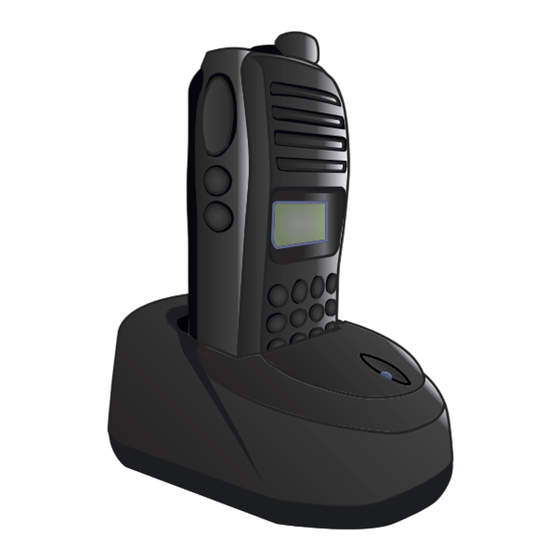
Carga de batería Conecte el cargador al puerto de carga ubicado en la parte trasera de la base; el LED se ilumina en rojo durante la carga y cambia a color verde una vez que la batería se ha cargado en su totalidad. Cuando la batería está... -
Page 14: Modo De Uso
Modo de uso 1.Gire el interruptor de encendido hacia la derecha hasta que escuche un clic. 2. Seleccione un canal presionado los botones derecha-izquierda (en modo de canal) o inserte una frecuencia por medio del teclado ( en modo de frecuencia). 3. -
Page 15: Funciones Principales
Funciones principales Puede variar las secuencias de algunas pantallas debido a la configuración predefinida. 1. CH setting (configuracion de canal) - Tono Puede configurar los códigos estándar 39 CTCSS y 83 DCS; puede añadir un código para evitar que la misma frecuencia interfiera, también puede quitar el silenciador de tono (squelch). - Page 16 2. Bandwidth/Narrow (banda ancha y banda estrecha) El radio viene con el ajuste predeterminado de ancho de banda ancha (W). Si usted configura banda estrecha, el ícono N aparecerá en pantalla. Siga los siguientes pasos: CHSetting Bandwidth CH Setting Bandwidth Narrow CHSetting Bandwidth...
- Page 17 4. Reverse (Frecuencia inversa) Para invertir las frecuencias TX y RX, puede configurarlo con esta función, los tonos CTCSS/DCS se invertirán, al igual que la configuración. La frecuencia de transmisión anterior será la nueva frecuencia de recepción, de igual manera la de recepción. Siga los siguientes pasos: CHSetting Reverse...
- Page 18 6. TX y RX diferentes Si desea establecer una frecuencia diferente, introduzca el RX directamente en el teclado o presione la tecla izquierda y derecha, entre en el menú Diff-Libre estableciendo TX. Siga los siguientes pasos: CHSetting Diff-fre Diff-Fre TX;4 --,------ CHSetting Oprima para guardar cambios o si desea salir oprima...
- Page 19 8. Scanning (búsqueda de frecuencia) El escaneo está disponible sólo mientras el ícono “A” aparece en la pantalla. Elija “scanning on”, el radio comienza la búsqueda de señal y se detendrá cuando encuentre una señal activa; el LED indicador se enciende en color verde.
- Page 20 9. Settings (modos de funcionamiento) Puede seleccionar cualquiera de los tres modos de trabajo Canal/ Frecuencia /Canal + Frecuencia Modo canal: el radio sólo muestra el número del canal. Modo frecuencia: el radio sólo muestra las frecuencias TX y RX, puede ingresar la frecuencia manualmente.
- Page 21 11. Backlight (Luz de fondo) Elija auto (la luz se apaga después de 5 segundo de inactividad), off (la luz está desactivada), on (la luz siempre está activada). Siga los siguientes pasos: Settings BackLight BackLight Auto Settings Oprima para guardar cambios o si desea salir oprima 12.
- Page 22 13. Squelch (limitador de ruido) Filtra el ruido de fondo, si se encuentra a un nivel alto se elimina la mayor cantidad del ruido, pero disminuye el rango de transmisión. Puede ajustar de 0 a 9 dependiendo el nivel que requiera el valor de fábrica es de 3.
- Page 23 15. Step frequency (paso de frecuencia) Puede configurar el paso de frecuencia en el modo canal y también en búsqueda de frecuencia, los valores disponibles son 5/6,25/10/12,5/25/100 kHz Siga los siguientes pasos: Settings CH-Step CH-Step 5.000 Settings Oprima para guardar cambios o si desea salir oprima 16.
- Page 24 17. LCD contrast (contraste de pantalla) Puede ajustar de 0- 9 niveles de contraste, el valor de fábrica es 5. Siga los siguientes pasos: Settings Contrast Contrast Settings Oprima para guardar cambios o si desea salir oprima 18. Radio Info (Indicador de batería) Muestra el valor actual del voltaje de la batería.
-
Page 25: Funciones Auxiliares
Funciones auxiliares 1. Marcado manual En modo canal: Realice la programación de marcación DTMF mediante el software o mediante la programación manual utilizando la configuración mediante comandos En modo de frecuencia: 1. Active la marcación DTMF desde el menú de funciones , en la pantalla aparecerá... -
Page 26: Programación Manual
3. Remarcado Para activar la función de remarcado del ultimo código DTMF enviado, mantenga presionado 4. Bloqueo de teclado Mantenga presionado para bloquear el radio, el ícono aparece; todos los botones se bloquearán excepto PTT y el botón lateral. Vuelva a presionar para desbloquear. - Page 27 Comandos de programación Paso Botón función Información en pantalla Instrucción Funciones Apagado el radio,presione el Modo botón 1 programable Modo de CH Edit de configuración y F al mismo tiempo configuracion Reset general encienda y sostenga durante 2 segundos Comienza la Inicio de CH Edit Presione F...
- Page 28 Paso Botón función Información en pantalla Instrucción Funciones Presione * para cambiar DCS.N, DCS.I , OFF Tipo de seleccione < > para CH Edit CTCSS/DCS Presione * señalización elegir el código o ingrese mediante el teclado. Presione < > y seleccione la frecuencia o digite CH Edit...
- Page 29 Paso Botón función Información en pantalla Instrucción Funciones Presione < > y CH Edit seleccione entre los Nivel de potencia Presione F dos niveles LOW / HIGH Presione < > y seleccione entre los CH Edit Banda ancha Presione F dos tipos de banda Narrow Narrow / Wide...
- Page 30 Paso Botón función Información en pantalla Instrucción Funciones Presione < > y Paso CH Edit seleccione SHIFT On Presione F de frecuencia SHIFT On / SHIFT Off Presione < > y Marcación CH Edit Presione F seleccione DTMF on / Multifrecuencial DTMF Off DTMF off...
-
Page 31: Solución De Problemas
Solución de problemas Asegúrese de que la batería está El equipo no enciende correctamente instalada. Recargue la batería. Cambie de posición, posiblemente Rango limitado existen obstáculos que interfieren la señal. Aumente el nivel de señal. Recepción débil La señal está fuera de rango. Antena mal instalada. -
Page 32: Especificaciones
Especificaciones Rango de frecuencia: UHF: 400-470 MHz Canales: 99 (16 pre configurados) Espacio de canales: 25 kHz /12,5 kHz Temperatura de operación: -20 °C - 60 °C Impedancia: 50 Ω Alimentación: 7,4 V- - - (±20%) Capacidad de batería: 2,500 mAh (Li-ion) Estabilidad de frecuencia: ≤... - Page 33 1.- Para hacer efectiva la garantía, presente esta póliza y el producto, en donde fue adquirido o en Electrónica Steren S.A. de C.V. 2.- Electrónica Steren S.A de C.V. se compromete a reparar el producto en caso de estar defectuoso sin ningún cargo al consumidor. Los gastos de transportación serán cubiertos por el proveedor.
- Page 34 RAD-630 7W Professional walkie talkie with subchannels 0615v V0.1 Instruction manual...
- Page 35 Steren, visit our website: www.steren.com The instructions of this manual are for reference about the product. There may be differences due to updates. Please check our web site (www.steren.com) to obtain the latest version of the instruction manual.
- Page 36 IMPORTANT Do not attempt to open the device, it may cause a malfunction and void the warranty. Do not use if it has suffered strong impacts, falls or other damage. Do not use or store the device in places where there are leaks, humidity or splashing water, it could cause a malfunction or electric shock.
- Page 37 Highlights With this professional radio you will have long distance communication with your security personnel, staff or family; never stop work flow, perfect for surveillance, construction or logistic applications. It has a keyboard and in conjunction with the LCD screen you can get easy access to configurations;...
- Page 38 Content User manual included Radio Li-ion battery Battery charger Belt clip Antenna and Charger hand strap...
- Page 39 Controls 1. On/Off switch 2. Flashlight 3. Antenna 4. Speaker 5. Microphone 6. LED • Red when transmitting signal. • Green when receiving. • Flashes red when the battery power is low. 7. Charge LED (base).
- Page 40 8. Scroll keys. 9. OK/Function (key to start a configuration and confirmation). 10. Exit 11. Keyboard. It is used to choose the communication channel and to select various functions. 12. Hnadsfree and prgramming port: Insert the handsfree taking care that enter the two plugs at the same time. 13.
-
Page 41: Screen Icons
Screen icons Signal Add search frequency Low power High power Handsfree Narrow band CTCSS (signaling analog tones) ( signaling digital tones) Current Out status frequency... - Page 42 Channel adjustment Frequency search Radio adjustment Radio info Battery level Block Key tone off DTMF Multifrequency dialing...
- Page 43 CH 01 Channel mode DTMF Frequency mode RX:400.12500 TX:400.12500 DTMF CH 01 RX:400.12500 Frequency mode + channel TX:400.12500 DTMF...
-
Page 44: Installation
Installation Antenna Insert the antenna, turn right and tighten it. Battery To install just place the battery in the lower connectors and press until you hear a click. 11 11... -
Page 45: Hand Strap
Belt clip Place the belt clip and insert the fixing screws using a Phillips screwdriver. Hand Strap Insert the tip of the belt, turn and pull to attach the strap. -
Page 46: Battery Charge
Battery charge Connect the charger to the charging port located on the back of the base; LED lights red while charging and turns green once the battery is fully charged. When the battery is at its minimum capacity, the radio LED flashes red, turn it off and place it on the base for charging. -
Page 47: How To Use
How to use 1. Turn the power switch to the right until you hear a click. 2. Select a channel pressing right-left (in channel mode) or type a frequency using the keyboard (in frequency mode). 3. To start a call, simply press and hold the PTT button. The LED lights red.To speak, keep the radio upright at a distance of 2.5 cm from the mouth. -
Page 48: Main Functions
Main functions Some sequences can vary due to the default configuration. 1. CH setting (channel settings) - Tone You can configure the standard 39 CTCSS codes and 83 DCS; you can add a code to prevent the same frequency interfere, you can also remove the tone squelch (squelch). - Page 49 2. Bandwidth/Narrow The radio comes with the default broadband (W) setting. If you configure narrowband the N icon appears in screen. Follow these steps: CHSetting Bandwidth CH Setting Bandwidth Narrow CHSetting Bandwidth Press to save changes or press to exit. * The adjustment only available in broadband frequency mode.
- Page 50 4. Reverse To reverse the TX and RX frequencies, you can configure this feature, CTCSS / DCS tones are invested, like setting. The previous transmission frequency is the new reception frequency, just as the reception. Follow these steps: CHSetting Reverse Reverse CHSetting Press...
- Page 51 6. Different TX and RX If you want to set a different frequency, enter the RX directly on the keyboard or press the left and right button to enter the setting menu Diff-Free TX. Follow these steps: CHSetting Diff-fre Diff-Fre TX;4 --,------ CHSetting Press...
- Page 52 8. Scanning The scanning is available only while the icon “A” appear on the screen. Choose “scanning on”, the radio starts searching for signal and stop when it finds an active signal; the LED indicator lights green. Press the PTT button to communicate with the active signal and the search is disabled.
- Page 53 9. Settings You can select any of the three operating modes Channel / Frequency / Channel + Frequency Channel mode: The radio only shows the channel number. Frequency mode: the radio only shows the TX and RX frequencies, you can enter the frequency manually. Channel + Frequency mode: the radio displays both the number of the channel as the TX and RX frequencies.
- Page 54 11. Backlight Choose auto (the light goes off after 5 seconds of inactivity), off (light is off), on (the light is always on). Follow these steps: Settings BackLight BackLight Auto Settings Press to save changes or press to exit. 12. Denoising Eliminate ambient noise depending on the chosen mode of operation.
- Page 55 13. Squelch It filters out background noise, if you are at a high level eliminates the as much noise, but it decreases the transmission range. You can adjust from 0-9 depending on the level required, the default value is 3. While you are at level 0, this function is always active; the screen always glows green, background noise remains.
- Page 56 15. Step frequency You can set the frequency step in the channel mode and also in frequency search, the available values are 5 / 6.25 / 10 / 12.5 / 25/100 kHz Follow these steps: Settings CH-Step CH-Step 5.000 Settings Press to save changes or press to exit.
- Page 57 17. Contrast You can adjust contrast levels 0- 9, the default is 5. Follow these steps: Settings Contrast Contrast Settings Press to save changes or press to exit. 18. Radio info Show the current value of the voltage Follow these steps: Radio Info Battery Battery...
-
Page 58: Aux Functions
Aux functions 1. Manual Dial In channel mode: Perform programming DTMF dialing software or by manual programming using the configuration using commands In frequency mode: 1. Activate the DTMF dialing from the function menu in the display shows DTMF 2. Press and enter the code number 3. -
Page 59: Manual Programming
3. Redial To activate the redial function the last DTMF code sent, press and hold 4. Keypad Lock Press and hold to lock the radio, the icon appears; All buttons are locked except PTT and the side button. Press again to unlock. - Page 60 Programming commands Paso Step Function button Screen info Instruction Botón función Información en pantalla Instrucción Funciones Functions With the radio turn off press the program- mable button 1 and General configuration Configuration CH Edit F at the same time mode mode Reset turn on and hold for 2...
- Page 61 Paso Botón función Información en pantalla Instrucción Funciones Step Function button Screen info Instruction Functions Press * to DCS.N change, DCS.I, OFF Type of select <> to select or CH Edit CTCSS/DCS Press * signaling enter code using the keyboard. Press <>...
- Page 62 Paso Step Botón función Información en pantalla Instrucción Funciones Screen info Instruction Function button Functions Press <> and CH Edit select between the Press F Power level two levels LOW / HIGH Press <> and select CH Edit between the two Wide and Press F Narrow...
- Page 63 Paso Step Botón función Información en pantalla Instrucción Funciones Function button Screen info Instruction Functions Step Press <> and select CH Edit Press F frequency SHIFT On / Off SHIFT SHIFT On Press <> and select Dialing CH Edit Press F DTMF on / off DTMF multifrequency DTMF Off...
-
Page 64: Troubleshooting
Troubleshooting Make sure the battery is properly The device won’t turn on installed. Charge the battery. Change positions, make sure no Limited range possibly obstacles are interfering signal. Increase the signal level. Weak signal The signal is out of range. Improperly installed antenna. -
Page 65: Specifications
Specifications Frequency range: UHF: 400-470 MHz Receiver Channels: 99 (16 pre-configured) Sensitivity: (in 12 dB SINARD) ≤0.2 μV Space between channels: 25 kHz / (wide) / 0.25 μV (narrow) 12.5 kHz Adjacent channel selectivity: ≥ 60 dB Operating temperature: -20 °C - 60 °C (wide) / 50 dB (narrow) Impedance: 50 Ω... - Page 66 Product: 7 W professional walkie talkie with subchannels Part number: RAD-630 Brand: Steren WARRANTY This Steren product is warranted under normal usage against defects in workmanship and materials to the original purchaser for one year from the date of purchase and three months in the battery. CONDITIONS 1.
Need help?
Do you have a question about the RAD-630 and is the answer not in the manual?
Questions and answers